
User Manual
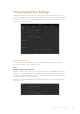
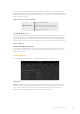
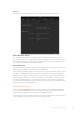
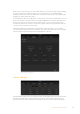
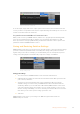
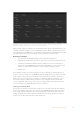
Table Of Contents
- Getting Started
- Switching your Production
- Additional Features on ISO Models
- ATEM SDI Extreme ISO
- ATEM Software Control
- Switching Modes
- Using ATEM Software Control
- Media Manager
- Audio Mixer
- Camera Control
- Using the Software Control Panel
- Transition Control and Upstream Keyer
- Downstream Keyers
- Processing Palettes
- Media Player Tab
- Output Tab
- Recording ISO Files
- Timecode Generator
- Using the Audio Mixer
- Shaping your Audio Mix using Advanced Fairlight Controls
- Using the 6 Band Parametric Equalizer
- Fairlight Controls Workflow Guide
- Using the Media Page
- Navigating the Browse Window
- ATEM Media Pool
- Image File Types
- Creating a TGA File with an Alpha Channel
- Camera Control
- Using Macros
- Changing Switcher Settings
- ATEM Setup Settings
- Using Adobe Photoshop with ATEM
- Using Multiple Control Panels
- Connecting to a Network
- Connecting to an Internet Router
- Keying using ATEM SDI
- Streaming Video
- HyperDeck Control
- ATEM 1 M/E Advanced Panel
- Using ATEM 1 M/E Advanced Panel
- ATEM Camera Control Panel
- Mixing Audio
- Help
- Regulatory Notices
- Safety Information
- Warranty

To compile small macros into a large macro:
1 Start recording a new macro, then while the macro is recording, click on the ‘run’
button to enter the run page.
2 Select ‘recall and run’ to automatically run macros at the push or click of a button,
or deselect to load a macro and play it manually.
3 Run your sequence of small macros, with pauses between each one to cover the
duration of each small macro, until you’ve completed the large macro.
4 Stop recording. You now have a complex, powerful large macro built from small macros
you can easily change later if you need to.
There is no limit to the amount of actions you can perform. You can easily build complex
transitions, create unique repeatable effects using keyers, or set up frequently used Blackmagic
Studio Camera settings, graphic overlays and DVEs so you don’t have to reconstruct them
every time you start a new program. Macros are fun and will save you a lot of time!
Macros Window Create Page
Create macro button:
Click this button to open the
create macro popup window.
From here you can name a
new macro tobe recorded,
write a description of your
macro in the notes section,
and click record to start
recording your macro.
Arrow buttons and
page Icons:
To access or record more
than 20macros, simply click
on the right arrow at the
bottom corner of the macros
window to open a new page
of macros. Tomove to the
previous page of macros, click
on the left arrow. You can
see which page of macros
you are viewing by observing
the page icons between
the arrows.
Edit macro button:
First select the macro you want to edit, then
click on the edit macro button to edit the
name and description of the macro.
Delete macro button: Select the macro
you want to delete, then click on the delete
macro button to delete the selected macro.
Status window:
This window provides helpful prompts and
status messages to help you getstarted
recording and running your macros. When a
macro is selected, it also displays any notes
you have included.
Macro buttons:
After recording a macro to a selected macro
slot, your macro will appear as a macro
button. 20macro buttons can be displayed
on one page. If a macro is unnamed when
recording, the number of the selected macro
slot will be used.
82Using Macros