
User Manual
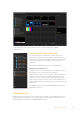
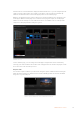
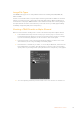
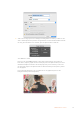
Table Of Contents
- Getting Started
- Switching your Production
- Additional Features on ISO Models
- ATEM SDI Extreme ISO
- ATEM Software Control
- Switching Modes
- Using ATEM Software Control
- Media Manager
- Audio Mixer
- Camera Control
- Using the Software Control Panel
- Transition Control and Upstream Keyer
- Downstream Keyers
- Processing Palettes
- Media Player Tab
- Output Tab
- Recording ISO Files
- Timecode Generator
- Using the Audio Mixer
- Shaping your Audio Mix using Advanced Fairlight Controls
- Using the 6 Band Parametric Equalizer
- Fairlight Controls Workflow Guide
- Using the Media Page
- Navigating the Browse Window
- ATEM Media Pool
- Image File Types
- Creating a TGA File with an Alpha Channel
- Camera Control
- Using Macros
- Changing Switcher Settings
- ATEM Setup Settings
- Using Adobe Photoshop with ATEM
- Using Multiple Control Panels
- Connecting to a Network
- Connecting to an Internet Router
- Keying using ATEM SDI
- Streaming Video
- HyperDeck Control
- ATEM 1 M/E Advanced Panel
- Using ATEM 1 M/E Advanced Panel
- ATEM Camera Control Panel
- Mixing Audio
- Help
- Regulatory Notices
- Safety Information
- Warranty

You will now see an alpha channel appear underneath the RGB color channels.
The alpha channel contains a grayscale version of the combined color channels in
your graphic. Don’t forget to click on the alpha channel’s ‘eye’ icon to make sure it is
selected so it will be included when the TGA file is saved.
5 Your selection has now been used to create the grayscale matte in the alpha channel.
Ifyou want to, you can now go to the ’menu’ bar and click ‘select/deselect’ to remove
the selection marquee.
6 Now it’s time to save your TGA file.
Go to the file menu and click on ‘save as’. Type the file name and select the location for
your file. In the format box, select ‘targa’, which is the full name for a TGA file and make
sure the ‘alpha channels’ checkbox is selected.
65ATEM Software Control