
User Manual
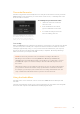
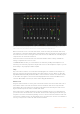
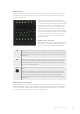
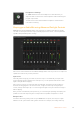
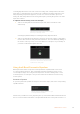
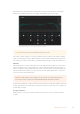
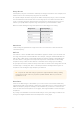
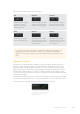
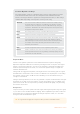
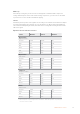
Table Of Contents
- Getting Started
- Switching your Production
- Additional Features on ISO Models
- ATEM SDI Extreme ISO
- ATEM Software Control
- Switching Modes
- Using ATEM Software Control
- Media Manager
- Audio Mixer
- Camera Control
- Using the Software Control Panel
- Transition Control and Upstream Keyer
- Downstream Keyers
- Processing Palettes
- Media Player Tab
- Output Tab
- Recording ISO Files
- Timecode Generator
- Using the Audio Mixer
- Shaping your Audio Mix using Advanced Fairlight Controls
- Using the 6 Band Parametric Equalizer
- Fairlight Controls Workflow Guide
- Using the Media Page
- Navigating the Browse Window
- ATEM Media Pool
- Image File Types
- Creating a TGA File with an Alpha Channel
- Camera Control
- Using Macros
- Changing Switcher Settings
- ATEM Setup Settings
- Using Adobe Photoshop with ATEM
- Using Multiple Control Panels
- Connecting to a Network
- Connecting to an Internet Router
- Keying using ATEM SDI
- Streaming Video
- HyperDeck Control
- ATEM 1 M/E Advanced Panel
- Using ATEM 1 M/E Advanced Panel
- ATEM Camera Control Panel
- Mixing Audio
- Help
- Regulatory Notices
- Safety Information
- Warranty

Each band of the 6 band parametric equalizer has a column of settings. These settings will
differ based on which band you are controlling, and what filter type you are using.
Each audio input has its own 6 band parametric equalizer
TIP You can learn more about band filters later in this section.
If you want to make changes to a setting, you will first need to make sure the band is enabled.
Click on a band label to enable it. When enabled, the button label is illuminated blue. Now you
can change the settings for that band, or click and drag the handles to make fast adjustments.
Handles
Each band handle is positioned along the line curve displayed in the graph. You can click and
drag each handle to choose the frequency you wish to adjust for that band, and the gain you
want to set. When moving a handle with your mouse, both the frequency and gain settings are
affected simultaneously, which gives you a fast way to make quick adjustments to each band
across the entire range of frequencies.
NOTE To make changes using a handle, ensure the band is enabled. Simply click on
the band you want to adjust. The band label will illuminate blue when enabled.
As you drag a handle left or right, you will notice the frequency and decibels update in the band
settings. This will also be reflected by the frequency range preset buttons for low, medium low,
medium high, and high.
Frequency Knobs
Alternatively, you can use the frequency knobs for each band to select a specific frequency
to adjust.
56ATEM Software Control