
User Manual
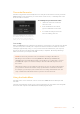
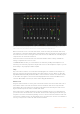
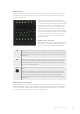
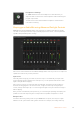
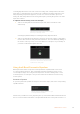
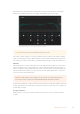
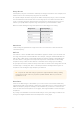
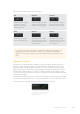
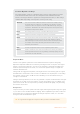
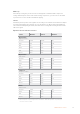
Table Of Contents
- Getting Started
- Switching your Production
- Additional Features on ISO Models
- ATEM SDI Extreme ISO
- ATEM Software Control
- Switching Modes
- Using ATEM Software Control
- Media Manager
- Audio Mixer
- Camera Control
- Using the Software Control Panel
- Transition Control and Upstream Keyer
- Downstream Keyers
- Processing Palettes
- Media Player Tab
- Output Tab
- Recording ISO Files
- Timecode Generator
- Using the Audio Mixer
- Shaping your Audio Mix using Advanced Fairlight Controls
- Using the 6 Band Parametric Equalizer
- Fairlight Controls Workflow Guide
- Using the Media Page
- Navigating the Browse Window
- ATEM Media Pool
- Image File Types
- Creating a TGA File with an Alpha Channel
- Camera Control
- Using Macros
- Changing Switcher Settings
- ATEM Setup Settings
- Using Adobe Photoshop with ATEM
- Using Multiple Control Panels
- Connecting to a Network
- Connecting to an Internet Router
- Keying using ATEM SDI
- Streaming Video
- HyperDeck Control
- ATEM 1 M/E Advanced Panel
- Using ATEM 1 M/E Advanced Panel
- ATEM Camera Control Panel
- Mixing Audio
- Help
- Regulatory Notices
- Safety Information
- Warranty

sound slightly ahead of the video. This is because analog audio is independent of the video
inputs and is coming directly from an external source, while the SDI inputs might have some
delay depending on upstream equipment, such as some cameras and video processors.
Setting the audio delay will ensure the analog audio input is perfectly AV synced to the video
inputs from cameras.
To adjust the amount of delay on the selected input:
1 Click on the delay indicator beneath the input audio level control knob on the
channel strip.
Click on the delay indicator below the level input
knob to open the delay control.
A small popup window will open containing the delay adjustment knob.
2 Click on the delay knob and drag left to decrease the amount of delay, or drag right to
increase. The amount of delay is measured in frames. Close the window by clicking on
the small ‘x’ in the top corner, or move the window to a safe place on your desktop if
you need to make further adjustments later.
Click on the delay control and drag left or right
to decrease or increase the amount of delay
required for an analog input
Using the 6 Band Parametric Equalizer
Each input and the master output has a 6 band parametric equalizer which can be used
to control specific frequencies. This could include reducing low frequency hum or noise
on a microphone input, or boosting the low frequencies on a thin sounding track, or even
to add uniqueness to each input so they are more distinct in the final mix. You have many
creative options.
Parametric Equalizer
To open the parametric equalizer for an input or the master output, click on the corresponding
equalizer indicator.
Click on an input’s equalizer indicator to open
a 6 band parametric equalizer
The first item you will notice is the graph along the top of the window with numbered indicators
from 1 to 6. These numbered indicators are adjustable handles that correspond to bands 1 to 6.
55ATEM Software Control