
User Manual
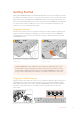
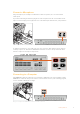
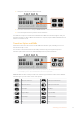
Table Of Contents
- Getting Started
- Switching your Production
- Additional Features on ISO Models
- ATEM SDI Extreme ISO
- ATEM Software Control
- Switching Modes
- Using ATEM Software Control
- Media Manager
- Audio Mixer
- Camera Control
- Using the Software Control Panel
- Transition Control and Upstream Keyer
- Downstream Keyers
- Processing Palettes
- Media Player Tab
- Output Tab
- Recording ISO Files
- Timecode Generator
- Using the Audio Mixer
- Shaping your Audio Mix using Advanced Fairlight Controls
- Using the 6 Band Parametric Equalizer
- Fairlight Controls Workflow Guide
- Using the Media Page
- Navigating the Browse Window
- ATEM Media Pool
- Image File Types
- Creating a TGA File with an Alpha Channel
- Camera Control
- Using Macros
- Changing Switcher Settings
- ATEM Setup Settings
- Using Adobe Photoshop with ATEM
- Using Multiple Control Panels
- Connecting to a Network
- Connecting to an Internet Router
- Keying using ATEM SDI
- Streaming Video
- HyperDeck Control
- ATEM 1 M/E Advanced Panel
- Using ATEM 1 M/E Advanced Panel
- ATEM Camera Control Panel
- Mixing Audio
- Help
- Regulatory Notices
- Safety Information
- Warranty

Getting Started
At first glance ATEM SDI might seem intimidating with all the connectors and buttons, however
your switcher is actually very easy to set up and use. Each feature serves a specific function and
it won’t take long to get familiar with your ATEM SDI and know exactly what each feature does.
This section of the manual will show you how to get started with your ATEM SDI, including how
to connect power, connect an SDI video source, connect a microphone and plug into your
computer so you can start broadcasting online.
Plugging in Power
The first step to getting started is to plug in the mains power supply using the supplied power
adapter. If your power supply has a locking ring, secure the connection to your ATEM SDI
by tightening the connector to the unit. This locks the power cable preventing it from being
accidentally removed.
1
2
Connect power to your ATEM SDI’s input using the
supplied cable
Secure the connector by tightening the
connector screw
NOTE As ATEM SDI Pro ISO and Extreme ISO models have additional features, their
power adapters support a larger power capacity. This means it’s important to use the
power adapter supplied with each unit. If you have different ATEM SDI models, it might
be a good idea to label each power adapter so it is always used with the correct unit.
Plugging in Video Sources
Plug your cameras and other video sources into your switcher’s SDI inputs. The first input you
plug in will set the video format, so if the first video source you plug in is 1080p50, all other
inputs will automatically be converted to 1080p50. All ATEM SDI switchers feature standards
converters and resynchronizers on each input, so all sources will conform to the same
video format.
Plug SDI sources into your switcher’s SDI inputs
5Getting Started