
User Manual
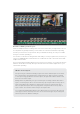


Table Of Contents
- Getting Started
- Switching your Production
- Additional Features on ISO Models
- ATEM SDI Extreme ISO
- ATEM Software Control
- Switching Modes
- Using ATEM Software Control
- Media Manager
- Audio Mixer
- Camera Control
- Using the Software Control Panel
- Transition Control and Upstream Keyer
- Downstream Keyers
- Processing Palettes
- Media Player Tab
- Output Tab
- Recording ISO Files
- Timecode Generator
- Using the Audio Mixer
- Shaping your Audio Mix using Advanced Fairlight Controls
- Using the 6 Band Parametric Equalizer
- Fairlight Controls Workflow Guide
- Using the Media Page
- Navigating the Browse Window
- ATEM Media Pool
- Image File Types
- Creating a TGA File with an Alpha Channel
- Camera Control
- Using Macros
- Changing Switcher Settings
- ATEM Setup Settings
- Using Adobe Photoshop with ATEM
- Using Multiple Control Panels
- Connecting to a Network
- Connecting to an Internet Router
- Keying using ATEM SDI
- Streaming Video
- HyperDeck Control
- ATEM 1 M/E Advanced Panel
- Using ATEM 1 M/E Advanced Panel
- ATEM Camera Control Panel
- Mixing Audio
- Help
- Regulatory Notices
- Safety Information
- Warranty
You can see how easy it is to do common fixes to your live event. Now select quick export
on the top right of the cut page window and you can get a new master file with all these
changes applied.
Editing in DaVinci Resolve
To understand how to use DaVinci Resolve, it’s best to watch some tutorial videos online and
download the free version to use for training. DaVinci Resolve is very sophisticated and is used
by high end Hollywood studios on feature films, however the cut page is a lot simpler and is
easy to learn. Check online for more information.
Recording in Camera
ATEM SDI model switchers can control Blackmagic Studio Camera 4K Pro, URSA Mini Pro and
URSA Broadcast G2 over SDI, using a second SDI cable connected to the camera input from
one of ATEM SDI’s outputs.
This means you can do color correction and adjust lens settings via the camera control panel
in the ATEM Software Control app. Please check the section in this manual that describes how
this works.
Another advantage of this control is you can select the record in camera setting in the record
stream palette so you can record in the cameras while recording to a USB disk.
The advantage of recording in camera is that the cameras will record in Blackmagic RAW,
which is a film gamma file that’s perfect for applying advanced color correction. However even
more exciting is that the files in camera are 4K, so by using these files you can master your
live production in Ultra HD. Even though these are HD switchers, you can still deliver Ultra HD
masters for upload or broadcast.
The connections to the camera will upload timecode as well as camera number and filename
information. This means the Blackmagic RAW files will be in sync with the switcher timecode.
This makes using them easy.
To use Blackmagic RAW files from the cameras, be sure to select the record in camera setting
in the record stream palette. Then once you have completed recording, be sure to copy the
camera files into the Video ISO files folder from the switcher. It’s important you do this as
DaVinci Resolve needs to see these files when you first open the DaVinci Resolve project file.
However one problem with using both ISO files from the switcher and the Blackmagic RAW files
from the camera is they will clash. Both files have the same timecode and the same camera
number. This is not an issue because DaVinci Resolve, by default will use the ISO files.
To change to use the higher resolution Blackmagic RAW files in your project, just select the
camera originals button on the top right of the cut page window. The icon that looks like a little
camera. Once you select this icon, you should see your timeline change as it’s now selected
the Blackmagic RAW files, which are film gamma.
You might need to add color correction to these files to make your cut look good. Blackmagic
RAW files are clean without color correction, so you can use the powerful color correction tools
in DaVinci Resolve to create an amazingly graded master.
If you want to deliver in Ultra HD, just select the resolution menu next to the camera originals
icon and it allows you to select various resolutions and aspect ratios. The top setting is for Ultra
HD. Once you select this, your whole project will be changed over to Ultra HD and you should
see your images become sharper.
Any non camera inputs such as slide shows from a computer will be upscaled automatically. HD
images from the media pool will also be upscaled automatically. You can replace these images
in the media folder if you want them to be replaced by higher resolution versions of your media
pool graphics.
49ATEM Software Control