
User Manual
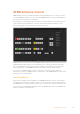
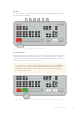
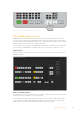
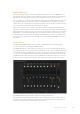
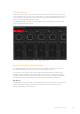
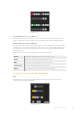
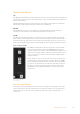
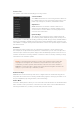
Table Of Contents
- Getting Started
- Switching your Production
- Additional Features on ISO Models
- ATEM SDI Extreme ISO
- ATEM Software Control
- Switching Modes
- Using ATEM Software Control
- Media Manager
- Audio Mixer
- Camera Control
- Using the Software Control Panel
- Transition Control and Upstream Keyer
- Downstream Keyers
- Processing Palettes
- Media Player Tab
- Output Tab
- Recording ISO Files
- Timecode Generator
- Using the Audio Mixer
- Shaping your Audio Mix using Advanced Fairlight Controls
- Using the 6 Band Parametric Equalizer
- Fairlight Controls Workflow Guide
- Using the Media Page
- Navigating the Browse Window
- ATEM Media Pool
- Image File Types
- Creating a TGA File with an Alpha Channel
- Camera Control
- Using Macros
- Changing Switcher Settings
- ATEM Setup Settings
- Using Adobe Photoshop with ATEM
- Using Multiple Control Panels
- Connecting to a Network
- Connecting to an Internet Router
- Keying using ATEM SDI
- Streaming Video
- HyperDeck Control
- ATEM 1 M/E Advanced Panel
- Using ATEM 1 M/E Advanced Panel
- ATEM Camera Control Panel
- Mixing Audio
- Help
- Regulatory Notices
- Safety Information
- Warranty

Media Manager
The media manager allows you to upload graphics to the media pool in your ATEM SDI. Your
switcher has memory for graphics that’s called the media pool and holds up to 20 still graphics
with alpha channel that can be assigned to a media player for use in your production.
So, for example, you could have the maximum 20 still graphics loaded that will be used on your
live production and then assign various stills to the media player as you work. As you take a
graphic off air, you can change the media player graphic to the next graphic you want, and then
you can put that media player back on air with the new graphic.
When a still is loaded into the media pool, the alpha channel is loaded automatically if one is
included in the image. When a still is loaded into a media player, the output of the media player
will include both key and fill outputs. If you select the media player as a key source, for example
Media Player 1, both the fill and the key are automatically selected so you don’t have to select
them separately. However the key can still be routed separately so you can use a different key
source if you wish. To learn more about keying, refer to the ‘keying using ATEM SDI’ section of
this manual.
Audio Mixer
The audio tab in ATEM Software Control contains a powerful audio mixer interface which
becomes active when controlling your ATEM switcher.
Your ATEM SDI includes a built in audio mixer that lets you use the embedded SDI audio from
your cameras, media servers and other inputs without the need for an external audio mixer. This
is perfect when using your ATEM SDI on location or in small spaces within modern OB vehicles
as you don’t have to find room for an external audio mixer. The audio is mixed in the audio tab
of ATEM Software Control and output via the USB webcam and Ethernet outputs. You can also
route the program output via your switchers SDI output if you want to record your broadcast.
Your ATEM SDI also features built in mic inputs for mixing external audio.
If you prefer to use an external audio mixer, it’s easy to disable the audio for all inputs and you
only need to leave the external audio active in the audio mixer interface. More information on
how to use the audio mixer is included in the next sections.
35ATEM Software Control