
User Manual
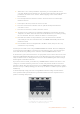
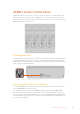
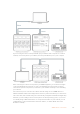
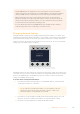
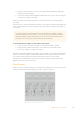
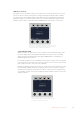
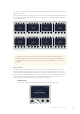
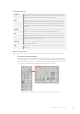
Table Of Contents
- Getting Started
- Switching your Production
- Additional Features on ISO Models
- ATEM SDI Extreme ISO
- ATEM Software Control
- Switching Modes
- Using ATEM Software Control
- Media Manager
- Audio Mixer
- Camera Control
- Using the Software Control Panel
- Transition Control and Upstream Keyer
- Downstream Keyers
- Processing Palettes
- Media Player Tab
- Output Tab
- Recording ISO Files
- Timecode Generator
- Using the Audio Mixer
- Shaping your Audio Mix using Advanced Fairlight Controls
- Using the 6 Band Parametric Equalizer
- Fairlight Controls Workflow Guide
- Using the Media Page
- Navigating the Browse Window
- ATEM Media Pool
- Image File Types
- Creating a TGA File with an Alpha Channel
- Camera Control
- Using Macros
- Changing Switcher Settings
- ATEM Setup Settings
- Using Adobe Photoshop with ATEM
- Using Multiple Control Panels
- Connecting to a Network
- Connecting to an Internet Router
- Keying using ATEM SDI
- Streaming Video
- HyperDeck Control
- ATEM 1 M/E Advanced Panel
- Using ATEM 1 M/E Advanced Panel
- ATEM Camera Control Panel
- Mixing Audio
- Help
- Regulatory Notices
- Safety Information
- Warranty

You can also disable the banks by holding down the bank soft button until the ‘bank off’ setting
appears on the LCD.
Turning the banks off lets you change the CCUs to other cameras when needed, with a defined
set of cameras ready on each bank you can access at any time. To enable banks, simply press
the bank button again.
The bank setting lets you assign 2 banks of cameras to the four CCUs and then instantly swap between them by
pressing the ‘bank’ soft button
TIP Any camera can be selected on each CCU in both banks. For example, imagine
you want to have constant control over camera 1, even after switching to another bank
of cameras. All you need to do is make sure one CCU in each bank always has camera
1 selected.
Panel Settings
Pressing the ‘panel settings’ button on the home screen opens all settings for your camera
control panel. Navigate through the pages of settings by pressing the arrow soft button. The
network settings, including DHCP and IP address settings, are the first pages in the sequence.
These settings are described in the section that shows how to change network settings when
connecting the camera control panel to your ATEM switcher. Keep reading this section for
information on the additional settings for your camera control panel.
Auxiliary Select
This setting is important for ATEM switchers that have an auxiliary output.
167ATEM Camera Control Panel