
User Manual
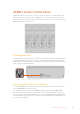
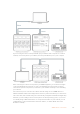
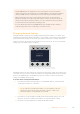
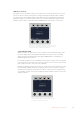
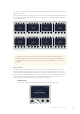
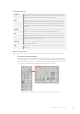
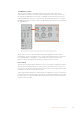
Table Of Contents
- Getting Started
- Switching your Production
- Additional Features on ISO Models
- ATEM SDI Extreme ISO
- ATEM Software Control
- Switching Modes
- Using ATEM Software Control
- Media Manager
- Audio Mixer
- Camera Control
- Using the Software Control Panel
- Transition Control and Upstream Keyer
- Downstream Keyers
- Processing Palettes
- Media Player Tab
- Output Tab
- Recording ISO Files
- Timecode Generator
- Using the Audio Mixer
- Shaping your Audio Mix using Advanced Fairlight Controls
- Using the 6 Band Parametric Equalizer
- Fairlight Controls Workflow Guide
- Using the Media Page
- Navigating the Browse Window
- ATEM Media Pool
- Image File Types
- Creating a TGA File with an Alpha Channel
- Camera Control
- Using Macros
- Changing Switcher Settings
- ATEM Setup Settings
- Using Adobe Photoshop with ATEM
- Using Multiple Control Panels
- Connecting to a Network
- Connecting to an Internet Router
- Keying using ATEM SDI
- Streaming Video
- HyperDeck Control
- ATEM 1 M/E Advanced Panel
- Using ATEM 1 M/E Advanced Panel
- ATEM Camera Control Panel
- Mixing Audio
- Help
- Regulatory Notices
- Safety Information
- Warranty

NOTE ATEM SDI Pro ISO and Extreme ISO model switchers don’t have a fixed IP
address because they are designed to use the DHCP. When connecting these switchers
directly to ATEM Camera Control Panel, we recommend setting a manual IP address.
When connecting to the camera control panel and a network, set the switcher to
DHCP. The network server will assign an IP address and you can then set that as the
camera control panel’s switcher IP address so it can communicate with your switcher.
You can read more about this in the following section.
For more information about setting ATEM SDI Pro ISO and Extreme ISO switcher’s
network settings refer to the ‘connecting to a network’ section.
Changing Network Settings
Changing network settings means manually setting the panel’s IP address so it can join your
network, then entering the switcher’s IP address on your panel so the switcher can be identified
by your panel. These settings are located in your camera control panel’s ‘settings’ LCD menu.
The home screen is the first menu item you will see on the CCU’s LCD. To access the network
settings, press the ‘panel settings’ soft button.
Press the ‘panel settings’ soft button on the LCD home
screen toaccess all the camera control panel’s settings
The DHCP setting is the first setting in the sequence of menu pages. Under this setting is a row
of small dot icons. As you press the arrow soft button to navigate through the pages of settings,
the dot icons will illuminate to show which page you are on. All your camera control panel
settings are available via these pages.
To set the camera control panel’s IP address:
1 If you want the panel to automatically set a compatible IP address, select the DHCP
setting by pressing the ‘on’ soft button.
TIP If you know your network’s IP address, you can navigate to the next
setting page and check the panel’s IP address setting to confirm it has
selected an address compatible with your network.
2 If you want to set the IP address manually, make sure the DHCP setting is set to ‘off’,
then press the arrow soft button to navigate to the ‘panel IP address’ setting.
3 Rotate the corresponding knobs to change the IP address fields.
164ATEM Camera Control Panel