
User Manual

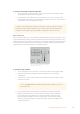
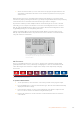
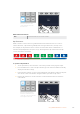

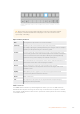
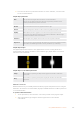
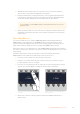
Table Of Contents
- Getting Started
- Switching your Production
- Additional Features on ISO Models
- ATEM SDI Extreme ISO
- ATEM Software Control
- Switching Modes
- Using ATEM Software Control
- Media Manager
- Audio Mixer
- Camera Control
- Using the Software Control Panel
- Transition Control and Upstream Keyer
- Downstream Keyers
- Processing Palettes
- Media Player Tab
- Output Tab
- Recording ISO Files
- Timecode Generator
- Using the Audio Mixer
- Shaping your Audio Mix using Advanced Fairlight Controls
- Using the 6 Band Parametric Equalizer
- Fairlight Controls Workflow Guide
- Using the Media Page
- Navigating the Browse Window
- ATEM Media Pool
- Image File Types
- Creating a TGA File with an Alpha Channel
- Camera Control
- Using Macros
- Changing Switcher Settings
- ATEM Setup Settings
- Using Adobe Photoshop with ATEM
- Using Multiple Control Panels
- Connecting to a Network
- Connecting to an Internet Router
- Keying using ATEM SDI
- Streaming Video
- HyperDeck Control
- ATEM 1 M/E Advanced Panel
- Using ATEM 1 M/E Advanced Panel
- ATEM Camera Control Panel
- Mixing Audio
- Help
- Regulatory Notices
- Safety Information
- Warranty

3 Manually move the fader bar from one end to the other to execute the transition.
The next move on the fader bar will begin a new transition.
4 During the transition the red and green buttons on the program and preview buses
both turn red to indicate that you are in the middle of a transition. The LED indicator
onthe fader bar also displays the position and progress of the transition.
TIP You will also see the ATEM software control panel mirror the move on the
hardware panel.
5 At the end of the transition, sources selected on the program and preview buses are
exchanged to indicate that the video source that was on preview is now on program
and vice versa.
Recording Macros
You can record and run macros using an ATEM 1 M/E Advanced Panel independently of
ATEM Software Control. All actions on the ATEM Software Control switcher page can be
performed using your hardware panel. If you need to arrange graphics in the media pool, or
adjust camera settings, simply access those settings using ATEM Software Control.
The buttons used to record and run macros on the ATEM 1 M/E Advanced Panel are located in
the system control buttons. The names of your macro buttons are displayed in the source select
names display.
Follow the steps below to create the ‘transitions’ macro demonstrated earlier using
ATEM Software Control. This time you will create a macro in macro slot 6.
1 Press the ‘macro’ soft button to open the macros LCD menu.
2 Using the ‘macro’ knob under the LCD, select the macro slot you want to record to.
For this example, select ‘slot 6 - Empty’.
3 Press the ‘record’ soft button at the top of the LCD to start recording. The record icon
appears as a red circle. When recording, this icon becomes a red square.
HOME
MIX
FTB
MACRO
SETTINGS
WIPE
MEDIA
PLAYERS
SUPER
SOURCE
KEYS
DVE
BORDER
CAMERA
CONTROL
STINGER
COLOR
AUDIO
DIP
AUX
1
4
7
ENTER
2
5
8
0
3
6
9
RESET
PROGRAM
PREVIEW
SHIFT MACRO
BKGD
KEY 1
KEY 2
KEY 4
KEY 3
ON
ON
ON
ON M/E 1 M/E 2
M/E 3
M/E 4
SHIFT DIP
DVE
STING
DSK 1
TIE
DSK 2
TIE
DSK 1
CUT
DSK 2
CUT
DSK 1
AUTO
DSK 2
AUTO
FTB
MIX
CUT
AUTO
WIPE
ARM
PREV
TRANS
Press the ‘record’ soft button to start recording
your macro
While recording, a red border will appear
around the LCD
4 Shift select ‘color bars’ on the program bus. The button will flash indicating it’s a
shifted source.
160Using ATEM 1 M/E Advanced Panel