
User Manual
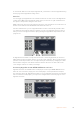
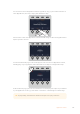
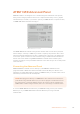
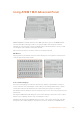
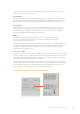
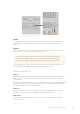
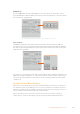
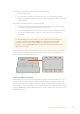
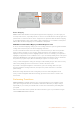
Table Of Contents
- Getting Started
- Switching your Production
- Additional Features on ISO Models
- ATEM SDI Extreme ISO
- ATEM Software Control
- Switching Modes
- Using ATEM Software Control
- Media Manager
- Audio Mixer
- Camera Control
- Using the Software Control Panel
- Transition Control and Upstream Keyer
- Downstream Keyers
- Processing Palettes
- Media Player Tab
- Output Tab
- Recording ISO Files
- Timecode Generator
- Using the Audio Mixer
- Shaping your Audio Mix using Advanced Fairlight Controls
- Using the 6 Band Parametric Equalizer
- Fairlight Controls Workflow Guide
- Using the Media Page
- Navigating the Browse Window
- ATEM Media Pool
- Image File Types
- Creating a TGA File with an Alpha Channel
- Camera Control
- Using Macros
- Changing Switcher Settings
- ATEM Setup Settings
- Using Adobe Photoshop with ATEM
- Using Multiple Control Panels
- Connecting to a Network
- Connecting to an Internet Router
- Keying using ATEM SDI
- Streaming Video
- HyperDeck Control
- ATEM 1 M/E Advanced Panel
- Using ATEM 1 M/E Advanced Panel
- ATEM Camera Control Panel
- Mixing Audio
- Help
- Regulatory Notices
- Safety Information
- Warranty

ATEM 1 M/E Advanced Panel
ATEM SDI switchers are designed to be controlled using their own built in control panels,
butif you have a larger production that is more complex and have many sources, graphics
andintricate keys to handle, or you need to operate your ATEM SDI from a separate location,
anATEM 1 M/E Advanced Panel can help you.
ATEM 1 M/E Advanced Panel
The ATEM 1 M/E Advanced Panel is designed for switchers with one mix effects panel, but
has the ability to control up to 4 M/Es if you decide to expand your production. The control
panel provides high quality buttons for fast, comprehensive control over your switcher, plus
CCU control. System control is fast and convenient using a centralized LCD menu with soft
buttons and controls. When using ATEM 1 M/E Advanced Panel and the software panel
together, any change on one panel will be reflected on the other and you can use both panels
at the same time.
Connecting the Advanced Panel
ATEM 1 M/E Advanced Panel connects directly to your ATEM SDI via Ethernet and is
programmed with a default fixed switcher IP address that works with your switcher. Once
plugged in, the panel will instantly recognize your ATEM SDI and you can then switch sources
and control your switcher via the external panel.
NOTE When plugged in directly to an ATEM SDI Pro ISO or Extreme ISO switcher, the
panel works using a fixed IP address, but you can also plug into a network and control
the switcher from a completely different location. To read more about controlling your
ATEM switcher switcher using a network, refer to the ‘connecting to a network’ section.
To connect ATEM 1 M/E Advanced Panel to your ATEM SDI simply connect your switchers
Ethernet port to your ATEM 1 M/E Advanced Panel’s Ethernet port using a standard
network cable.
143ATEM 1 M/E Advanced Panel