
User Manual
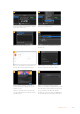
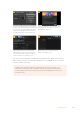
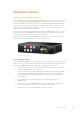
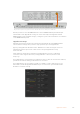
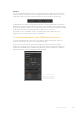
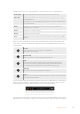
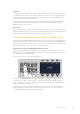
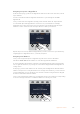
Table Of Contents
- Getting Started
- Switching your Production
- Additional Features on ISO Models
- ATEM SDI Extreme ISO
- ATEM Software Control
- Switching Modes
- Using ATEM Software Control
- Media Manager
- Audio Mixer
- Camera Control
- Using the Software Control Panel
- Transition Control and Upstream Keyer
- Downstream Keyers
- Processing Palettes
- Media Player Tab
- Output Tab
- Recording ISO Files
- Timecode Generator
- Using the Audio Mixer
- Shaping your Audio Mix using Advanced Fairlight Controls
- Using the 6 Band Parametric Equalizer
- Fairlight Controls Workflow Guide
- Using the Media Page
- Navigating the Browse Window
- ATEM Media Pool
- Image File Types
- Creating a TGA File with an Alpha Channel
- Camera Control
- Using Macros
- Changing Switcher Settings
- ATEM Setup Settings
- Using Adobe Photoshop with ATEM
- Using Multiple Control Panels
- Connecting to a Network
- Connecting to an Internet Router
- Keying using ATEM SDI
- Streaming Video
- HyperDeck Control
- ATEM 1 M/E Advanced Panel
- Using ATEM 1 M/E Advanced Panel
- ATEM Camera Control Panel
- Mixing Audio
- Help
- Regulatory Notices
- Safety Information
- Warranty

In addition to the text color, each HyperDeck’s selection button also has a tally indicator.
Green Outline Indicates a HyperDeck that is currently switched to the preview output.
Red Outline Indicates a HyperDeck that is currently switched to the program output, meaning it
is currently live to air.
You may also see one of the following status indicators above the selection buttons
for your HyperDecks.
Ready HyperDeck is set to remote and a disk is inserted. It is ready for playback and
recording if space is available.
Record HyperDeck is currently recording.
No Disk HyperDeck has no disk inserted.
Local HyperDeck is not set to ‘remote’ and cannot currently be controlled by your ATEM
switcher.
When you select a HyperDeck, you’ll see information about the currently selected clip such
as the name and length, as well as time elapsed and time remaining. Below this you’ll see the
control buttons.
Record
Click on this button to start recording on your HyperDeck.
Click again to stop recording.
Previous Clip
Moves to the previous clip in your HyperDeck’s media list.
Play
Clicking ‘play’ once initiates playback, clicking it again stops playback. If you
have ‘auto roll’ enabled in your HyperDeck settings, playback will commence
automatically when your HyperDeck is switched to the program output.
Next Clip
Moves to the next clip in your HyperDeck’s media list.
Loop
Click ‘loop’ once to loop the currently selected clip, and again to loop all of the clips
in your HyperDeck’s media list.
To move through a clip use the shuttle/jog slider underneath your HyperDeck’s control buttons.
This lets you move quickly, or shuttle through a selected clip, or jog frame by frame. You can
switch between these modes with the buttons next to the shuttle/jog slider.
Choose between shuttle and jog transport controls with the
buttons to the left of the transport slider. Adjust the slider left
and right to move forward or backwards through your clip.
The clip list below the transport control shows all of the clips currently available on the selected
HyperDeck. You can expand or collapse the list by pressing the arrow to the right of the clip list.
138HyperDeck Control