
User Manual
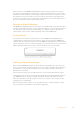
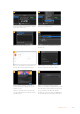
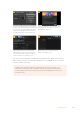
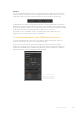
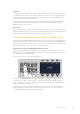
Table Of Contents
- Getting Started
- Switching your Production
- Additional Features on ISO Models
- ATEM SDI Extreme ISO
- ATEM Software Control
- Switching Modes
- Using ATEM Software Control
- Media Manager
- Audio Mixer
- Camera Control
- Using the Software Control Panel
- Transition Control and Upstream Keyer
- Downstream Keyers
- Processing Palettes
- Media Player Tab
- Output Tab
- Recording ISO Files
- Timecode Generator
- Using the Audio Mixer
- Shaping your Audio Mix using Advanced Fairlight Controls
- Using the 6 Band Parametric Equalizer
- Fairlight Controls Workflow Guide
- Using the Media Page
- Navigating the Browse Window
- ATEM Media Pool
- Image File Types
- Creating a TGA File with an Alpha Channel
- Camera Control
- Using Macros
- Changing Switcher Settings
- ATEM Setup Settings
- Using Adobe Photoshop with ATEM
- Using Multiple Control Panels
- Connecting to a Network
- Connecting to an Internet Router
- Keying using ATEM SDI
- Streaming Video
- HyperDeck Control
- ATEM 1 M/E Advanced Panel
- Using ATEM 1 M/E Advanced Panel
- ATEM Camera Control Panel
- Mixing Audio
- Help
- Regulatory Notices
- Safety Information
- Warranty

Auto Roll
You can set a HyperDeck disk recorder to automatically roll video when it is switched to the
program output. For example, you can cue a HyperDeck to the point you want your source to
begin, then roll the source by pressing its input button on the mix effects program row.
As HyperDecks must buffer a couple of frames before commencing playback, the actual cut
will be delayed a preset number of frames to ensure a clean transition. This is just like setting a
preroll on a videotape machine. You can adjust the length of this delay by changing the number
in the ‘offset’ box. We’ve found that five frames usually ensures a clean cut.
If you want to cue to a still frame of video or manually trigger video playback on your
HyperDeck, you can also deselect the ‘auto roll’ feature.
Controlling HyperDecks with ATEM Software Control
To control the HyperDecks connected to your switcher, click the ‘media player’ tab in the
software control panel, and choose the ‘HyperDecks’ palette.
Here you can choose between each of the HyperDecks connected to your system by
clicking one of the four buttons along the top of the panel. These are named according to the
labels entered in ATEM settings. Available HyperDecks are shown with white text, while the
HyperDeck you are currently controlling is shown in orange.
Choose from up to four
HyperDecks by clicking
their selection buttons in
the HyperDecks palette
137HyperDeck Control