
User Manual
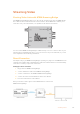
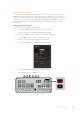
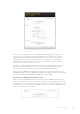
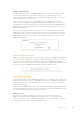
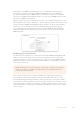
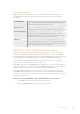
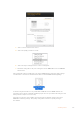
Table Of Contents
- Getting Started
- Switching your Production
- Additional Features on ISO Models
- ATEM SDI Extreme ISO
- ATEM Software Control
- Switching Modes
- Using ATEM Software Control
- Media Manager
- Audio Mixer
- Camera Control
- Using the Software Control Panel
- Transition Control and Upstream Keyer
- Downstream Keyers
- Processing Palettes
- Media Player Tab
- Output Tab
- Recording ISO Files
- Timecode Generator
- Using the Audio Mixer
- Shaping your Audio Mix using Advanced Fairlight Controls
- Using the 6 Band Parametric Equalizer
- Fairlight Controls Workflow Guide
- Using the Media Page
- Navigating the Browse Window
- ATEM Media Pool
- Image File Types
- Creating a TGA File with an Alpha Channel
- Camera Control
- Using Macros
- Changing Switcher Settings
- ATEM Setup Settings
- Using Adobe Photoshop with ATEM
- Using Multiple Control Panels
- Connecting to a Network
- Connecting to an Internet Router
- Keying using ATEM SDI
- Streaming Video
- HyperDeck Control
- ATEM 1 M/E Advanced Panel
- Using ATEM 1 M/E Advanced Panel
- ATEM Camera Control Panel
- Mixing Audio
- Help
- Regulatory Notices
- Safety Information
- Warranty

3 Select a custom name for the service.
4 Select the quality you want to stream.
5 Select the export settings button to create a settings file.
6 Email this settings file to the person using the remote ATEM SDI Pro ISO or ATEM SDI
Extreme ISO.
This settings file is what you will send to the remote ATEM switcher and it has all the settings
contained in it so the remote switcher knows where to find this ATEM Streaming Bridge.
It’s worth noting that this file is a very similar kind of XML file used on ATEM switchers for
streaming services. More technically qualified people can even open and make changes to this
file if you have a unique or custom setup.
The name you give the service will be the name listed in the platform menu in the remote
ATEMSDI’s streaming settings. The quality setting will set the remote quality setting in
the switcher.
130Streaming Video