
User Manual
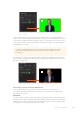
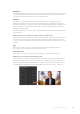
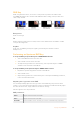

Table Of Contents
- Getting Started
- Switching your Production
- Additional Features on ISO Models
- ATEM SDI Extreme ISO
- ATEM Software Control
- Switching Modes
- Using ATEM Software Control
- Media Manager
- Audio Mixer
- Camera Control
- Using the Software Control Panel
- Transition Control and Upstream Keyer
- Downstream Keyers
- Processing Palettes
- Media Player Tab
- Output Tab
- Recording ISO Files
- Timecode Generator
- Using the Audio Mixer
- Shaping your Audio Mix using Advanced Fairlight Controls
- Using the 6 Band Parametric Equalizer
- Fairlight Controls Workflow Guide
- Using the Media Page
- Navigating the Browse Window
- ATEM Media Pool
- Image File Types
- Creating a TGA File with an Alpha Channel
- Camera Control
- Using Macros
- Changing Switcher Settings
- ATEM Setup Settings
- Using Adobe Photoshop with ATEM
- Using Multiple Control Panels
- Connecting to a Network
- Connecting to an Internet Router
- Keying using ATEM SDI
- Streaming Video
- HyperDeck Control
- ATEM 1 M/E Advanced Panel
- Using ATEM 1 M/E Advanced Panel
- ATEM Camera Control Panel
- Mixing Audio
- Help
- Regulatory Notices
- Safety Information
- Warranty

The chroma sample setting lets you position a cursor over the screen area you
want to sample
Choose a representative area of your green screen that covers as much of the luminance
range of the screen as possible. The default size of the box cursor is well suited to most green
screens that are relatively evenly lit, however if there is a lot of variance in your green screen,
you can adjust the size of the box by clicking on the slider to the right of the sample window
and dragging it up or down.
TIP When sampling uneven green screens, we recommend sampling the darkest
area first before increasing the size of the sample box. This can give you a more
accurate key.
You can preview your key on the preview output at any time by clicking the ‘preview’ button
above the chroma sample panel. This shows you the final composited version of your chroma
key effect on the preview.
Click the preview button to check the final composite on the preview output
Fine Tuning your Key using Key Adjustments
Once you have achieved a good chroma sample that removes most of your green
screen whilegenerally retaining foreground elements, its time fine tune your key with the
‘key adjustments’ controls.
Foreground
Use the ‘foreground’ slider to adjust how opaque the foreground mask is. This determines the
strength of the foreground against the background. By increasing the slider, you can fill in any
small areas of transparency inside your foreground image. We recommend moving this slider
and stopping as soon as the foreground becomes solid.
113Keying using ATEM SDI