
User Manual
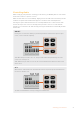
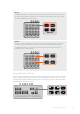
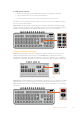
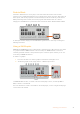

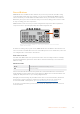
Table Of Contents
- Getting Started
- Switching your Production
- Additional Features on ISO Models
- ATEM SDI Extreme ISO
- ATEM Software Control
- Switching Modes
- Using ATEM Software Control
- Media Manager
- Audio Mixer
- Camera Control
- Using the Software Control Panel
- Transition Control and Upstream Keyer
- Downstream Keyers
- Processing Palettes
- Media Player Tab
- Output Tab
- Recording ISO Files
- Timecode Generator
- Using the Audio Mixer
- Shaping your Audio Mix using Advanced Fairlight Controls
- Using the 6 Band Parametric Equalizer
- Fairlight Controls Workflow Guide
- Using the Media Page
- Navigating the Browse Window
- ATEM Media Pool
- Image File Types
- Creating a TGA File with an Alpha Channel
- Camera Control
- Using Macros
- Changing Switcher Settings
- ATEM Setup Settings
- Using Adobe Photoshop with ATEM
- Using Multiple Control Panels
- Connecting to a Network
- Connecting to an Internet Router
- Keying using ATEM SDI
- Streaming Video
- HyperDeck Control
- ATEM 1 M/E Advanced Panel
- Using ATEM 1 M/E Advanced Panel
- ATEM Camera Control Panel
- Mixing Audio
- Help
- Regulatory Notices
- Safety Information
- Warranty

Controlling Audio
When setting up your production or during your broadcast, you will likely want to control audio
levels if the sound is too quiet or too loud.
When an audio level is too loud it will clip. Clipping means the audio has increased beyond the
maximum accepted level and when this happens it can distort and sound unpleasant.
Pressing the up and down arrow buttons for each input will increase or decrease the audio
level for the respective source. For example, if the presenter’s voice is too loud and risks
clipping, you can decrease the audio level by pressing the down button incrementally until the
level is safe.
ON OFF
Pressing the on or off buttons will let you permanently enable the audio from the respective input
source, or turn its audio off completely.
ON – When the input’s audio is set to ‘on’, the input audio will be heard permanently, even if the
source is not currently on air.
OFF – When the input’s audio is set to ‘off’, the source audio will never be heard even if the source
video is on air.
AFV
AFV stands for ‘audio follows video’ and will let the audio for a respective input be heard whenever
the source is switched on air.
To enable or disable AFV for each input, simply press its AFV button.
11Switching your Production