
User Manual
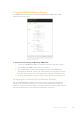
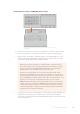
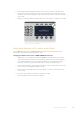
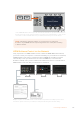
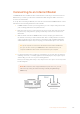
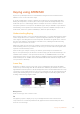
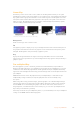
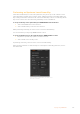
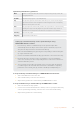
Table Of Contents
- Getting Started
- Switching your Production
- Additional Features on ISO Models
- ATEM SDI Extreme ISO
- ATEM Software Control
- Switching Modes
- Using ATEM Software Control
- Media Manager
- Audio Mixer
- Camera Control
- Using the Software Control Panel
- Transition Control and Upstream Keyer
- Downstream Keyers
- Processing Palettes
- Media Player Tab
- Output Tab
- Recording ISO Files
- Timecode Generator
- Using the Audio Mixer
- Shaping your Audio Mix using Advanced Fairlight Controls
- Using the 6 Band Parametric Equalizer
- Fairlight Controls Workflow Guide
- Using the Media Page
- Navigating the Browse Window
- ATEM Media Pool
- Image File Types
- Creating a TGA File with an Alpha Channel
- Camera Control
- Using Macros
- Changing Switcher Settings
- ATEM Setup Settings
- Using Adobe Photoshop with ATEM
- Using Multiple Control Panels
- Connecting to a Network
- Connecting to an Internet Router
- Keying using ATEM SDI
- Streaming Video
- HyperDeck Control
- ATEM 1 M/E Advanced Panel
- Using ATEM 1 M/E Advanced Panel
- ATEM Camera Control Panel
- Mixing Audio
- Help
- Regulatory Notices
- Safety Information
- Warranty

5 If the subnet mask and gateway address need to be set, then press the right arrow
button in the system control buttons to progress through each setting menu, and use
the knobs or the numeric keypad to edit. If at any time you want to cancel the changes,
press ‘undo’.
6 When you are happy with your settings, press the ‘save changes’ soft button to confirm.
HOME
MIX
FTB
MACRO
SETTINGS
WIPE
MEDIA
PLAYERS
SUPER
SOURCE
KEYS
DVE
BORDER
CAMERA
CONTROL
STINGER
COLOR
AUDIO
DIP
AUX
1
4
7
ENTER
2
5
8
0
3
6
9
RESET
PROGRAM
PREVIEW
SHIFT MACRO
BKGD
KEY 1
KEY 2
KEY 4
KEY 3
ON
ON
ON
ON M/E 1 M/E 2
M/E 3
M/E 4
SHIFT DIP
DVE
STING
DSK 1
TIE
DSK 2
TIE
DSK 1
CUT
DSK 2
CUT
DSK 1
AUTO
DSK 2
AUTO
FTB
MIX
CUT
AUTO
WIPE
ARM
PREV
TRANS
When you are happy with your network settings, pressthe ‘save
changes’ button to confirm them
Setting the Switcher’s IP Location on the Panel
To set ATEM SDI’s IP location on ATEM 1 M/E Advanced Panel so the panel can find your
switcher and communicate, simply follow these steps:
Changing the Switcher’s IP location on ATEM 1 M/E Advanced Panel
1 When there is no communication with your ATEM SDI, the LCD will say ‘connecting’
andnotify you of the IP address it is searching for. If the panel can’t find the switcher,
the connection will time out and a notification will ask you to check the IP address.
Pressthe ‘network’ soft button above the LCD to open the network settings.
2 In the network settings, press the right arrow in the system control buttons next to the
LCD to move to the ‘switcher IP address’ setting.
3 Now use the corresponding LCD soft control knobs to set the correct IP address for
your switcher.
4 Press the ‘save changes’ soft button to confirm the setting.
Your panel will now connect with your switcher.
103Connecting to a Network