
User Manual
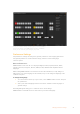
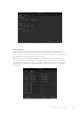
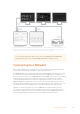
Table Of Contents
- Getting Started
- Switching your Production
- Additional Features on ISO Models
- ATEM SDI Extreme ISO
- ATEM Software Control
- Switching Modes
- Using ATEM Software Control
- Media Manager
- Audio Mixer
- Camera Control
- Using the Software Control Panel
- Transition Control and Upstream Keyer
- Downstream Keyers
- Processing Palettes
- Media Player Tab
- Output Tab
- Recording ISO Files
- Timecode Generator
- Using the Audio Mixer
- Shaping your Audio Mix using Advanced Fairlight Controls
- Using the 6 Band Parametric Equalizer
- Fairlight Controls Workflow Guide
- Using the Media Page
- Navigating the Browse Window
- ATEM Media Pool
- Image File Types
- Creating a TGA File with an Alpha Channel
- Camera Control
- Using Macros
- Changing Switcher Settings
- ATEM Setup Settings
- Using Adobe Photoshop with ATEM
- Using Multiple Control Panels
- Connecting to a Network
- Connecting to an Internet Router
- Keying using ATEM SDI
- Streaming Video
- HyperDeck Control
- ATEM 1 M/E Advanced Panel
- Using ATEM 1 M/E Advanced Panel
- ATEM Camera Control Panel
- Mixing Audio
- Help
- Regulatory Notices
- Safety Information
- Warranty

Below is an example of fixed IP address settings when ATEM SDI is connected directly to
ATEM 1 M/E Advanced Panel.
ATEM SDI IP Settings
IP Address - 192.168.10.240
Subnet Mask - 255.255.255.0
Gateway - 192.168.10.1
ATEM 1 M/E Advanced Panel IP Settings
IP Address - 192.168.10.60
Subnet Mask - 255.255.255.0
Gateway - 192.168.10.1
Notice that all the numbers are the same except for the last field of each IP address. This means
they are set correctly and the units will communicate with each other without conflicts.
When connecting to a network, the network will have its own subnet mask, gateway, and IP
address settings which every connected device will conform to. You will need to make sure
both your ATEM SDI and the ATEM 1 M/E Advanced Panel share those numbers and similarly
with regards to the IP address, have their own identifying number in the last field so they won’t
conflict with each other.
Below is an example showing ATEM SDI and an ATEM 1 M/E Advanced Panel set to conform to
a network using a fixed IP address.
Network IP Settings
IP Address - 192.168.26.30
Subnet Mask - 255.255.255.0
Gateway - 192.168.26.250
ATEM SDI IP Settings
IP Address - 192.168.26.35
Subnet Mask - 255.255.255.0
Gateway - 192.168.26.250
ATEM External Hardware Panel IP Settings
IP Address - 192.168.26.40
Subnet Mask - 255.255.255.0
Gateway - 192.168.26.250
If there are other devices on the network that have the same identifying number in their
IP address, there will be a conflict and the units won’t connect. If you encounter a conflict,
simply change the identifying number in the unit’s IP address. Refer to the next sections for
information on how to change network settings.
NOTE If ATEM 1 M/E Advanced Panel is not connecting to your ATEM SDI and displays
a message saying it is looking for the switcher, you will need to tell the panel where
your switcher is on the network. This is simply typing your ATEM SDI’s IP address into
the panel’s switcher IP settings. Refer to the next sections for information on how to set
the switcher IP location on ATEM 1 M/E Advanced Panel.
100Connecting to a Network