
Instruction Sheet
ASSEMBLY & INSTALLATION INSTRUCTIONS for STX-28P-SN-6S
CAUTION: READ ALL INSTRUCTIONS CAREFULLY FOR SAFE OPERATION AND INSTALLATION.
CAUTION
Turn off the main power at the circuit breaker before installing the fixture in order to prevent possible
shock.
GENERAL
1. All electrical connections must be in accordance with local and national electrical code (N.E.C)
standards. If you are unfamiliar with proper electrical wiring connections obtain the services of a
qualified electrician. Remove the fixture and the mounting package from the box and make sure
that no parts are missing by referencing the illustrations on the installation instruction.
2. Uses 0-10V dimming controls:
ASSEMBLY AND INSTALLATION
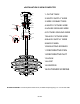
1. Take the fixture out of the box.
2. Remove the back panel (9) from the decorative pan (11) by loosening two decorative nuts (12).
3. Pull the supply wires (2&8) and the house ground wire (5) out of the outlet box (1) .
4. Place the back panel(9)over outlet box (1) and secure it by tightening two mounting screws (10) .
5. Make the wiring connections: connect the white supply wire (2) to the white fixture wire (4);
connect the black supply wire (8) to the black fixture wire (7); connect the house ground wire (5) to the
fixture ground wire (6) using wire connectors (3).
6. Temporarily mount decorative pan (11) to back panel (9) by attaching loop (14) to mating hooks
(13). Adjust the two suspension cables to appropriate length by either pushing the individual wire up
into the adjustable gripper (15) or pushing the small barrel upward (located on the bottom of the
adjustable gripper). This will release the wire tension and allow the suspended wire to increase in
length.
8. Once the wire is adjusted to approximate mounting length use the attached twist ties to retain the
excess wire into neat loops that will fit inside the decorative pan (11).
9. Secure the decorative pan (11) on the back panel (9) by tightening two decorative nuts (12).
10. Once the canopy is in place; A- fine tune the fixture suspension cable lengths to get the fixture level and the
two wires even in length. Either push the individual wire up into the adjustable gripper (16) or push the
small barrel upward (located on the bottom of the adjustable gripper). This will release the wire
tension and allow the suspended wire to increase in length. B- For additional fine tuning of pendant
alignment, with two fingers, slightly twist one of the suspension wires right near the gripper until the
pendant rotates to the correct facing direction.