
Installation Sheet

ASSEMBLY & INSTALLATION INSTRUCTIONS FOR
CUB-12V-PC, CUB-24V-PC, CUB-24V-RB, CUB-36V-PC
CAUTION: READ ALL INSTRUCTIONS CAREFULLY FOR SAFE OPERATION AND INSTALLATION.
CAUTION
Turn off the main power at the circuit breaker before installing the fixture in order to prevent possible
shock.
GENERAL
1. All electrical connections must be in accordance with local and national electrical code (N.E.C)
standards. If you are unfamiliar with proper electrical wiring connections obtain the services of a
qualified electrician. Remove the fixture and the mounting package from the box and make sure
that no parts are missing by referencing the illustrations on the installation instruction.
2. Dimming controller type: TRIAC phase control dimmer.
3. Recommended TRIAC dimmers: LEVITON: ILLUMATECH IPL06, SURESLIDE 6674
LUTRON: ARIADNI AYCL-153P, DIVA DVCL-153P, SKYLARK CTCL-153P, SKYLARK SCL-153P;
ASSEMBLY AND INSTALLATION
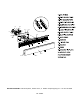
1. Take the fixture out of the box.
2. Remove the acrylic lens / decorative plate asembly(16 / 15) from the fixture pan(12)by
loosening two screws(14). Retain the screws.
3. Remove the back panel (10) from the fixture pan (12) by loosening four screws (11)
4. Pull the supply wires (2&8) and the house ground wire (5) out of the outlet box (1) and install cross
bar (18) to the outlet box (1) by using two mounting screws (9).
5. Place the back panel(10)over the cross bar (18) through the two outward screws (17) and
secure it by tightening two hex nuts (13).
6. Make the wiring connections: connect the white supply wire (2) to the white fixture wire (4);
connect the black supply wire (8) to the black fixture wire (7); connect the house ground wire (5) to the
fixture ground wire (6) using wire connectors (3).
7. Align the four holes on the fixture pan (12) with four screws (11) and securely tighten the fixture pan
(12) to the back panel (10)
8. Before assembling acrylic lens / decorative plate assembly (16 / 15), insert both screw fasteners (14)
into the threaded raised tabs on decorative plate (15). Thread screws (14) into the tabs so the ends of
the screws do not extend beyond the back of the tabs.
9. Insert the two tabs from the inside of the decorative plate (15) into the two rectangular slots on the
side of the fixture pan (12). Please see fig.2
10. Rotate the other side of the decorative plate (15) up until the screws (14) are aligned with the
mounting holes in the fixture pan (12). Now thread the two screws (14) completely into the fixture pan
(12).
11. If diffuser surface requires cleaning, we recommend using NOVUS 7020 plastic polish #1.
INSTALLATION IS NOW COMPLETED