
Installation Sheet

ASSEMBLY & INSTALLATION INSTRUCTIONS for CL3-24F-SN-__
CAUTION: READ ALL INSTRUCTIONS CAREFULLY FOR SAFE OPERATION AND INSTALLATION.
CAUTION
Turn off the main power at the circuit breaker before installing the fixture in order to prevent possible
shock.
GENERAL
1. All electrical connections must be in accordance with local and national electrical code (N.E.C)
standards. If you are unfamiliar with proper electrical wiring connections obtain the services of a
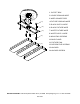
qualified electrician. Remove the fixture and the mounting hardware from the box. Make sure that
no parts are missing by referencing the illustrations below.
2. Dimming controller type: TRIAC phase control dimmer.
3. Recommended TRIAC dimmers:
LUTRON: ARIADNI AYCL-153P, DIVA DVCL-153P, SKYLARK CTCL-153P, SKYLARK SCL-153P;
LEVITON: ILLUMATECH IPI06-1L, ILLUMATECH IPI10-1L, DECORA DSL06, DECORA DSM10;
LEGRAND: ADORNE: WHISPER/ ADWR, SOFTTAP/ ADTP, TOUCH/ ADTH.
ASSEMBLY AND INSTALLATION
1. Take the fixture out of the box.
2. Remove the fixture pan(11) from the back panel(10)by loosening four decorative screws(12).
3. Pull the supply wires (2&8) and the house ground wire (5) out of the outlet box (1). Thread through
large center hole in back panel (10). Temporarily attach back panel (10) to the outlet box (1) by using
two mounting screws (9). Mark the two mounting hole locations (for anchor screw 14) on the ceiling
above the canopy.
4. Remove the back panel (10) from the ceiling. Drill the two holes using the appropriately sized drill
bit. Insert the provided ceiling anchors (13) into the holes. First screw the anchor screws (14)
halfway into the ceiling anchors, then further attach back panel (10) to the outlet box (1) by using
two mounting screws (9). Afterward fully tighten anchor screws (14).
5. Make the wiring connections: connect the white supply wire (8) to the white fixture wire (7);
connect the black supply wire (5) to the black fixture wire (6); connect the house ground wire (2) to
the fixture ground wire (4) using wire connectors (3).
6. Secure the fixture pan (11) to the back panel (10) by attaching the four decorative screws (12).
INSTALLATION IS NOW COMPLETED