
System information


5. Mark a vertical line across the horizontal line, centered on the stud.
6. Drill a 3-1/2 inch deep pilot hole, centered on the point where the lines
cross, using a 1/4 inch bit.
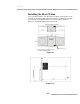
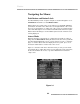
7. Hold the Z-bracket so the mounting holes are on the bottom and the top
of the bracket is projecting away from the wall (see figure 2.3.)
8. Center the Z-bracket across the two studs and note which mounting
holes line up over the studs.
9. Secure one side of the bracket using a lag screw and flat washer. Do
not over tighten — the bracket must be able to move for the next step.
10. Using a level, adjust the bracket so that it is level across the wall.
11. Using the bracket mounting holes for reference, mark the center point
over the second stud and drill another pilot hole.
12. Secure this side of the bracket with the other lag screw and flat washer.
13. Check to be sure the bracket is level, then tighten both screws securely.
NOTE: Over-tightening the screws will “bow” the bracket and cause
problems in mounting the cabinet.
Remove the Monitor from the Cabinet
To ease the lifting process, remove the monitor from the cabinet as follows:
1. Disconnect the Video Out cable from the CPU.
2. Unplug the monitor-attached power cord where it joins the junction box
power cord.
3. Slide the monitor forward on the rails enough to grasp the hand holds
on each side of the chassis. Using the hand holds, carefully slide the
monitor out of the cabinet. Turn the monitor over and set it down so that
it is resting on its metal framework.
4. Close and lock the cabinet door.
Hanging the Cabinet
1. Locate the mounting flange on the back of the cabinet.
2. With a person on each side, lift the cabinet and place it against the wall
Basics
2.4