GL650 GL660 GL660P GL670 GL670P 1
English 8 Deutsch 16 Français 24 Italiano 32 Nederlands 40 Español 48 Português 56 EÏÏËÓÈη 64 Copyright Black & Decker 2
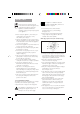
2 3 1 5 4 7 8 2 3 8 4 8 12 13 9 5 10 6 11 7 1 15 14 8 9 10 11 12 13 14 15 A 3
19 16 11 19 B C 20° D 4 17 18 20
7 E F 7 5 6 G H 5
D A 10 C 11 B J I 24 22 25 23 12 21 26 25 K 6 L
28 27 27 27 M N O P 27 7
ENGLISH GRASS TRIMMER GL650/GL660/GL660P/GL670/GL670P CONGRATULATIONS! You have chosen a Black & Decker tool. Our aim is to provide quality tools at an affordable price. We hope that you will enjoy using this tool for many years. INTENDED USE Your Black & Decker grass trimmer GL650/GL660/ GL660P/GL670/GL670P has been designed for trimming and finishing lawn edges and to cut grass in confined spaces. This tool is intended for consumer use only.
ENGLISH Work area ◆ Do not expose the appliance to rain. Do not use the appliance in damp or wet conditions. ◆ Only use the appliance in daylight or good artificial light. Personal protection ◆ Wear stout shoes or boots to protect your feet. Do not operate the appliance wearing opentoed sandals or when barefoot. ◆ Wear long trousers to protect your legs. Using your appliance ◆ Be sure that the appliance is switched off when plugging in. ◆ Stay alert. Watch what you are doing. Use common sense.
ENGLISH Switch off, remove the plug from the socket and ensure that moving parts have stopped rotating before leaving the appliance unattended and before changing, cleaning or inspecting any parts of the appliance. This appliance is double insulated in accordance with EN 60335; therefore no earth wire is required. ◆ ◆ ◆ ◆ ◆ ◆ ◆ ◆ ◆ ◆ ◆ ◆ Before using the appliance, check that your cutting path is free from sticks, stones, wire and any other objects.
ENGLISH Never use a light socket. Using an extension cable Always use an approved extension cable suitable for the power input of this appliance (see rating plate). The extension cable must be suitable for outdoor use. ◆ Before use, inspect the cable for signs of damage, wear and ageing. Replace the extension cable if damaged or defective. ◆ When using a cable reel, always unwind the cable completely. ◆ Take care to keep the cable away from the cutting line. Always be aware of the position of the cable.
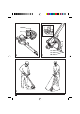
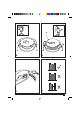
ENGLISH Setting the tool to trimming or edging mode (fig. D, E & F) The tool can be used in trimming mode as shown in fig. D or in edging mode to trim overhanging grass along lawn edges and flower beds as shown in fig. E. Trimming mode (fig. D & F) For trimming, the trimmer head should be in the position shown in fig. D. If it is not: ◆ Turn the locking ring (7) counterclockwise. ◆ Rotate the trimmer body counterclockwise until the trimmer head engages in the trimming position.
ENGLISH ◆ When there are no plants near the cutting area, set the plant protector to position D. MAINTENANCE Your Black & Decker tool has been designed to operate over a long period of time with a minimum of maintenance. Continuous satisfactory operation depends upon proper tool care and regular cleaning. Before performing any maintenance, switch off and unplug the tool. ◆ ◆ ◆ Regularly clean the ventilation slots in your tool using a soft brush or dry cloth.
ENGLISH Tool runs slowly ◆ Check that the spool housing can rotate freely. Carefully clean it if necessary. ◆ Check that the cutting line does not protrude more than 9 cm from the spool housing. If it does, cut it off so that it just reaches the line trimming blade. Automatic line feed does not work ◆ Keep the tabs depressed and remove the spool cover from the housing. ◆ Pull the cutting line until it protrudes 9 cm from the housing.
ENGLISH If your product needs repair, please take or send it to an authorised repair agent, providing proof of purchase if claiming a guarantee repair. Black & Decker offers a nationwide network of authorised repair agents. Full details on our after sales service can be obtained from any of our authorised repair agents. OTHER OUTDOOR TOOLS Black & Decker has a full range of outdoor power tools that make life in the garden easy.
DEUTSCH RASENTRIMMER GL650/GL660/GL660P/GL670/GL670P HERZLICHEN GLÜCKWUNSCH! Sie haben sich für ein Gerät von Black & Decker entschieden. Wir möchten Qualitätsgeräte zu einem erschwinglichen Preis bieten. Wir hoffen, daß Sie dieses Gerät viele Jahre mit Freude verwenden werden.
DEUTSCH ◆ ◆ Die bestimmungsgemäße Verwendung ist in dieser Betriebsanleitung beschrieben. Das Verwenden anderer als der in dieser Anleitung empfohlenen Vorsatzgeräte und Zubehörteile oder die Ausführung von Arbeiten mit diesem Gerät, die nicht der bestimmungsgemäßen Verwendung entsprechen, kann zu Unfallgefahren führen. Bewahren Sie diese Anleitung auf. Arbeitsbereich ◆ Setzen Sie das Gerät keinem Regen aus. Verwenden Sie das Gerät nicht in einer feuchten oder nassen Umgebung.
DEUTSCH Falls das Netzkabel beschädigt oder defekt ist, ist es von einer autorisierten Reparaturwerkstatt auszutauschen, um Gefahren vorzubeugen. Versuchen Sie nie, irgendwelche Teile zu entfernen oder auszutauschen, wenn dies in der Anleitung nicht beschrieben wird.
DEUTSCH Verlängerungskabel Verwenden Sie nur zugelassene Verlängerungskabel, die sich für die Leistungsaufnahme des Geräts eignen (siehe Typenschild). Das Verlängerungskabel muß für den Einsatz im Freien geeignet sein. ◆ Überprüfen Sie vor dem Gebrauch das Netzkabel auf Beschädigung, Alterung und Verschleiß. Tauschen Sie ein beschädigtes oder defektes Verlängerungskabel aus. ◆ Rollen Sie das Kabel bei Verwendung einer Kabelrolle immer völlig aus. ◆ Halten Sie das Kabel dem Schneidfaden fern.
DEUTSCH Das Verlängerungskabel muß für den Einsatz im Freien geeignet sein. ◆ GEBRAUCH ◆ Beschleunigen Sie den Arbeitsvorgang nicht mit Gewalt. Vermeiden Sie eine Überlastung des Gerätes. Einstellen des Gerätes auf Trimmen oder Kantenschneiden (Abb. D, E & F) Dieses Gerät kann sowohl zum Trimmen wie in Abb. D als auch zum Kantenschneiden (Beschneiden überhängenden Grases entlang Rasenkanten und Blumenbeeten) wie in Abb. E verwendet werden. Trimmen (Abb.
DEUTSCH ◆ ◆ ◆ Bei langem Gras arbeiten Sie stufenweise in kleinen Schritten von oben nach unten. Halten Sie das Gerät harten Gegenständen und empfindlichen Pflanzen fern. Falls das Gerät anfängt, langsam zu laufen, verringern Sie die Belastung. ◆ ◆ ◆ Kantenschneiden Optimale Schnittergebnisse erhalten Sie bei Kanten mit einer Tiefe von mindestens 50 mm. ◆ Verwenden Sie das Gerät nicht zum Bilden neuer Kanten. Zum Bilden von Kanten verwenden Sie einen Kantenspaten. ◆ Führen Sie das Gerät, wie in Abb.
DEUTSCH Aufwickeln neuen Fadens auf eine leere Spule (Abb. M, N & P) Sie können auch neuen Schneidfaden auf eine leere Spule aufwickeln. Neuer, loser Schneidfaden ist bei Ihrem Black & Decker Händler erhältlich (Bestellnummer A6440). ◆ Entfernen Sie die leere Spule, wie im vorigen beschrieben. ◆ Entfernen Sie etwaige Fadenreste von der Spule. ◆ Wickeln Sie zuerst neuen Faden auf den oberen Teil der Spule auf. - Führen Sie 2 cm Schneidfaden wie abgebildet in einen der Schlitze oben in der Spule.
DEUTSCH UMWELTSCHUTZ Falls Sie Ihr Gerät eines Tages ersetzen möchten oder keine Verwendung mehr dafür haben, denken Sie bitte an den Umweltschutz. Black & Decker nimmt Ihre Black & Decker Altgeräte gern zurück und sorgt für eine umweltfreundliche Entsorgung.
FRANÇAIS COUPE BORDURES GL650/GL660/GL660P/GL670/GL670P FELICITATIONS ! Vous avez choisi un outil Black & Decker. Notre but est de fournir des outils de qualité au meilleur prix. Nous espérons que vous profiterez de cet outil pendant de longues années.
FRANÇAIS ◆ ◆ Le domaine d’utilisation de l’outil est décrit dans le présent manuel. Utilisez l’outil conformément à sa destination, afin d’éviter tout risque de blessure due à toute autre utilisation de l’outil. Conservez ces instructions. Aire de travail ◆ N’exposez pas l’outil à la pluie. N’exposez pas l’outil à l’humidité. ◆ N’utilisez l’outil qu’à la lumière du jour ou sous un éclairage artificiel suffisant. Protection ◆ Portez des chaussures ou des bottes renforcées pour vous protéger les pieds.
FRANÇAIS ◆ Porter des lunettes de sécurité lorsque vous utilisez cet outil. Le fil de coupe continuera de fonctionner pendant quelques secondes après l’arrêt de l’outil. Ne tentez jamais de forcer sur le fil pour qu’il s’arrête. ◆ Prenez garde à ne pas vous blesser avec la lame de coupe du fil. Ne touchez pas la lame. Après avoir tiré sur le fil de coupe, remettez toujours l’outil en position normale avant de l’allumer. Veillez à ne pas laisser le câble à proximité du fil de coupe.
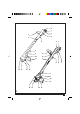
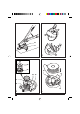
FRANÇAIS CONTENU DE LA BOITE La boîte contient : 1 Coupe bordures 1 Carter protecteur avec vis de fixation 1 Protecteur de plante avec jeu de pièces de rechange (GL660P/GL670P seulement) 1 Manuel d’instructions ◆ Déballez soigneusement toutes les pièces. APERÇU (fig. A) 1. Interrupteur marche/arrêt 2. Poignée 3. Goupille de retenue de fil 4. Entrée électrique 5. Deuxième poignée 6. Bouton de poignée (GL670/GL670P) 7. Bague 8. Crochets d’accroche du fil 9. Boîtier moteur 10. Pédale (GL670/GL670P) 11.
FRANÇAIS Mode de taille (fig. D & F) Pour tailler, la tête du coupe bordures devra être dans la position indiquée à la fig. D. Si ce n’est pas le cas : ◆ Faites tourner la bague (7) dans le sens inverse des aiguilles d’une montre. ◆ Faites tourner le corps de la tête de coupe dans le sens inverse des aiguilles d’une montre jusqu’à ce que la tête de coupe s’engage dans la position de coupe. ◆ Serrez la bague en la faisant tourner dans le sens des aiguilles d’une montre. Mode de coupe (fig.
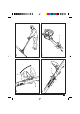
FRANÇAIS Généralités ◆ Pour des résultats de coupe optimaux, ne coupez que de l’herbe sèche. ◆ GL660P/GL670P Utilisation du protecteur de plante (fig. J) Le protecteur de plante vous aidera à protéger les plantes lors de la coupe en bordure de pelouse. ◆ En mode de taille, placez le protecteur de plante en position A. ◆ En mode de coupe, placez le protecteur de plante en position B ou C. ◆ Lorsqu’il n’y a pas de plantes à côté de la zone de coupe, placez le protecteur de plante en position D.
FRANÇAIS ◆ ◆ Répétez l’opération précédente pour le second fil de coupe sur la partie inférieure de la bobine. Laissez le fil dans les encoches restées libres (27). Procédez comme expliqué ci-dessus pour installer la bobine dans l’outil. N’oubliez pas de relâcher le fil de coupe des encoches où vous l’avez laissé (27). Utilisez uniquement le bon type de fil de coupe de Black & Decker. Vérifiez que le fil de coupe se trouve dans les deux parties de la bobine (fig. P).
FRANÇAIS La politique de garantie Les défauts suivants ne sont pas couverts par la garantie ci-dessus : ◆ Remplacement des lames usées ou endommagées, des fils de nylon, des chaînes et des cordons d’alimentation. Ces articles sont considérés comme des articles pouvant être remplacés et s’abîmant suite à une utilisation normale. ◆ Défauts résultant d’un choc brutal ou d’un abus évident. ◆ Défauts dus à une utilisation non conforme aux instructions et aux recommandations contenues dans ce manuel.
ITALIANO TOSAERBA GL650/GL660/GL660P/GL670/GL670P CONGRATULAZIONI! Lei ha scelto un utensile Black & Decker. Il nostro obiettivo é fornire utensili di qualità ad un prezzo contenuto. Desideriamo che questo utensile sia di suo gradimento e lo possa usare per molti anni. USO PROGETTATO Il vostro tosaerba Black & Decker GL650/GL660/ GL660P/GL670/GL670P è stato progettato per tosare e rifinire i cigli dei prati oltre che per tagliare erba in spazi ridotti. L’utensile é stato progettato per un uso individuale.
ITALIANO ◆ ◆ L’utilizzo previsto è quello indicato nel presente manuale. L’uso di accessori o attrezzature diversi o l’impiego del presente utensile per scopi diversi da quelli indicati nel presente manuale d’uso comportano il rischio di infortuni. Conservare queste istruzioni per utilizzarle in futuro. Area di lavoro ◆ Non lasciare l’utensile sotto la pioggia. Non usare l’utensile in ambienti carichi di umidità. ◆ Usare l’utensile solo alla luce naturale oppure con una buona illuminazione artificiale.
ITALIANO Istruzioni addizionali di sicurezza per il tosaerba I seguenti simboli di avvertenza si trovano sull’utensile: Indossate sempre occhiali di protezione quando fate funzionare questo utensile. Il filo di taglio continuerá a girare per alcuni secondi dopo aver spento l’utensile. Non cercate mai di forzare il fermo del filo. 360˚ 6m/20ft Non fate avvicinare persone o animali a meno di 6 m. dall’area di taglio. ◆ ◆ Fare attenzione a evitare lesioni provocate dalla lama di tosatura.
ITALIANO ◆ Attenzione a tenere il cavo dell’alimentazione lontano dal filo di taglio. Tenere sempre sotto controllo la posizione del cavo. CONTENUTO DELLA SCATOLA La scatola contiene: 1 Tosaerba 1 Protezione con vite di montaggio 1 Proteggipiante incl. pacchetto a parte (solo GL660P/GL670P) 1 Libretto d’istruzioni ◆ Disimballate con cura tutte le parti. L’INSIEME (fig. A) 1. Interruttore acceso/spento 2. Impugnatura 3. Fermacavo 4. Ingresso alimentazione 5. Impugnatura secondaria 6.
ITALIANO Funzione di tosatura (fig. D & F) Per tosare l’erba, la testa tosatrice deve trovarsi sulla posizione indicata nella fig. D. In caso contrario: ◆ Ruotare l’anello di bloccaggio (7) in senso antiorario. ◆ Ruotare in senso antiorario il corpo della tosatrice, sino a che la testa tosatrice si blocchi in posizione di tosatura. ◆ Serrare l’anello di bloccaggio ruotandolo in senso orario. Funzione di rifinitura bordi (fig.
ITALIANO Norme generali ◆ Per ottenere un taglio ottimale, tosare soltanto l’erba secca. GL660P/GL670P - Utilizzo del proteggipiante (fig. J) Il proteggipiante aiuta a proteggere le piante quando si tosa l’erba lungo il bordo dei prati. ◆ Nella funzione di tosatura, impostare il proteggipiante in posizione A. ◆ Nella funzione di rifinitura dei bordi, impostare il proteggipiante in posizione B o C.
ITALIANO ◆ ◆ Ripetere la procedura precedente per il secondo filo di taglio sulla sezione inferiore della bobina. Bloccare il filo nelle fessure inutilizzate (27). Eseguire i passi di cui sopra per inserire la bobina nell’utensile. Non dimenticare di liberare il filo di taglio dalle aperture (27) in cui è stato temporaneamente fermato. Impiegare unicamente filo di tipo corretto, della Black & Decker. Verificare che il filo di taglio sia presente in entrambe le sezioni della bobina (fig. P).
ITALIANO Estremi della garanzia I seguenti difetti non sono coperti da garanzia: ◆ Sostituzione di lame usurate o danneggiate, fili di nylon e catene danneggiati durante l’uso o l’immagazzinaggio. Questi vengono considerati normali ricambi soggetti ad usura durante il normale utilizzo. ◆ Danni causati da impatti e evidenti abusi. ◆ Danni causati da un utilizzo non conforme alle istruzioni ed ai consigli contenuti nel presente manuale.
NEDERLANDS GRASSTRIMMER GL650/GL660/GL660P/GL670/GL670P GEFELICITEERD! U heeft gekozen voor een machine van Black & Decker. Ons doel is om kwaliteitsproducten te leveren tegen een betaalbare prijs. Wij hopen dat u aan het gebruik van deze machine jarenlang plezier zult beleven.
NEDERLANDS ◆ Gebruik ter voorkoming van lichamelijk letsel uitsluitend de in deze gebruiksaanwijzing aanbevolen accessoires en hulpstukken. Gebruik de machine uitsluitend volgens bestemming. Bewaar deze instructies zorgvuldig! Werkomgeving ◆ Stel de machine niet bloot aan regen. Gebruik de machine niet in een vochtige of natte omgeving. ◆ Gebruik de machine alleen bij daglicht of goede kunstmatige verlichting. Persoonlijke bescherming ◆ Draag stevige schoenen of laarzen om uw voeten te beschermen.
NEDERLANDS Indien het netsnoer beschadigd is, dient het ter voorkoming van gevaren te worden vervangen door een erkend servicecentrum. Probeer nooit om enig onderdeel te verwijderen of vervangen, anders dan in deze handleiding beschreven. ◆ ◆ Aanvullende veiligheidsinstructies voor strimmers De machine is voorzien van de volgende pictogrammen: Draag een veiligheidsbril als u deze machine bedient. Het snijdraad draait nog een aantal seconden rond nadat de machine is uitgeschakeld.
NEDERLANDS ◆ ◆ ◆ Controleer het verlengsnoer voor gebruik op beschadiging, veroudering en slijtage. Vervang een beschadigd of defect verlengsnoer. Wanneer het verlengsnoer op een haspel zit, rol het snoer dan helemaal af. Zorg dat het snoer uit de buurt van het snijdraad wordt gehouden. Zorg dat u altijd op de hoogte bent van de plaats waar het snoer zich bevindt. INHOUD VAN DE VERPAKKING De verpakking bevat: 1 Grasstrimmer 1 Beschermkap met montageschroef 1 Plantenbeschermer incl.
NEDERLANDS GEBRUIK Laat de machine op haar eigen tempo werken. Niet overbelasten. Instellen van de machine voor strimmen of graskantsnijden (fig. D, E & F) De machine kan worden gebruik voor strimmen zoals afgebeeld in fig. D, of voor graskantsnijden om overhangend gras langs graskanten en bloembedden te strimmen zoals afgebeeld in fig. E. Srimmen (fig. D & F) Voor strimmen staat de strimkop in de stand zoals afgebeeld in fig. D. Indien dit niet het geval is: ◆ Draai de kraag (7) linksom.
NEDERLANDS Algemeen ◆ Voor een optimaal resultaat kunt u het beste alleen droog gras bewerken. ◆ ◆ GL660P/GL670P Gebruik van de plantenbeschermer (fig. J) De plantenbeschermer helpt planten te beschermen tijdens het strimmen. ◆ Zet de plantenbeschermer voor strimmen in positie A. ◆ Zet de plantenbeschermer voor graskantsnijden in positie B of C. ◆ Indien er geen planten in de buurt van het snijdraad zijn, zet u de plantenbeschermer in positie D.
NEDERLANDS ◆ Ga verder te werk zoals hierboven beschreven om de spoel op de machine aan te brengen. Vergeet niet om het snijdraad uit de sleuven (27) te verwijderen. ◆ ◆ ◆ Gebruik uitsluitend het geschikte type Black & Decker-snijdraad. Zorg dat er op beide gedeelten van de spoel snijdraad zit (fig. P). Reinig zorgvuldig het deksel en de behuizing van de spoel. Verwijder de spoel en controleer of de hefboom vrij kan bewegen.
NEDERLANDS ◆ Defecten veroorzaakt door het niet opvolgen van de voorschriften en aanbevelingen in deze handleiding. Het gebruik van accessoires en onderdelen anders dan die van Black & Decker kan de prestaties van het product verminderen, tot beschadiging leiden en de garantie doen vervallen. KLANTENSERVICE Nadere informatie over onze service vindt u op Internet: www.2helpU.com. U kunt ook contact opnemen met onze service- en informatiecentra. Adresinformatie vindt u achter in deze handleiding.
ESPAÑOL RECORTADORA GL650/GL660/GL660P/GL670/GL670P ¡ENHORABUENA! Ha escogido una herramienta Black & Decker. Nuestro objetivo es ofrecerle herramientas de calidad a un precio asequible y estamos seguros que podrá disfrutar de esta herramienta durante muchos años. FINALIDAD Su recortabordes Black & Decker GL650/GL660/ GL660P/GL670/GL670P está diseñado para recortar y rematar bordes de césped y para cortar el césped en espacios reducidos. Esta herramienta está pensada únicamente para consumo doméstico.
ESPAÑOL ◆ ◆ En este manual se explica para qué uso está destinada la herramienta. El uso de otros accesorios, adaptadores, o la propia utilización de la herramienta en cualquier forma diferente de las recomendadas en este manual de instrucciones puede constituir un riesgo de lesiones a las personas. Mantenga a mano este manual para consultas posteriores. Área de trabajo ◆ No exponga herramientas a la humedad. ◆ Utilice la herramienta sólo a la luz del día o con una buena iluminación artificial.
ESPAÑOL Antes de utilizar la herramienta, revise el cable de alimentación de corriente para ver si presenta señas de daños, envejecimiento o desgaste. No utilice la herramienta si el cable de alimentación de corriente está dañado o defectuoso. Si el cable eléctrico está estropeado, hay que sustituirlo en un agente de reparaciones autorizado con el fin de evitar un accidente. No intente nunca extraer o remplazar ninguna de las piezas que no sean las especificadas en este manual.
ESPAÑOL ◆ Se puede incrementar la seguridad eléctrica utilizando disyuntores de alta sensibilidad (30 mA/30 mS) para detectar corrientes de fuga. Utilización de un cable de prolongación Utilice siempre un cable alargador homologado, apropiado para el consumo de corriente de esta herramienta (ver placa de datos de la herramienta). El cable alargador debe ser adecuado para uso en exteriores.
ESPAÑOL ◆ Conecte el enchufe a una toma de corriente. El cable alargador debe ser adecuado para uso en exteriores. USO Deje que la herramienta funcione a su ritmo. No la sobrecargue. Coloque la herramienta en modo de recorte de bordes o ribeteador (fig. D, E & F) La herramienta puede usarse en modo de recorte de bordes, como se indica en la fig. D, o en modo ribeteador, para recortar el césped que sobresale de bordes y parterres, como se indica en la fig. E. Modo de recorte de bordes (fig.
ESPAÑOL ◆ ◆ Mantenga la herramienta alejada de objetos duros y plantas delicadas. Si la herramienta empieza a funcionar lentamente, reduzca la carga. Rebordear Los mejores resultados de corte se consiguen en bordes de profundidad superior a 50 mm. ◆ No use la herramienta para crear bordes. Para crear bordes, use una azada rebordeadora. ◆ Dirija la herramienta como se indica en la fig. E. Mantenga la dirección para rebordear contra los bordes del césped.
ESPAÑOL ◆ ◆ ◆ ◆ Extraiga la línea de corte residual de la bobina de hilo. En primer lugar, arrolle la hoja nueva en la parte superior del carrete: - Introduzca unos 2 cm de línea de corte en una de las rendijasdel carrete, tal y como se indica. - Enrolle la línea de corte en la bobina de hilo en la dirección de la flecha. Asegúrese de arrollar el cable de corte cuidadosamente, formando capas. Evite que el cable de corte se cruce consigo mismo en una capa al ser arroyado en el carrete.
ESPAÑOL ◆ ◆ ◆ ◆ El producto se envíe a un centro de servicio Black & Decker con prueba de su fecha de compra. El producto haya sido adquirido por el proprio usuario y no para alquilarlo. El producto haya sido correctamente utilizado y tratado con cuidado. No se haya intentado repararlo por personal distinto al de los centros de servicio autorizados.
PORTUGUÊS APARADOR DE RELVA GL650/GL660/GL660P/GL670/GL670P PARABÉNS! Você escolheu uma ferramenta Black & Decker. O nosso objectivo é fornecer ferramentas de qualidade a um preço acessível. Esperamos que a utilize por muitos anos. FINALIDADE DA FERRAMENTA O aparador GL650/GL660/GL660P/GL670/ GL670P da Black & Decker foi projectado para aparar e acertar orlas, bem como cortar relva em espaços limitados. Esta ferramenta destina-se apenas para uso doméstico.
PORTUGUÊS ◆ Guarde este manual para referência futura. Área de trabalho ◆ Não exponha a ferramenta à chuva. Não utilize a ferramenta em situações onde haja humidade ou água. ◆ Utilize a ferramenta apenas durante o dia ou com boa iluminação artificial. Protecção pessoal ◆ Utilize botas ou sapatos resistentes para proteger os pés. Não a opere descalço ou se estiver a utilizar sandálias. ◆ Vista calças compridas para proteger as pernas.
PORTUGUÊS ◆ Desligada a ferramenta, o fio de nylon continuará a funcionar por alguns segundos. Nunca tente forçar a sua paralisação. 360˚ 6m/20ft Mantenha as pessoas a uma distância mínima de 6 m da área de corte. SEGURANÇA ELÉCTRICA A ferramenta foi concebida para uma única tensão. Verifique sempre se a tensão da rede corresponde à voltagem indicada na placa de identificação. Essa ferramenta foi concebida apenas para uso em fontes de alimentação CA. Não tente utilizá-la em outras fontes.
PORTUGUÊS ◆ Retire todas as peças da embalagem, com cuidado. VISÃO GERAL (fig. A) 1. Interruptor 2. Cabo 3. Retentor do cabo 4. Entrada de energia 5. Pega suplementar 6. Botão de ajuste da pega (GL670/GL670P) 7. Anel 8. Ganchos para guardar o cabo 9. Compartimento do motor 10. Pedal (GL670/GL670P) 11. Resguardo 12. Lâmina limitadora do fio de nylon 13. Guia de acerto de orlas 14. Compartimento da bobina 15.
PORTUGUÊS ◆ ◆ Gire o corpo do aparador em sentido contrário do relógio até que a cabeça do aparelho esteja na posição de apara. Aperte o anel de travamento girando-o em sentido horário. Modo de acerto de orlas (fig. E & F) Para acertar orlas, a cabeça do aparador deverá estar na posição demonstrada na fig. E. Caso contrário: ◆ Gire o anel de travamento (7) no sentido contrário ao do relógio.
PORTUGUÊS ◆ ◆ No modo de acerto de orlas, ajuste o protector de plantas na posição B ou C. Quando não houver plantas por perto da área de corte, ajuste o protector na posição D. ◆ ◆ MANUTENÇÃO Esta ferramenta Black & Decker foi desenvolvida para funcionar por um longo período, com um mínimo de manutenção. O funcionamento contínuo e satisfatório depende da limpeza regular e cuidado adequado da ferramenta.
PORTUGUÊS RESOLUÇÃO DE PROBLEMAS Se a sua ferramenta não estiver a funcionar adequadamente, siga as instruções abaixo. Se não solucionar o problema, contacte um centro de assistência técnica da Black & Decker. Antes de continuar, desligue a ferramenta da tomada. O aparador está lento ◆ Verifique se o compartimento da bobina pode girar livremente. Limpe-o com cuidado, se necessário. ◆ Verifique se o fio de nylon não se estende além de 9 cm do compartimento da bobina.
PORTUGUÊS OUTRAS FERRAMENTAS PARA JARDIM A Black & Decker possui uma grande variedade de ferramentas que facilitam o trabalho no jardim. Se desejar obter mais informações sobre os produtos a seguir mencionados, contacte o nosso Serviço a Clientes (veja a página de endereços no final deste manual) ou contacte o revendedor local da Black & Decker.
∂§§∏¡π∫∞ ª∏Ã∞¡∏ ºπ¡πƒπ™ª∞∆√™ Ã√ƒ∆√À GL650/GL660/GL660P/GL670/GL670P ™À°Ã∞ƒ∏∆∏ƒπ∞! E¯ÂÙ ÂÈϤÍÂÈ ¤Ó· ÂÚÁ·ÏÂ›Ô Ù˘ Black & Decker. ™Ùfi¯Ô˜ Ì·˜ Â›Ó·È Ó· Û·˜ ÚÔÛʤÚÔ˘Ì ÂÚÁ·Ï›· ÔÈfiÙËÙ·˜ Û ÚÔÛÈÙ¤˜ ÙÈ̤˜. E˘ÂÏÈÛÙԇ̠fiÙÈ ı· ·ÔÏ·‡ÛÂÙ ÙË ¯Ú‹ÛË ·˘ÙÔ‡ ÙÔ˘ ÂÚÁ·Ï›Ԣ ÁÈ· ÔÏÏ¿ ¯ÚfiÓÈ·.
∂§§∏¡π∫∞ ◆ ◆ ∏ ÂӉ‰ÂÈÁ̤ÓË ¯ÚËÛÈÌÔÔ›ËÛË ·Ó·Ê¤ÚÂÙ·È Û ·˘Ù¤˜ ÙȘ Ô‰ËÁ›Â˜ ¯Ú‹Ûˆ˜. ∆fiÛÔ Ë ¯Ú‹ÛË ÂÍ·ÚÙËÌ¿ÙˆÓ ‹ ÚÔÛıËÎÒÓ fiÛÔ Î·È Ë Ú·ÁÌ·ÙÔÔ›ËÛË ÂÚÁ·ÛÈÒÓ Ô˘ ‰ÂÓ Û˘ÓÈÛÙÒÓÙ·È ÛÙȘ Ô‰ËÁ›Â˜ ·˘Ù¤˜ ÂÁ΢ÌÔÓ› ΛӉ˘ÓÔ ÙÚ·˘Ì·ÙÈÛÌÔ‡. Ê˘Ï¿ÍÙ ÙȘ Ô‰ËÁ›Â˜ ηϿ. ÃÒÚÔ˜ ÂÚÁ·Û›·˜ ◆ ªËÓ ÂÎı¤ÙÂÙ ËÏÂÎÙÚÈο ÂÚÁ·Ï›· Û ˘ÁÚ·Û›·. ◆ ÃÚËÛÈÌÔÔț٠ÙÔ ÂÚÁ·ÏÂ›Ô ÌfiÓÔ ÛÙÔ Êˆ˜ Ù˘ Ë̤ڷ˜ ‹ Û ηÏfi Ù¯ÓËÙfi ʈ˜. ∞ÙÔÌÈ΋ ÚÔÛÙ·Û›· ◆ ºÔÚ¤ÛÙ ¯ÔÓÙÚ¿ ˘Ô‰‹Ì·Ù· ‹ ÌfiÙ˜, ÁÈ· Ó· ÚÔÛٷ٤„ÂÙ ٷ fi‰È· Û·˜.
∂§§∏¡π∫∞ ºÚÔÓÙ›ÛÙ ÁÈ· ÙËÓ ÂÈÛ΢‹ ‹ ·ÓÙÈηٿÛÙ·ÛË Ù˘¯fiÓ ÂÏ·Ùو̷ÙÈÎÒÓ ÂÍ·ÚÙËÌ¿ÙˆÓ ·fi ÂÍÔ˘ÛÈÔ‰ÔÙË̤ÓÔ Î¤ÓÙÚÔ ÂÈÛ΢ÒÓ. ¶ÚÈÓ ·fi ÙË ¯Ú‹ÛË, ÂϤÁÍÙ ÚÔÛÂÎÙÈο ÙÔ Î·ÏÒ‰ÈÔ ÙÚÔÊÔ‰ÔÛ›·˜ ÁÈ· ÛËÌ¿‰È· ˙ËÌÈ¿˜, ·Ï·›ˆÛ˘ Î·È ÊıÔÚ¿˜. ªË ¯ÚËÛÈÌÔÔț٠ÙÔ ÂÚÁ·ÏÂ›Ô ·Ó ÙÔ Î·ÏÒ‰ÈÔ ÙÚÔÊÔ‰ÔÛ›·˜ ÙÔ˘ ¤¯ÂÈ ¿ıÂÈ ˙ËÌÈ¿ ‹ ·ÚÔ˘ÛÈ¿˙ÂÈ ÂÏ¿Ùو̷. E¿Ó ÙÔ Î·ÏÒ‰ÈÔ ÙÚÔÊÔ‰ÔÛ›·˜ Â›Ó·È Î·ÙÂÛÙÚ·Ì̤ÓÔ, Ú¤ÂÈ Ó· ·ÓÙÈηٷÛÙ·ı› ·fi ÂÍÔ˘ÛÈÔ‰ÔÙË̤ÓÔ Î¤ÓÙÚÔ ÂÈÛ΢‹˜, ÒÛÙ ӷ ÌËÓ ÚÔ·„ÂÈ Î›Ó‰˘ÓÔ˜.
∂§§∏¡π∫∞ ∞˘Ùfi ÙÔ ÂÚÁ·ÏÂ›Ô ¤¯ÂÈ Û¯Â‰È·ÛÙ› ÁÈ· ¯Ú‹ÛË ÌfiÓÔ Ì ËÏÂÎÙÚÈ΋ ÙÚÔÊÔ‰ÔÛ›· Ì ÂÓ·ÏÏ·ÛÛfiÌÂÓÔ Ú‡̷ (Ú‡̷ ÙÔ˘ ‰ÈÎÙ‡Ô˘). ªËÓ ÂȯÂÈÚ›Ù ӷ ÙÔ ¯ÚËÛÈÌÔÔÈ‹ÛÂÙ Ì ‰È·ÊÔÚÂÙÈ΋ ËÏÂÎÙÚÈ΋ ÙÚÔÊÔ‰ÔÛ›·. ∆Ô ÂÚÁ·ÏÂ›Ô Û·˜ ʤÚÂÈ ‰ÈÏ‹ ÌfiÓˆÛË Î·Ù¿ EN 60335. ∫·Ù¿ Û˘Ó¤ÂÈ· ‰Â ¯ÚÂÈ¿˙ÂÙ·È Î·ÏÒ‰ÈÔ Á›ˆÛ˘. ◆ ◆ ∞ÔʇÁÂÙ ÙË ÛˆÌ·ÙÈ΋ ·ʋ Ì ÁÂȈ̤Ó˜ ‹ Û˘Ó‰Â‰Â̤Ó˜ Ì ÙÔ ¤‰·ÊÔ˜ ÂÈÊ¿ÓÂȘ (.¯. ÌÂÙ·ÏÏÈο ÎÈÁÎÏȉÒÌ·Ù·, Ͽ̘ Î.Ï.).
∂§§∏¡π∫∞ ∆ÔÔı¤ÙËÛË ÙÔ˘ Û˘ÛÙ‹Ì·ÙÔ˜ ÚÔÛÙ·Û›·˜ Ê˘ÙÒÓ (ÂÈÎ. C) ∆Ô Û‡ÛÙËÌ· ÚÔÛÙ·Û›·˜ Ê˘ÙÒÓ ·Ú¤¯ÂÙ·È ˆ˜ ‚·ÛÈÎfi˜ ÂÍÔÏÈÛÌfi˜ ÙˆÓ GL660P Î·È GL670P. °È· Ù· ¿ÏÏ· ÌÔÓ٤Ϸ, ‰È·Ù›ıÂÙ·È ˆ˜ ÚÔ·ÈÚÂÙÈÎfi ÂÍ¿ÚÙËÌ·. ◆ ∆ÔÔıÂÙ‹ÛÙ ÙÔ Û‡ÛÙËÌ· ÚÔÛÙ·Û›·˜ Ê˘ÙÒÓ (17) ¿ӈ ·fi ÙÔÓ ÚÔÊ˘Ï·ÎÙ‹Ú·, fiˆ˜ Ê·›ÓÂÙ·È ÛÙËÓ ÂÈÎfiÓ·. µÂ‚·Èˆı›Ù fiÙÈ Ô ÚÔÛ·Ó·ÙÔÏÈÛÌfi˜ Â›Ó·È ÛˆÛÙfi˜. ◆ ∆ÔÔıÂÙ‹ÛÙ ÙȘ ‰‡Ô Ï·ÛÙÈΤ˜ ٿ˜ (18) ÛÙÔ Û‡ÛÙËÌ· ÚÔÛÙ·Û›·˜ Ê˘ÙÒÓ, ¢ı˘ÁÚ·ÌÌ›˙ÔÓÙ·˜ Ù· ÛËÌ¿‰È· (19) ÛÙȘ ٿ˜ Ì ·˘Ù¿ ÛÙÔÓ ÚÔÊ˘Ï·ÎÙ‹Ú· (11).
∂§§∏¡π∫∞ ◆ ™Ê›ÍÙ ÙÔ ÂÚÈÏ·›ÌÈÔ, ÛÙÚ¤ÊÔÓÙ¿˜ ÙÔ ‰ÂÍÈfiÛÙÚÔÊ·. GL670/GL670P - ƒ‡ıÌÈÛË Ù˘ ÁˆÓ›·˜ Ù˘ ÎÂÊ·Ï‹˜ ÊÈÓÈÚ›ÛÌ·ÙÔ˜ (ÂÈÎ. I) ªÂ ÙË Ú˘ıÌÈ˙fiÌÂÓË ÁˆÓ›· Ù˘ ÎÂÊ·Ï‹˜ ÊÈÓÈÚ›ÛÌ·ÙÔ˜ ÌÔÚ›Ù ӷ Ú˘ıÌ›ÛÂÙ ÙË ‚¤ÏÙÈÛÙË ÁˆÓ›· ÊÈÓÈÚ›ÛÌ·ÙÔ˜, ·ÓÂÍ¿ÚÙËÙ· ÙÔ˘ Ì‹ÎÔ˘˜. ªÔÚ›Ù ›Û˘ Ó· οÓÂÙ ÊÈÓ›ÚÈÛÌ· οو ·fi ¿ÁÎÔ˘˜ Î·È ı¿ÌÓÔ˘˜. ◆ ∞Ê‹ÛÙ ÙÔÓ ÚÔÊ˘Ï·ÎÙ‹Ú· (11) Ó· ·ÎÔ˘Ì‹ÛÂÈ ÛÙÔ ¤‰·ÊÔ˜. ◆ ∫Ú·ÙÒÓÙ·˜ ÙÔ ÂÓÙ¿Ï (10) ·ÙË̤ÓÔ Ì ÙÔ fi‰È Û·˜, ÌÂÙ·ÎÈÓ‹ÛÙ ÙË Ï·‚‹-‰È·ÎfiÙË Â¿Óˆ ‹ οو, ÛÙÔ ÛËÌÂ›Ô Ô˘ ı¤ÏÂÙÂ.
∂§§∏¡π∫∞ ◆ ◆ ◆ ∫·ı·Ú›˙ÂÙ ٷÎÙÈο ÙȘ Ô¤˜ ÂÍ·ÂÚÈÛÌÔ‡ ÛÙÔ ÂÚÁ·ÏÂ›Ô Û·˜ Ì ÌÈ· ‚Ô‡ÚÙÛ· Ì ̷ϷΤ˜ ÙÚ›¯Â˜ ‹ Ì ¤Ó· ÛÙÂÁÓfi ·Ó›. ∫·ı·Ú›˙ÂÙ ٷÎÙÈο ÙÔ Ó‹Ì· ÎÔ‹˜ Î·È ÙËÓ Ơ̂ӷ, ¯ÚËÛÈÌÔÔÈÒÓÙ·˜ ̷Ϸ΋ ‚Ô‡ÚÙÛ· ‹ ÛÙÂÁÓfi ·Ó›. ÃÚËÛÈÌÔÔÈ›ÛÙ ٷÎÙÈο ÌÈ· ͇ÛÙÚ·, fi¯È ÎÔÊÙÂÚ‹, ÁÈ· Ó· ·Ê·ÈÚ¤ÛÂÙ ÙÔ ¯fiÚÙÔ Î·È ÙȘ ·Î·ı·Úۛ˜ ·fi ÙÔ Î¿Ùˆ ̤ÚÔ˜ ÙÔ˘ ÚÔÊ˘Ï·ÎÙ‹Ú·. ∆ÔÔı¤ÙËÛË ÌÈ·˜ Ó¤·˜ Ơ̂ӷ˜ Ó‹Ì·ÙÔ˜ ÎÔ‹˜ (ÂÈÎ.
∂§§∏¡π∫∞ E¡∆√¶π™ª√™ ∫∞π ∞¶√∫∞∆∞™∆∞™∏ ¶ƒ√µ§∏ª∞∆ø¡ ∞Ó ÙÔ ÂÚÁ·ÏÂ›Ô ‰Â›¯ÓÂÈ Ó· ÌË ÏÂÈÙÔ˘ÚÁ› ηÓÔÓÈο, ÂÓÂÚÁ‹ÛÙ ۇÌʈӷ Ì ÙȘ Ô‰ËÁ›Â˜ Ô˘ ·ÎÔÏÔ˘ıÔ‡Ó. ∞Ó, ·Ú fiÏ· ·˘Ù¿, ÙÔ Úfi‚ÏËÌ¿ Û·˜ ‰ÂÓ Ï˘ı›, ·Ú·Î·Ïԇ̠ÂÈÎÔÈÓˆÓ‹ÛÙ Ì ÙÔ ÂÍÔ˘ÛÈÔ‰ÔÙË̤ÓÔ Û¤Ú‚È˜ Ù˘ Black & Decker Ù˘ ÂÚÈÔ¯‹˜ Û·˜. ¶ÚÈÓ Û˘Ó¯›ÛÂÙÂ, ‚Á¿ÏÙ ÙÔ ÂÚÁ·ÏÂ›Ô ·fi ÙËÓ Ú›˙·. ∆Ô ÂÚÁ·ÏÂ›Ô ÏÂÈÙÔ˘ÚÁ› Û ¯·ÌËÏ‹ Ù·¯‡ÙËÙ· ◆ EϤÁÍÙ ·Ó ÙÔ ÂÚ›‚ÏËÌ· Ù˘ Ơ̂ӷ˜ ÂÚÈÛÙÚ¤ÊÂÙ·È ÂχıÂÚ·. ∫·ı·Ú›ÛÙ ÙÔ ÚÔÛÂÎÙÈο, ·Ó ¯ÚÂÈ¿˙ÂÙ·È.
∂§§∏¡π∫∞ µÏ¿‚˜ ÏfiÁˆ ·ÈÊÓ›‰ÈÔ˘ ÙÚ·ÓÙ¿ÁÌ·ÙÔ˜ ‹ ÚÔÊ·ÓÔ‡˜ ηÎÔÌÂÙ·¯Â›ÚÈÛ˘. ◆ µÏ¿‚˜ ÏfiÁˆ ¯Ú‹Û˘ Ô˘ ‰ÂÓ Û˘ÌÌÔÚÊÒÓÂÙ·È Ì ÙȘ Ô‰ËÁ›Â˜ Î·È ÙȘ Û˘ÛÙ¿ÛÂȘ Ô˘ ÂÚȤ¯ÔÓÙ·È ÛÙÔ ‚È‚Ï›Ô Ô‰ËÁÈÒÓ. ∏ ¯Ú‹ÛË ¿ÏÏˆÓ ÂÍ·ÚÙËÌ¿ÙˆÓ Î·È ·ÓÙ·ÏÏ·ÎÙÈÎÒÓ ÂÎÙfi˜ ÙˆÓ ·˘ıÂÓÙÈÎÒÓ Ù˘ Black & Decker, ÌÔÚ› Ó· ÚÔηϤÛÂÈ ‚Ï¿‚Ë ‹ Ó· ÌÂÈÒÛÂÈ ÙËÓ ·fi‰ÔÛË ÙÔ˘ ÂÚÁ·Ï›Ԣ Ù˘ Black & Decker Î·È Ó· ÂÈʤÚÂÈ ÙËÓ ·Î‡ÚˆÛË Ù˘ ÂÁÁ‡ËÛ˘.
TYP. GL650 GL660 GL660P 1 123 140 144 122 142 117 120 141 144 119 122 118 143 121 106 106 117 131 116 108 110 111 117 132 837 836 101 112 117 GL660P 149 113 104 114 148 147 E13015 115 www.2helpU.
GL670 105 123 102 TYP. GL670P 1 129 122 105 121 127 128 103 126 117 120 119 118 106 106 117 131 107 116 124 107 108 125 110 111 101 117 132 112 113 GL670P 135 117 104 114 837 134 109 115 133 E13016 74 www.2helpU.
Australia Belgique/België Danmark Deutschland EÏÏ¿˜ España France Helvetia Italia Nederland New Zealand Norge Österreich Portugal South Africa Suomi Sverige Türkiye United Kingdom 78 806620-08 DEWALT Industrial Power Tool Company 7 Clarice Road, Box Hill, Victoria 3128 Black & Decker (Belgium) N.V. Weihoek 1, 1930 Zaventem Black & Decker Hejrevang 26B, 3450 Allerød Internet: www.blackdecker.dk Black & Decker GmbH Black & Decker Str. 40, D - 65510 Idstein Black & Decker (EÏÏ¿˜) ∞.E.
○ ○ ○ ○ ○ ○ ○ ○ ○ ○ ○ ○ ○ ○ ○ ○ ○ ○ ○ ○ ○ ○ ○ ○ ○ ○ ○ ○ ○ ○ ○ ○ ○ ○ ○ ◆ Ei ............................................................ ◆ Postal code ◆ Postleitzahl ◆ Code postal ◆ Codice postale ◆ Postcode ◆ Código ◆ Código postal ◆ Postnr. ◆ Postnr. ◆ Postnr. ◆ Postinumero ◆ ∫ˆ‰ÈÎfi˜ ............................................................
○ ○ ○ ○ ○ ○ ○ ○ ○ ○ ○ ○ ○ ○ ○ ○ ○ ○ ○ ○ ○ ○ ◆ TAGLIANDO DI GARANZIA ◆ GARANTIBEVIS ◆ ∫∞ƒ∆∞ E°°À∏™∏™ ○ ○ ○ ○ ○ ○ ○ ○ ○ ○ ○ ○ ○ ○ ○ ○ ○ ○ ◆ CARTE DE GARANTIE ◆ CARTÃO DE GARANTIA ◆ TAKUUKORTTI ○ ○ ○ ○ ○ ○ ○ ○ ○ ○ ○ ○ ○ ○ ○ ○ ○ ◆ GARANTIEKARTE ◆ TARJETA DE GARANTÍA ◆ GARANTI KORT Español Português Svenska Norsk Dansk Suomi EÏÏËÓÈη Después de haber comprado su herramienta envíe usted, por favor, esta tarjeta a la central de Black & Decker en su pa