
Quick Start Guide


7
ENGLISH
• Lift the spool (17) approximately 6mm (
1
/4")
from the spool housing (12), while pulling the
cutting line (5). This will allow you to lengthen
the line while clearing any line jammed inside
the spool. Ensure there is a minimum of 9cm
(3.5") protruding from the spool housing.
• To replace the spool, rotate as necessary
and replace the cover by aligning both tabs
on the cover with the slots in the spool
housing and push into place. Ensure that
both tabs are securely located.
Line still jammed on spool
• Disconnect the power supply and remove
the cover, as previously described.
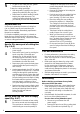
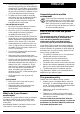
• Lift out the spool (17) completely, holding the
coiled cutting line in place to prevent it
unravelling from the spool (Fig. 7).
• Carefully unwind the cutting line (5) from the
spool until any crossed or trapped loops are
cleared. Rewind the cutting line evenly, in the
direction of the arrows (16) on the spool.
• Temporarily park the cutting line end in one
of the ‘L’ shaped slots to prevent the spool
unravelling. Ensure you leave a minimum of
9cm (3.5") protruding.
• Turn the lever (14) backwards and forwards
to ensure it operates freely.
• Remove any dirt or grass that may have
collected inside the spool housing and cover.
• Feed the end of the line through the eyelet
and then push the spool into the centre drive
shaft while pulling the free end of the line to
release it from the ‘L’ shaped slot. To fully
seat the spool, rotate as necessary, taking
care not to trap the line underneath the
spool, and making sure that there is a
minimum of 9cm (3.5") of line protruding from
the spool housing.
• Finally, replace the cover as previously
described.
Spool jammed
• Remove the spool cover and the spool,
as previously described.
• Remove any dirt or grass that may have
collected inside the cover and the
spool housing.
What to do if your trimmer
needs repair
Information on how and where to send your trimmer
for repair or service is given on the reverse of the
parts diagram. We recommend you keep this in
a safe place.
Australia/New Zealand: See Black & Decker under
‘Tools electric’ in your yellow pages.
Unwanted products and the
environment
Should you find one day that your product
needs replacement, or is of no further use to
you, think of the protection of the environment.
Black & Decker service centres will accept
your old products and will dispose of them in
an environmentally safe way.
Black & Decker Lawn and garden
guarantee
This guarantee provides: 36 months parts cover
and 12 months labour (UK), 24 months parts
cover and labour (Australia) and 12 months
replacement product cover (New Zealand).
In all cases proof of purchase will be required.
If your Black & Decker product becomes defective ,
within the guarantee period, due to faulty materials
and workmanship, we guarantee to either replace all
defective parts, or at our discretion, replace the unit
free of charge, provided that:-
• The product is returned to us or our authorised
repairers with evidence of purchase.
• The product has been used within the
parameters of its consumer classification.
• The product has not been used for hire purposes.
• Repairs have not been attempted by anyone other
than our own service staff or authorised repairers.
• The failure represents normal wear and tear.
This guarantee is offered as an extra benefit and is
additional to your statutory rights.
The guarantee policy
Failures due to the following are not covered:-
• Replacing worn or damaged blades, nylon line
and chains, or cables damaged during storage
or use. These are regarded as replacement items
which wear during normal usage.
• Failures as a result of sudden impact or
obvious abuse.
• Failures due to usage not in accordance with
instructions and recommendations contained in
the instruction manual.
The use of other than genuine Black & Decker
accessories and parts may damage or reduce the
performance of you Black & Decker product and
may render the guarantee void.