R GL340 GL340 UK p02-11 w/p 13 24/3/00, 2:17 pm
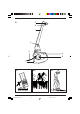
A 2 3 1 4 5 6 8 7 B1 B2 B3 20º 14 GL340 UK p02-11 w/p 14 24/3/00, 2:17 pm
B5 B4 B6 B7 B8 C 1 D 13 5 6 10 9 15 GL340 UK p02-11 w/p 15 24/3/00, 2:17 pm
E 8 F 6 8 14 11 12 5 G H 15 17 J1 16 K 18 J2 16 GL340 UK p02-11 w/p 16 13 24/3/00, 2:17 pm
TYP.
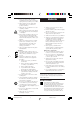
String Trimmer GL340 Congratulations! Know your trimmer Read all of this manual carefully, observing all the recommended safety instructions before, during and after using your trimmer, and maintain your trimmer in good working order. Familiarise yourself with the controls on your trimmer before attempting to operate it, but above all, be sure you know how to stop your trimmer in an emergency. Retain this user manual and all other literature supplied with your trimmer for future reference.
• • • • ! • • • The power supply cable should be regularly inspected for signs of damage or ageing, and only used if in good condition. Always keep the power supply cable away from the line - be aware of its position at all times. Always be sure your trimmer is in a safe operating condition. Always switch off and remove the plug if the supply cable has become damaged or entangled. Before using your trimmer, disconnect it from the electrical supply and visually check that the spool assembly is secure.
Electrical safety (UK only) ! Your trimmer should always be switched off at the mains before disconnecting any plug and socket connector or extension cables. Fuse replacement If your trimmer is supplied with cable fitted with a non-re-wireable plug: • The plug is fitted with a 5 amp fuse which is the recommended fuse for your trimmer. • Only use replacement fuses which are approved to BS1362. • When changing the fuse in your plug, always ensure the fuse cover is refitted.
Existing cable systems (UK only) ENGLISH If you already own an outdoor cable system, we recommend that you replace the existing ‘female’ cable connector with the new ‘female’ connector (see below) which is supplied loose in the carton. (Please read the section entitled “Fitting the ‘female’ connector”.
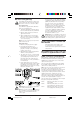
• • Remove cable clamp (see opposite, figure a). Take care of loose parts. To connect the extension cable to the connector terminals, unscrew the terminal screws until the clamp washers have lifted just enough to enter the conductor between the raised washer and the terminal (see below). Connect the brown lead to ‘L’ and the blue lead to ‘N’. Note: There is no need to remove the terminal screws. Connections are not to be made under the screw heads. terminal screw Preparing your trimmer for use (Fig.
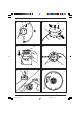
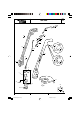
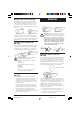
B2 B3 B4 B5 B6 B7 B8 Do not cut wet grass, best results are achieved when the grass is dry. Cut at an angle and with the tip of the nylon line. Your trimmer is balanced to operate at this angle. Swing your trimmer gently from side to side. Do not overload your trimmer. It operates best at high speeds. On long grass, start at the top. ENGLISH How to wind new line onto an empty spool (Fig. H & J) • A maximum of 10 metres of new cutting H Take small cuts.
• or solvent which might contain chemicals that could seriously damage the plastic. Do not spray your trimmer with water. Self lubricating bearings are used in this tool and so lubrication is not required. • Fault finding Before checking your trimmer for any faults, disconnect it from the mains. • If your trimmer will not start, check that the power cord is properly connected. If this does not work, check your power point. Finally, check the fuse and wiring on the cable extension plug (UK only).
The use of other than genuine Black & Decker accessories and parts may damage or reduce the performance of your Black & Decker trimmer and may render the guarantee void. Black & Decker after sales service (UK, Australia and New Zealand only) Black & Decker offers a nationwide network of authorised service agents. The use of other than genuine Black & Decker accessories and parts may damage or reduce the performance of your Black & Decker product and may also endanger the user.
Australia New Zealand South Africa United Kingdom DeWalt Industrial Powertool Co. (Pty) Ltd 7 Clarice Road, Box Hill, Victoria 3136 Black & Decker 483 Great South Road, Penrose, Auckland Black & Decker South Africa (Pty) Ltd Suite no 107, PostNet X65, Halfway House 1685 Black & Decker 210 Bath Road, Slough Berkshire SL1 3YD Tel: Fax: Tel: Fax: Tel: Fax: Tel: Tlx: Fax: Part no.
11 GL340 UK p02-11 w/p 11 24/3/00, 2:17 pm Data protection act: Tick this box if you prefer not to receive information from Black & Decker or other companies.
GUARANTEE CARD South Africa: Black & Decker South Africa (Pty) Ltd, Suite no 107, PostNet X65, Halfway House 1685 United Kingdom & Ireland: PO Box 821, Slough, Berkshire, SL1 3AR 24/3/00, 2:17 pm 12 GL340 UK p02-11 w/p Please complete this section immediately after the purchase of your string trimmer and post it to the Black & Decker address in your country (above). If you live in Australia or New Zealand, please register your purchase by using the alternative guarantee card supplied in the carton.