® GL200 GL300
✗ ✗ ✗ 1 2 3 5 6 7 8 46 20 o 4
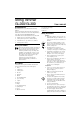
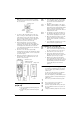
A B 1 2 3 6 8 1 4 5 6 C 10 5 9 8 7 D 14 11 12 8 15 1 6 6 13 47
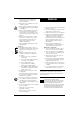
E a c b 14 17 5 8 F G b 18 7 a c 14 16 5 8 6 18 48 5
English Italiano Deutsch Français Nederlands Español Português Eλληνικα ® 1
String Trimmer GL200/GL300 Congratulations! On your purchase of your Black & Decker string trimmer. This user manual provides important operating and maintenance instructions for all of the string trimmers in the Black & Decker GL200/GL300 range. Your trimmer has the following features for your benefit: • Light body for ease and manoeuvrability. • Switch guard to prevent accidental starting. • Powerful motor to cope with most conditions. • Sturdy guard for safety.
• • • ! • • • Always keep the power supply cable away from the line - be aware of its position at all times. Always be sure your trimmer is in a safe operating condition. Always switch off and remove the plug if the supply cable has become damaged or entangled. Before using your trimmer, disconnect it from the electrical supply and visually check that the spool assembly is secure. Never fit metal cutting line or wire to your trimmer.
Electrical safety (UK only) ! Your trimmer should always be switched off at the mains before disconnecting any plug and socket connector or extension cables. Fuse replacement If your trimmer is supplied with cable fitted with a non-re-wireable plug: • The plug is fitted with a 5 amp fuse which is the recommended fuse for your trimmer. • Only use replacement fuses which are approved to BS1362. • When changing the fuse in your plug, always ensure the fuse cover is refitted.
ENGLISH old ‘female’ connector new ‘female’ connector Should you wish to convert more than one cable system, the new female connector is available as an accessory from most major DIY retail outlets and from Black & Decker service agents (cat. no. A6624S). Existing powered garden tools (UK only) plug with the recommended fuse. Never wire a ‘male’ connector to your extension cable and never wire an extension cable with a plug of any kind at each end of the cable.
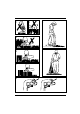
Note: There is no need to remove the terminal screws. Connections are not to be made under the screw heads. terminal screw clamp terminal washer conductor position to left of screw • • • • Locate the cable and cable protector into the body correctly (see below, figure a). Then fit the cable clamp over the outer sheath of the cable and screw down until the screws are fully home. Failure to do this may result in the cover not fitting correctly to the connector body.
5 6 7 8 Take small cuts. • If your trimmer features a cord restraint, loop a length of cord through the restraint to prevent the plug and socket coming apart accidentally if the cord is pulled. Feeding out more nylon line (Fig. F) F Note: There must be a minimum of 5cm (2 inches) of nylon line protruding from the spool cover before your manual-feed trimmer is operated: • Hold the spool housing firmly with one hand, and the nylon line with the other, then pull the nylon line out of the slot.
ENGLISH Unwanted products and the environment Should you find one day that your trimmer needs replacement, or is of no further use to you, think of the protection of the environment. Black & Decker service agents will accept your old trimmer and will dispose of it in an environmentally safe way.
Tagliaerba a filo di nylon GL200/GL300 Manuale d’istruzioni Congratulazioni! Complimenti per aver acquistato un tagliaerba a filo Black & Decker. L’utensile è dotato delle seguenti caratteristiche: • Peso ridotto, per una maggiore manovrabilità e facilità d’uso. • Protezione dell’interruttore per prevenire avviamenti accidentali. • Motore potente, ideale in ogni condizione. • Robusta protezione per una maggiore sicurezza. Norme di sicurezza 360˚ t 6m/20f Conoscere l’utensile 17. Collare 18.
• • • • ! • • • Il cavo deve essere controllato regolarmente ed utilizzato solo se in buone condizioni. Tenete sempre il cavo lontano dalla zona di taglio ed assicuratevi in ogni momento della sua posizione. Accertatevi sempre che l’utensile sia in buone condizioni. Spegnete l’utensile e disinserite sempre la spina se il cavo di alimentazione si è danneggiato o aggrovigliato.
ITALIANO La Black & Decker persegue una politica di continua innovazione dei propri prodotti e si riserva pertanto il diritto di modifica delle specifiche senza preavviso. Doppio isolamento Il vostro utensile è dotato di doppio isolamento. Questo significa che le parti metalliche esterne sono isolate elettricamente dalla fonte di energia. Ciò è possibile grazie all’inserimento di due barriere esterne protettive tra le parti elettriche e quelle metalliche.
Nota: Quando si avvia l’utensile per la prima volta l’eventuale eccesso di filo sarà automaticamente tagliato dalla lama posta sulla protezione. Ciò accade anche per ogni successivo assestamento del filo. Venendo tagliato al momento dell’accensione, il filo di nylon può essere espulso violentemente; è bene quindi non fare uscire troppo filo dal rocchetto. Nel caso che abbiate tirato fuori troppo filo, prima di azionare l’utensile, tagliatelo riportandolo alla lunghezza della protezione.
Potete telefonare per ottenere tutte le informazioni necessarie e prendere accordi per portare o inviare il vostro prodotto al Centro di Assistenza scelto. ITALIANO Altri prodotti Black & Decker Black & Decker dispone di una gamma completa di utensili per il giardinaggio. Se desideraste ulteriori informazioni su tali utensili, contattate il Servizio Informazioni Black & Decker all’indirizzo posto sul retro di questo manuale o contattate il vostro rivenditore Black & Decker.
Rasentrimmer GL200/GL300 Herzlichen Glückwunsch! Zum Erwerb Ihres neuen Black & Decker Rasentrimmers. Der Trimmer bietet Ihnen folgende Ausstattungsmerkmale, die Ihnen die Gartenarbeit erleichtern: • Geringes Gewicht für bequeme Handhabung. • Schalterschutzbügel zur Verhinderung unbeabsichtigten Einschaltens. • Kraftvoller Motor zur Bewältigung fast aller Arbeitsbedingungen. • Schutzhaube. Bedienungsanleitung 13. 14. 15. 16. 17. 18.
• • • • • • • • • • ! • • • Seien Sie beim Rasentrimmen vorsichtig, da frisch gemähtes Gras feucht und rutschig ist. Tragen Sie zu Ihrer eigenen Sicherheit rutschfestes Schuhwerk. Benutzen Sie während des Arbeitens Schutzkleidung. Tragen Sie immer eine Schutzbrille. Bei starker Staubentwicklung, empfehlen wir Ihnen das Tragen einer Gesichtsmaske. Sollte die Lärmentwicklung während der Nutzung des Trimmers zu laut sein, so empfehlen wir Ihnen das Tragen eines Hörschutzes.
• • • • • Trimmen Sie keine extrem steilen Abhänge. Gehen Sie immer im Schritt mit dem Rasentrimmer, betreiben Sie ihn niemals im Laufen. Überlasten Sie nicht das Gerät. Benutzen Sie das Gerät niemals mit defekter Schutzhaube oder defekter Spule. Benutzen Sie Ihr Gerät immer so, wie in der Bedienungsanleitung beschrieben. Der Trimmer darf nur in aufrechter Position betrieben werden, da sonst Verletzungsgefahr besteht.
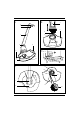
• • Spule in die Spulenhalterung am Trimmergehäuse stecken. Greifen Sie die Spule mit der einen und die Spulenhalterung mit der anderen Hand. Drücken Sie die Spule in Richtung des Pfeiles a. Drehen Sie anschließend die Spule vorsichtig so lange im Uhrzeigersinn - in Pfeilrichtung b - bis die Spule einklickt. DEUTSCH F Einsatz Ihres Rasentrimmers (Abb. 1 - 8) 1 2 3 4 5 6 7 8 Um Ihren Rasentrimmer einzuschalten, drücken Sie den Betriebsschalter.
DEUTSCH Ersatzschneidfaden Sie erhalten bei Ihrem Black & Decker Händler eine neue Spule mit 5,5 Metern Schneidfaden. Lose Fäden in den Längen von 25 bis 50 Meter sind ebenfalls erhältlich. Um ein Höchstmaß an Zuverlässigkeit zu erhalten, sollten Sie nie einen dickeren oder dünneren Schneidfaden (z.B eine Angelschnur) verwenden. Dies könnte zu einem Ausfall des Motors führen oder die Schnittleistung erheblich beeinträchtigen.
Rotofil GL200/GL300 Instructions de sécurité Nous vous félicitons pour cette acquisition d’un Rotofil Black & Decker. Ce Rotofil possède les caractéristiques suivantes: • Léger pour plus de maniabilité. • Système de blocage du câble d’alimentation pour éviter tout démarrage intempestif. • Moteur puissant pour répondre à la plupart des situations. • Carter protecteur de sécurité. Description Voici les pièces qui seront mentionnées dans le guide d’utilisation: 1. Corps 2. Interrupteur 3.
• • • • • • • • • • • • • • • • 20 Le fil de nylon continue de tourner pendant un bref laps de temps après que l’interrupteur soit relâché. En aucun cas vous ne devez essayer d’immobiliser le fil de nylon. Laissez-le s’arrêter seul. Ne portez jamais votre appareil par le câble, ni ne secouez le câble pour séparer les raccords. Conservez la machine à l’écart des sources de chaleur et des surfaces grasses. Vérifiez l’état de votre fil éléctrique avant utilisation; ne l’utilisez pas s’il est endommagé.
FRANÇAIS Assemblage du capuchon de la bobine (Fig. E) E • • • • Faites passer le fil dans le trou, à l’intérieur du capuchon, puis libèrez le fil de l’incision de blocage dans laquelle il se trouve, sur la partie supérieure de la bobine. Placez le capuchon sur la bobine. Avant de fixer le capuchon sur la bobine, assurez vous que vous avez fait sortir suffisamment de fil de la bobine.
FRANÇAIS Conseils d’entretien • Pour de meilleurs résultats, veillez à la propreté • • du fil de nylon, de la bobine et des oules d’aération. Utilisez une brosse ou un chiffon sec pour nettoyer. Les parties plastiques peuvent être nettoyées en utilisant du savon liquide et un chiffon humidifié d’eau chaude. N’utilisez jamais un autre type de détergent. Ce rotofil est muni de roulements à billes autolubrifiés si bien que l’outil ne nécessite pas de lubrification.
Strimmer GL200/GL300 Veiligheidsvoorschriften! Gefeliciteerd met de aankoop van deze strimmer van Black & Decker. Deze strimmer heeft de volgende praktische eigenschappen: • Een lichtgewicht model voor gebruiksgemak en wendbaarheid. • Een veiligheidsschakelaar waardoor de machine niet per ongeluk kan worden ingeschakeld. • Een krachtige motor die ook voor het zwaardere werk geschikt is. • Een beschermkap voor extra veiligheid. Ken uw machine Lees deze handleiding zorgvuldig.
• • • • 360˚ • 6m/20f t • • • • • • • • • • • • 24 Houd het snoer uit de buurt van de nylondraad - controleer steeds waar het snoer zich bevindt. Blijf bij de machine zolang de stekker in het stopcontact zit. De strimmer werkt uitsluitend op wisselstroom - sluit de machine niet aan op andere energiebronnen. De strimmer is geschikt voor 220 volt. Laat alleen personen die deze gebruiksaanwijzing hebben gelezen met de strimmer werken.
D • • • De beschermkap is op de juiste manier gemonteerd wanneer de richels op de kap precies in de gleuven van het motorhuis vallen en de blokkeerpal goed zit. Wanneer de beschermkap op de juiste plaats zit, kunt u de schroef door de opening in de beschermkap vastdraaien in het schroefgat van het motorhuis van de strimmer. Om schade tijdens het transport te voorkomen, is de spoel in een polytheen zak verpakt. Montage van de spoel (Fig.
NEDERLANDS Ongewenste producten en het milieu Denk a.u.b aan het milieu als u op een dag besluit dat u het product wilt vervangen of niet langer nodig heeft. De Black & DeckerCentra zullen al uw oude producten aanvaarden en ze op een milieu-vriendelijke manier verwerken. Black & Decker garantie voor gras en tuin Deze garantie dekt onderdelen gedurende 12 en herstellingen gedurende 6 maanden. Een aankoopbewijs is steeds vereist.
Recortabordes GL200/GL300 Enhorabuena! Enhorabuena por haber adquirido este Recortabordes Biack & Decker, una máquina que le ofrece las siguientes ventajas: • Poco peso y gran maniobrabilidad. • Protector del interruptor para evitar la puesta en marcha accidental. • Potente motor para resolver cualquier problema. • Robusto protector para mayor seguridad. Importante: Antes de usar este producto, lea con atencion todas estas instrucciones.
• 360˚ • 6m/20f t • • • • • • • • • • • • • ! alimentación y compruebe si el voltaje de la máquina corresponde con el c corriente. El voltaje de la máquina está indicado en la placa de características. • No deje nunca que usen la máquina niños ni personas que no estén familiarizadas co ni aquéllos que no hayan leido este folleto. El hilo de nylon sigue girando algunos momentos después de haber apagado la máquina ningún caso intente parar el hilo con la mano. Deje que lo haga por sí mismo.
B • C • D • • • Coloque el protector sobre el alojamiento de la bobina en el recortabordes, procurando que el hilo de nylon no quede pillado entre las dos partes. Haga coincidir la marca cuadrada del protector con la que hay en el cuerpo del recortabordes y tire del protector hacia arriba hasta que quede casi tocando la parte inferior del cuerpo. Gire entonces el protector en la dirección de la flecha.
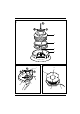
ESPAÑOL G Ponga una nueva bobina de hilo según se indica en Cómo montar la tapa de la bobina. También puede enrollar el hilo de nylon en la bobina vacia del siguiente modo: • Coloque el extremo del hilo en una de las ranuras de la bobina y enróllelo en dirección (a izquierdas) hasta que la bobina esté llena. • Ponga la tapa interior de la bobina y monte ésta en el recortabordes, como se indica en montar la tapa de la bobina.
Aparador GL200/GL300 Manual de instruções Parabéns! 6m/20f t Pela compra deste aparador Black & Decker. Ele inclui as seguintes características: • Corpo leve para maior facilidade de uso. • Resguardo do interruptor para prevenção de arranque acidental. • Potente motor para todo o tipo de condições. • Resguardo resistente para maior segurança. 360˚ Descrição 1. 2. 3. 4. 5. 6. 7. 8. 9. 10. 11. 12. 13. 14. 15. 16. 17. 18.
• Verifique o posicionamento do cabo eléctrico ou extensão, antes de iniciar o trabalho. Utilização • Verifique se na relva não existem obstáculos que podem danificar a máquina. • Certifique-se que ao trabalhar com o aparelho, o cabo eléctrico não fica ao alcance da zona de corte. • Nunca tente parar o fio. Deixe-o parar por si. • Opere com a sua máquina apenas à luz do dia ou com boa iluminação artificial. • Trabalhe sempre numa posição de equilibrio. Não facilite o acidente. • Não force a máquina.
PORTUGUÊS • Segure firmemente a bobina de fio com uma mão e com a outra, puxe o fio para fora da ranhura. • Puxe o fio de nylon na direcção da seta conforme mostra o diagrama. • Puxe até que haja fio suficiente para chegar até à esquina do resguardo e depois prenda-o na ranhura da bobina, tal como indicado pela seta (C). Nota: Quando o aparador for accionado, qualquer excesso de fio que tenha sido puxado será cortado pela lâmina limitadora situada num dos lados do resguardo.
PORTUGUÊS também, encontrar os acessórios e peças necessárias para que possa usufruir de todas as potencialidades da sua máquina. Peças ou acessórios não genuinos Black & Decker podem danificar ou reduzir as capacidades da sua máquina e pôr em perigo a sua utilização. A garantia da máquina pode ser afectada em tais circunstancias.
Mηχανή Φινιρίσµατοσ XÞρτου Oδηγίεσ χρήσεωσ GL200/GL300 Συγχαρητήρια µε την ευκαιρία που αγοράσατε την µηχανή φινιρίσµατοσ χÞρτου σασ απÞ την Black & Decker. H µηχανή αυτή έχει τα ακÞλουθα χαρακτηριστικά για το δικÞ σασ Þφελοσ: • EλαφρÞ αµάξωµα για ευκολία και κινητικÞτητα. • Προφυλακτήρα διακÞπτη για την παρεµπÞδιση τυχαίου ξεκινήµατοσ. • ∆υναµικÞ κινητήρα για να λειτουργεί στισ πλείστεσ συνθήκεσ. • lσχυρÞ φυλακτήρα για ασφάλεια.
• • • Nα διατηρείτε πάντοτε το καλώδιο παροχήσ ρεύµατοσ µακρυά απÞ τη γραµµή νάυλον - να προσέχετε τη θέση του πάντοτε. Ποτέ µη µεταφέρετε τη µηχανή σασ απÞ το καλώδιο ή να σηκώνετε το καλώδιο για να χωρίζετε τουσ συνδετήρεσ. ∆ιατηρείτε το καλώδιο µακρυά απÞ πηγέσ φωτιάσ, απÞ λάδια ή κοφτερά αντικείµενα. Eξετάστε την κατάσταση του καλωδίου σασ πριν απÞ τη χρήση και µην την χρησιµοποιείτε άν έπαθε βλάβη.
• • • • χρησιµοποιείτε σκούπα για την αφαίρεση του γρασιδιού και των ακαθαρσιών. Πάντοτε να την αποσυνδέετε απÞ το ρευµατοδÞτη και να βεβαιώνεστε Þτι η γραµµή είναι σταµατηµένη πριν απÞ το καθάρισµα. Mη λειτουργείτε τη µηχανή σασ αν µερικά εξαρτήµατά τησ είναι ελαττωµατικά. Aφαιρέστε τυχÞν ελαττωµατικά µέρη και ρυθµίστε νέα εξαρτήµατα πριν απÞ την χρήση. Ποτέ µην χρησιµοποιείτε τη µηχανή µε κατα στραµµένο προφυλακτήρα ή αν ο προφυλακτή ρασ τησ µηχανήσ δεν βρίσκεται στη θέση του.
ρυθµίζετε στη θέση που είναι για σασ η πιο βολική. Για να το κάνετε αυτÞ, χαλαρώστε το κουµπί σύσφιξησ και κινήστε το χερούλι στο σωληνάριο µέχρι που να βρεθεί η πιο βολική θέση. Tώρα ξανασφίξτε το κουµπί σύσφιξησ µέχρι που το χερούλι να είναι ασφαλισµένο. Mήν σφίγγετε υπερβολικά. F Πώσ να χρησιµοποιήσετε τη µηχανή σασ (EικÞνεσ 1 - 8) 1 2 3 4 5 6 7 8 Για να έχετε τα καλύτερα αποτελέσµατα απÞ τη µηχανή σασ, παρακαλώ µάθετε τισ ακÞλουθεσ τεχνικέσ. Mήν είστε ανυπÞµονοι.
Φροντίδα και συντήρηση • Για καλύτερα αποτελέσµατα, παρακαλώ • • διατηρείτε καθαρά, τη γραµµή νάυλον, το πηνίο και τισ οπέσ εισÞδου αέρα στο αµάξωµα τησ µηχανήσ σασ. Xρησιµοποιείτε στεγνή βούρτσα ή ύφασµα για την αφαίρεση γρασιδιού, χυµούσ ή άλλησ ακαθαρσίασ. Tα πλαστικά µέρη µπορούν να καθαρίζονται χρησιµοποιώντασ µαλακÞ σαπούνι και βρεγµένο ύφασµα µε ζεστÞ νερÞ. Mη χρησιµοποιείτε πλαστικά µέσα. Mην βρέχετε τη µηχανή µε νερÞ.
EΛΛHNIKA ∆ήλωση ΣυµµÞρφωσησ τησ EK Yπεύθυνα δηλώνουµε Þτι οι συσκευέσ: GL200, GL300, GL320, GL325, GL330, GL335, GL555, GL565, ST20, ST22, ST23, ST25, ST32 συµµορφούνται προσ τισ διατάξεισ 89/392/EEC, 89/336/EEC, EN60335, EN55014, EN55104, 73/23/EEC Για καταµετρηµένη πίεση ήχου 108dB (A) Για καταµετρηµένη ισχύσ ήχου 95dB (A) Kαταµέτρηση δÞνησησ χεριού/βραχίονα <2.
TYP.
Australia Belgique/België Danmark Deutschland Eλλάσ España France Helvetia Italia Nederland New Zealand Norge Österreich Portugal South Africa Suomi Sverige Türkiye United Kingdom Black & Decker (A’asia) Pty Ltd Tel: 286-288 Maroondah Highway, North Croydon, Victoria 3136 Fax: Black & Decker Belgium NV Tel: Weihoek 1, 1930 Zaventem Fax: Black & Decker Tlf: Hejrevang 26 B, 3450 Allerød Fax: Black & Decker GmbH Tel: Black & Decker Straße 40, 65510 Idstein Fax: Black & Decker (Eλλάσ) AE Tηλ: Λεωφ.
43 Er maskinen en gave?/Ist diese Maschine ein Geschenk?/H µηχανή είναι δώρο?/Is this product a gift?/¿Ha recibido usted esta herramienta como regalo?/S’agit-il d’un cadeau?/Si tratta di un regalo?/Kreeg u deze Postnr./Postleitzahl/KωδικÞσ/Postcode/ Code postal/Código/Codice postale/Postcode/ Postnr./Código postal/Postinumero/Postnr.
• GARANTI KORT • GARANTIEKARTE • KAPTA EΓΓYHΣHΣ • GUARANTEE CARD • TARJETA DE GARANTÍA • CARTE DE GARANTIE • TAGLIANDO DI GARANZIA • GARANTIE-KAART • GARANTI KORT • CARTÃO DE GARANTIA • TAKUUKORTTI • GARANTIBEVIS Deutsch Danmark Bitte schneiden Sie diesen Abschnitt ab, stecken ihn in einen frankierten Umschlag und schicken ihn direkt an die Black & Decker Adresse Ihres Landes. Venligst klip denne del ud og send frankeret til Black & Decker i dit land.