GARDEN CULTIVATOR INSTRUCTION MANUAL CATALOG NUMBER GC150 Thank you for choosing BLACK+DECKER! PLEASE READ BEFORE RETURNING THIS PRODUCT FOR ANY REASON. If you have a question or experience a problem with your BLACK+DECKER purchase, go to http://www.blackanddecker.com/instantanswers If you can’t find the answer or do not have access to the Internet, call 1-800-544-6986 from 8 a.m. to 5 p.m. EST Mon. - Fri. to speak with an agent. Please have the catalog number available when you call.
SAFETY GUIDELINES - DEFINITIONS It is important for you to read and understand this manual. The information it contains relates to protecting YOUR SAFETY and PREVENTING PROBLEMS. The symbols below are used to help you recognize this information. DANGER: Indicates an imminently hazardous situation which, if not avoided, will result in death or serious injury. WARNING: Indicates a potentially hazardous situation which, if not avoided, could result in death or serious injury.
g) If devices are provided for the connection of dust extraction and collection facilities, ensure these are connected and properly used. Use of dust collection can reduce dustrelated hazards. 4) POWER TOOL USE AND CARE a) Do not force the power tool. Use the correct power tool for your application. The correct power tool will do the job better and safer at the rate for which it was designed. b) Do not use the power tool if the switch does not turn it on and off.
• • • • • • • SYMBOLS The label on your tool may include the following symbols. The symbols and their definitions are as follows: V..................volts A..................amperes Hz................hertz W.................watts min..............minutes or AC......alternating current or DC....direct current no................no load speed ................Class I Construction (grounded) .................earthing terminal ...............safety alert symbol ................
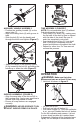
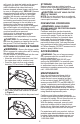
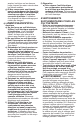
B E 6 TINE ASSEMBLY (FIGURE F) NOTE: Do not assemble tines (5) without first attaching the shroud (4). • Place tine (5) on shaft (10), making sure the flat side of the hole of tine is aligned with flat side of the shaft. Be sure to push tine completely onto shaft. • Insert straight end of pin (11) into shaft hole. Push in pin completely until the looped end bottoms out against the shaft. • Repeat for other tine. For tine removal reverse the process.
soil is wet - for electrical safety and to prevent clogging of the tines. If you must cultivate under conditions that cause the tines to become clogged, release trigger, wait for tines to come to complete stop! UNPLUG! Remove clogged material with a stick or screwdriver. Continuing to operate the tool in a clogged condition will seriously overload the motor.
TWO-YEAR LIMITED HOME USE WARRANTY repair or replacement at our option. Proof of purchase may be required. This warranty does not apply to accessories. This warranty gives you specific legal rights and you may have other rights which vary from state to state or province to province. Should you have any questions, contact the manager of your nearest BLACK+DECKER Service Center. This product is not intended for commercial use.
CULTIVATEUR DE JARDIN MODE D’EMPLOI NUMERO DE CATALOGUE GC150 Merci d’avoir choisi BLACK+DECKER! Consulter le site Web www.BlackandDecker.com/NewOwner pour enregistrer votre nouveau produit. À LIRE AVANT DE RETOURNER CE PRODUIT POUR QUELQUE RAISON QUE CE SOIT : Si des questions ou des problèmes surgissent après l’achat d’un produit BLACK+DECKER, consulter le site Web www.blackanddecker.com/instantanswers pour obtenir des réponses instantanément 24 heures par jour.
Avertissements de sécurité généraux pour les outils électriques AVERTISSEMENT : Lire tous les avertissements de sécurité et toutes les directives. Le non-respect des avertissements et des directives pourrait se solder par un choc électrique, un incendie et/ou une blessure grave. Conserver tous les avertissements et toutes les directives pour un usage ultérieur.
amples, les bijoux ou les cheveux longs risquent de rester coincés dans les pièces mobiles. g) Si des composants sont fournis pour le raccordement de dispositifs de dépoussiérage et de ramassage, s’assurer que ceux-ci sont bien raccordés et utilisés. L’utilisation d’un dispositif de dépoussiérage peut réduire les dangers engendrés par les poussières. 4) Utilisation et entretien d’un outil électrique a) Ne pas forcer un outil électrique. Utiliser l’outil électrique approprié à l’application.
i) Faire un nœud comme illustré en Figure A; ou ii) Utiliser un dispositif de retenue de fiche ou les connecteurs décrits dans ce manuel. A • Éviter tout démarrage accidentel – Ne pas transporter un appareil sous tension avec le doigt sur l’interrupteur. S’assurer que l’interrupteur est à l’arrêt avant tout branchement. • Prendre soin du cordon – Ne pas transporter l’appareil par son cordon ou arracher celui-ci pour le débrancher. Protéger le cordon de la chaleur, de l’huile et de tout objet coupant.
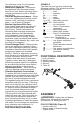
• Insérez le boulon (9) sur la poignée et ............... symbole d´avertissement dans le bloc puis resserrez (FIG. C). .../min........... tours à la minute ............... Lire le mode d’emploi avant C l’utilisation .............Utiliser une protection . respiratoire adéquate. ............Utiliser une protection oculaire . adéquate. .............Utiliser une protection auditive . 9 adéquate. 7 DESCRIPTION FONCTIONNELLE 1. Bouton de verrouillage 2. Détente 3. Poignée auxiliaire 4. Flasque 5.
• Insérer l’extrémité droite de la goupille (11) dans le trou de l’arbre. Insérer la goupille au complet jusqu’à ce que l’extrémité bouclée vienne en butée contre l’arbre. • Refaire le même montage pour l’autre dent. Pour retirer les dents, inverser la procédure. F 11 10 FONCTIONNEMENT AVERTISSEMENT : s’assurer que toutes les personnes et animaux sont éloignés d’au moins 6 m (20 pi). • Tenir l’outil comme indiqué à la FIG. G. G présence de conditions de travail exigeantes.
GARANTIE LIMITÉE DE DEUX ANS REMARQUE : ne pas ranger l’outil sur des engrais ou des produits chimiques ou près de ceux-ci. Un rangement de cette sorte risque de provoquer une corrosion rapide. PRÉVENTION DE LA CORROSION AVERTISSEMENT : PORTER DES GANTS ET UNE PROTECTION OCULAIRE ADÉQUATS LORS DU NETTOYAGE DE L’OUTIL. Les engrais et autres produits chimiques de jardin renferment des agents qui accélèrent gravement la corrosion du métal.
DÉPANNAGE Problème Cause possible • L’appareil refuse de • Cordon d’alimentation démarrer. non branché. • Le fusible du circuit est grillé. • Le disjoncteur est déclenché. • Le cordon d’alimentation ou la prise de courant est endommagé(e). • Bouton de verrouillage non activé. Solution possible • Brancher l’outil dans une prise qui fonctionne.
CULTIVADOR PARA JARDÍN MANUAL DE INSTRUCCIONES CATÁLOGO N° GC150 Gracias por elegir BLACK+DECKER! Visite www.BlackandDecker.com/NewOwner para registrar su nuevo producto. LEA EL MANUAL ANTES DE DEVOLVER ESTE PRODUCTO POR CUALQUIER MOTIVO: Si tiene una consulta o algún inconveniente con su producto BLACK+DECKER, visite http://www.blackanddecker.com/instantanswers para obtener respuestas instantáneas las 24 horas del día.
Advertencias generales de seguridad para herramientas eléctricas ADVERTENCIA: Lea todas las advertencias de seguridad e instrucciones El incumplimiento de las advertencias e instrucciones puede provocar descargas eléctricas, incendios o lesiones graves. CONSERVE TODAS LAS ADVERTENCIAS E INSTRUCCIONES PARA FUTURAS CONSULTAS.
polvo puede reducir los peligros relacionados con el polvo. 4) Uso y mantenimiento de la herramienta eléctrica a) No fuerce la herramienta eléctrica. Utilice la herramienta eléctrica correcta para el trabajo que realizará. La herramienta eléctrica correcta hará el trabajo mejor y más seguro a la velocidad para la que fue diseñada. b) No utilice la herramienta eléctrica si no puede encenderla o apagarla con el interruptor.
A menos que se indique de otro modo en este manual de instrucciones. • Piezas de repuesto – Al realizar trabajos de servicio, utilice únicamente piezas de repuesto idénticas. • Conexiones del aparato polarizadas – Para reducir el riesgo de descarga eléctrica, este aparato cuenta con un enchufe polarizado (una clavija es más ancha que la otra) y requerirá el uso de un cable de extensión polarizado. El enchufe del aparato solo encajará en el cable de extensión polarizado en un sentido.
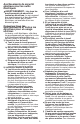
DESCRIPCIÓN DE LA FUNCIONES aflojando el perno (9) y deslizando el mango hacia arriba o hacia abajo del tubo (Figura D). 1. Botón de bloqueo 2. Interruptor disparador 3. Mango auxiliar 4. Cubierta 5. Conjunto de dientes (2) 1 D 3 2 5 4 ENSAMBLAJE ADVERTENCIA: desenchufe la unidad antes de realizar cualquier ajuste, cambiar accesorios o guardar la unidad. EXTENSIÓN DE LOS POSTES (FIG. B) • Afloje el anillo (6). • Extienda los postes hasta el largo deseado. • Ajuste el anillo.
dientes dejando caer o golpeando la herramienta contra el suelo. Esto puede dañar la unidad. F 11 10 OPERACIÓN ADVERTENCIA: CIA: Asegúrese de que las demás personas y mascotas estén a no menos de 6,1 m (20 pies) de distancia. • Sostenga la herramienta como se muestra en la Figura G. G RETENEDOR PARA CABLE PROLONGADOR ADVERTENCIA: Asegúrese de que el interruptor de gatillo no esté accionado para reducir el riesgo de encender la herramienta accidentalmente.
ACCESORIOS La primera opción, el reemplazo, es ADVERTENCIA: El uso de accesorios devolver el producto al comercio donde se adquirió (siempre y cuando se trate de un comercio participante). Las devoluciones deben realizarse conforme a la política de devolución del comercio (generalmente, entre 30 y 90 días posteriores a la venta). Le pueden solicitar comprobante de compra. Consulte en el comercio acerca de la política especial sobre devoluciones una vez excedido el plazo establecido.
· GARANTÍA BLACK+DECKER · BLACK+DECKER WARRANTY . SOLAMENTE PARA PROPOSITOS DE MEXICO Distributor Name · Sello firma del distribuidor Date of purchase · Fecha de compra Invoice No. · No. de factura PRODUCT INFOMATION · IDENTIFICACIÓN DEL PRODUCTO Cat. No. · Catalogo ó Modelo Serial Number · No. de serie Name · Nombre Last Name · Apellido Address · Dirección City · Ciudad State · Estado Postal Code · Código Postal Country · País Telephone · No.
SOLAMENTE PARA PROPOSITOS DE MEXICO Herramientas y Equipos Profesionales Grupo Realsa en herramientas, Av. Colón 2915 Ote. S.A. de C.V. Col. Francisco I. Madero Súper Manzana 69 MZ.01 Lote 30 Monterrey, Nvo. León (Av. Torcasita) Tel. 01 81 83 54 60 06 Col. Puerto Juárez Cancún, Quintana Roo Htas. Portátiles de Chihuahua, Tel. 01 998 884 72 27 S.A. de C.V. Av. Universidad No. 2903 Ferre Pat de Puebla, S.A. de C.V. Col. Fracc. Universidad 16 de Septiembre No. 6149 Chihuahua, Chihuahua Col. El Cerrito Tel.