
Quick Start Guide

6
ENGLISH
(Original instructions)
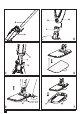
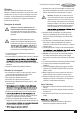
Removing a cleaning pad (Fig. E)
Caution! Always wear suitable shoes when changing the
cleaning pad on your steam mop. Do not wear slippers or
open toed footwear.
u Return the handle (4) to the upright position and turn the
steam mop ‘OFF’.
u Place the steam mop on the resting mat and wait until it
cools down. (approximately ve minutes)
u Place the front of your shoe onto the cleaning pad removal
tab (14) and press down rmly.
u Lift the steam mop up off the cleaning pad.
Caution! Always place the steam mop on the resting mat (7)
with the handle (4) in the upright position when stationary and
make sure the steam mop is turned off when not in use.
Attaching the carpet glider (Fig. F) (FSM1620 Only)
u Place carpet glider on the oor.
u Lightly press the steam mop down onto the carpet glider
(11) until it clicks into place.
Caution! Always place the steam mop on the resting mat (8)
with the handle (4) in the upright position when stationary and
make sure the steam mop is turned off when not in use.
Removing the carpet glider (Fig. F) (FSM1620 Only)
Caution! Always wear suitable shoes when changing the
carpet glider on your steam mop. Do not wear slippers or
open toed footwear.
u Return the handle (4) to the upright position and turn the
steam mop ‘OFF’.
u Place the steam mop on the resting mat and wait until it
cools down. (approximately ve minutes)
u Place the front of your shoe onto the carpet glider removal
tab (15) and press down rmly.
u Lift the steam mop up off the carpet glider (9).
Caution! Always place the steam mop on the resting mat (8)
with the handle (4) in the upright position when stationary and
make sure the steam mop is turned off when not in use.
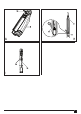
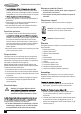
Filling the water tank (Fig. G)
The watertank on your steam mop is removable for convi-
enient and easy lling.
This Steam Mop incorporates an anti-calc system to help
prolong the life of the system.
Note: Fill the water tank with clean tap water.
Note: In areas of very hard water, the use of de-ionised water
is recommended.
u Remove the water tank (3).
u Open the ller cap (16) by lifting it up.
u Fill the water tank (3) with water.
Warning! Your water tank has a 0.5 litre capacity. Do not over
ll the tank.
u Re-t the ller cap (14).
u Re-t the water tank (3).
Note: Ensure the ller cap is rmly secured.
Use
Important! This unit will kill 99.9% of bacteria & germs when
used in accordance with this manual and with the micro bre
pad tted and a continuous run time of 90 seconds.
Switching on and off
u To switch the appliance on, press the ON/OFF button (1).
It takes approximately 15 seconds for the steam mop to
heat up.
Note: When the steam mop is rst turned on the water res-
ervoir will glow red. Once the steam mop is ready to use the
water reservoir will glow blue.
u To switch the appliance off, press the ON/OFF button (1).
Caution! Never leave the steam mop in one spot on any
surface for any period of time. Always place the steam mop on
the resting mat (7) with the handle (4) in the upright position
when stationary and make sure the steam mop is turned off
when not in use.
Caution! Always empty the steam mop after use.
Autoselect
TM
Technology
This steam mop is tted with an Autoselect
TM
dial (2) which
shows various cleaning applications. They are used to select
the correct operating mode for your particular cleaning opera-
tion.
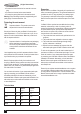
Using the Autoselect
TM
dial (2), choose from one of the follow-
ing applications:
Wood/Laminate
Stone/Marble
Tiles/Vinyl
The steam mop will select the correct volume of steam
required for your particular cleaning operation.
Note: Always check you are using the correct setting before
using your steam mop.