
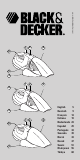
Operation Manual

6
ENGLISH
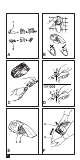
2. Release button
3. Dust bowl
4. Charging base
5. Filter cleaning wheel (CV9605/CV1205)
6. Charging indicator
Fig. A
7. Crevice tool
8. Brush tool
Installation
Fitting the charging base to the wall
(fig. B)
The charging base can be placed on a
worktop or fitted to the wall to provide a
convenient storage and charging point for
the appliance.
Assembly
Fitting the accessories (fig. A & C)
These models are supplied with the
following accessories:
- a crevice tool (7) for confined spaces
- a brush tool (8) for furniture and stairs
To fit an accessory, proceed as follows:
◆ Take the accessories from the
appliance.
◆ Insert the appropriate accessory into
the front of the appliance.
Use
◆ Before first use, the battery must be
charged for at least 16 hours.
◆ Place the appliance on the charging
base whenever it is not in use.
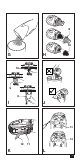
Charging the battery (fig. B)
◆ Make sure that the appliance is
switched off. The battery will not be
charged with the on/off switch in the
on position.
◆ Place the appliance on the charging
base as shown.
◆
Plug in the charger. Switch on at the
mains.
The charging indicator (6) will be lit.
◆ Leave the appliance to charge for at
least 16 hours.
Whilst charging, the charger may become
warm. This is normal and does not
indicate a problem. The appliance can be
left connected to the charger indefinitely.
The charging indicator will be lit as long
as the appliance is connected to the
plugged-in charger.
Warning! Do not charge the battery at
ambient temperatures below 4 °C or
above 40 °C.
Switching on and off (fig. D)
◆ To switch the appliance on, slide the
on/off switch (1) forward.
◆ To switch the appliance off, slide the
on/off switch back.
CV9605/CV1205 - Optimising the
suction force (fig. E)
In order to keep the suction force
optimised, the filter must be cleared
regularly during use.
◆ Rotate the wheel (5) a few turns to
shake out dust clogging the filter (9).
Cleaning and maintenance
Warning! Regularly clean the filters.
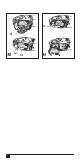
Cleaning the dust bowl and filters
(fig. F - I)
The filters are re-usable and should be
cleaned regularly.
◆ Press the release button (2) and
remove the dust bowl (3) (fig. F).
◆ Empty the dust bowl (fig. G).
◆ Remove the filters (9 & 10) by
twisting them clockwise (fig. H).
◆ Brush any loose dust off the filters.
◆ Wash the filters in warm, soapy
water (fig. I). The bowl can also be
washed if necessary. Do not immerse
the appliance in water (fig. J).
◆ Make sure the dust bowl and filters
are dry.
◆ Refit the filters (9 & 10) onto the
appliance, twisting them
counterclockwise until they lock into
place.
◆ Refit the dust bowl onto the
appliance. Make sure the dust bowl
clicks into place.