
User Manual


9
ENGLISH
(Original instructions)
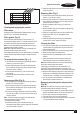
14 Wide mouth dust brush
BHFEV182B
BHFE
V182
C
BHFEV
182CP
10 2 in 1 Accessory
11 Crevice tool √√√
12 Accessory storage clip √√√
13 Pet hair tool √
u All available through service department
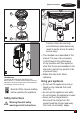
Cleaning and emptying the vacuum
Filter sense
WheneveralterisBlockedandneedscleaning,thered
lterLED(3)inthechassiswillilluminate.
Filter agitator (Fig. H)
With the lift away dust canister (6) off the chassis (17) ,
rotatethelteragitatorwheel5-10timestoremoveexces-
sivedustfromthelterthusincreasingitsperformance.
Note: It is recommended that you agitate when the unit is
emptiedandtheprelterremoved.
Note: Maximum dust collection will only be obtained with
cleanltersandanemptydustcanister.
If dust begins to fall back out of the product after it is switched
off, this indicates that the dust canister is full and requires
emptying.
To empty the dust canister (Fig. I, J)
u Lift and remove the lift away dust canister (6) from the
chassis(17)asshowningureI.
u Place the dust canister over a dust bin and press the
dust canister lid release button (6a) to empty the dust
canisterasshowningureJ.
u Closethedustcanisterlid(7),untilit“clicks”rmly
into position.
u Install the lift away dust canister (6) back onto the
chassis (17).
Removing pre-lter (Fig. K)
u Lift and remove the lift away dust canister (6) from the
chassis(17)asshowningureI.
u Place the dust canister over a trash bin and press the
dust canister lid release button (6a) to empty the dust
canisterasshowningureJ.
u Useyourindexngerandthumbtopinchthepre-lter
(18),pullthepre-lter(18)fromthedustcanister(6)as
showningureK.
Note:Thelterhousingtssnugglyinthedustcanister
andmaybedifculttoremoveatrst.
u Empty the dust canister.
u Installthepre-lter(18)intothedustcanister(6)
ensuringthedustcanistertab(20)alignswiththeprelter
slot(19)asshowningureK.
u Install the dust canister onto the vacuum, until it “clicks”
rmlyintoposition.
Removing lter (Fig. L)
u Lift and remove the lift away dust canister (6) from the
chassis(17)asshowningureI.
u Place the dust canister over a trash bin and press the
dust canister lid release button (6a) to empty the dust
canisterasshowningureJ.
u Grasptheagitatorwheelhousing(21)andpullup
to remove.
u Removethelter(22),fromtheagitatorwheelhousing
(21)asshowningureL.
u Shakeofforlightlybrushanyloosedustfromthelter.
u Installthethelter(22),intotheagitatorwheel
housing (21).
u Install the agitator wheel housing (21) onto the dust
canister,untilit“clicks”rmlyintoposition.
Cleaning the lters
u Oncethelterandpre-lterareremovedfromthedust
canister shake off or lightly brush any loose dust from
thepre-lterandlter.
u Rinse out the dust canister (6) with warm soapy water.
u Washthelterswithwarmsoapywater.
u Ensuretheltersarecompletelydry(24hrs)before
retting.
u Followinstructionsinthe“Removingpre-lterand
Removinglter”sectionsforassemblyinstructions.
Note: Maximum dust collection will only be obtained with
cleanltersandanemptydustcanister.
If dust begins to fall back out of the product after it is
switched off, this indicates that the dust canister is full
and requires emptying or that there is a blockage somewhere.
u Washtheltersregularlyusingwarm,soapywaterand
ensure that it is completely dry before using again. The
cleanerthelteris,thebettertheproductwillperform.
u Itisveryimportantthattheltersarecompletelydry
and correctly in position before use.
Removing and clearing the rotary brushes
(Fig. M)
Warning! To reduce the risk of injury from moving parts,
disconnect battery before cleaning or servicing.
u Toremovetherotarybrush(23)fromtheoorhead(8)
depressthereleasebutton(24)asshowningureM.
u Lift the rotary brush from its locked position.
u The rotary brush (23) can now be removed.
u Clean the rotary brush, and reinstall. Ensure it is secured
in its locked position before operating.