
Use and Care Manual


ENGLISH
8
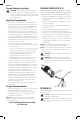
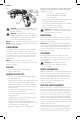
Fig. F
3
WARNING: Check to make sure tool handle is locked
after pressing pivot release button and changing
screwdriverpositions.
WARNING: To avoid being pinched at the areas
indicated with black arrows, hold the screwdriver at
both ends and use your thumb to depress the pivot
release button when changingpositions.
NOTE: Do not use screwdriver as a pry bar in anyposition.
NOTE: To avoid screwdriver being turned on accidentally,
do not carry in yourpocket.
SCREW DRIVING
For driving fasteners, the forward/reverse/lock-off slider
should be pushed to the right. Use reverse (button
pushed to the left) for removing fasteners. When moving
from forward to reverse, or vice versa, always release the
trigger first. Release trigger when the fastener is at the
desireddepth.
NOTE: For best performance, #8, 2” fasteners are
recommended, or screw into pre-drilled holes (1/16 - 5/32
bitrecommended).
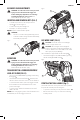
DRILLING
• Insert the appropriate hex shank drillbit.
• Select forwardrotation.
GENERAL DRILLING TIPS
• This tool is not recommended for drilling inmasonry.
• Use sharp drill bits only
• Drill bits for metal can be used for drilling holes in wood.
These bits must be sharp and should be pulled out
frequently when drilling to clear chips from theflutes.
• Support and secure work properly, as instructed in the
safety Instructions.
• Use appropriate and required safety equipment, as
instructed in the safety instructions.
• Secure and maintain work area, as instructed in the
safety instructions.
• Use light pressure until the hole is started enough to
keep the drill bit from slipping out ofit.
• Apply pressure in a straight line with the bit. Use
enough pressure to keep the bit biting but not so much
as to stall the motor or deflect thebit.
• Hold the tool firmly to control its twistingaction.
DO NOT CLICK THE TRIGGER OF A STALLED TOOL OFF AND
ON IN AN ATTEMPT TO START IT. DAMAGE TO THE TOOL
CAN RESULT. To remove:
• Put tool in reverse and back drill bitout.
• Turn tool off and back bit out byhand.
• Remove bit withpliers.
• Minimize stalling on breakthrough by reducing pressure
and slowly drilling through last part ofhole.
• Put tool in reverse while pulling the bit out of a drilled
hole. This will help reducejamming.
• Make sure switch turns tool on andoff.
WARNING: It is important to support work properly
and to hold the tool firmly to prevent loss of control
which could cause personalinjury.
MAINTENANCE
Use only a dry cloth to clean the tool. Never use solvents.
Never let any liquid get inside the tool; never immerse any
part of the tool into aliquid.
IMPORTANT:
To assure product SAFETY and RELIABILITY,
repairs, maintenance and adjustment (other than those listed
in this manual) should be performed by authorized service
centers or other qualified service personnel, always using
identical replacementparts.
ACCESSORIES
Recommended accessories for use with your tool are
available from your local dealer or authorized service center.
If you need assistance regarding accessories, please call:
1-800-544-6986.
WARNING: The use of any accessory not
recommended for use with this tool could
behazardous.
SERVICE INFORMATION
All BLACK+DECKER Service Centers are staffed with trained
personnel to provide customers with efficient and reliable
power tool service. Whether you need technical advice,
repair, or genuine factory replacement parts, contact the
BLACK+DECKER location nearest you. To find your local
service location, call: 1-800-544-6986 or visit
www.blackanddecker.com
TWO-YEAR LIMITED WARRANTY
Black & Decker (U.S.) Inc. warranties this product to be free
from defects in material or workmanship for a period of
two (2) years following the date of purchase, provided that
the product is used in a home environment. This limited
warranty does not cover failures due to abuse, accidental
damage or when repairs have been made or attempted
by anyone other than BLACK+DECKER and its Authorized
Service Centers. A defective product meeting the warranty
conditions set forth herein will be replaced or repaired at no
charge in either of two ways:
The first, which will result in exchanges only, is to return
the product to the retailer from whom it was purchased
(provided that the store is a participating retailer).Returns
should be made within the time period of the retailer’s