AVX-HDMI-WI Wireless HDMI Presentation System (WHPS) Transform your wired projector into a wireless projector with audio.BLACK BOX ® Includes plug-and-show, 4-to-1 split screen, 1-to-4 screen projection, and PDA wireless projection features. Customer Support Information AVX-HDMI-WI Order toll-free in the U.S.: Call 877-877-BBOX (outside U.S.
Trademarks Used in this Manual Trademarks Used in this Manual Black Box and the Double Diamond logo are registered trademarks of BB Technologies, Inc. Mac and Macintosh are registered trademarks of Apple Computer, Inc. Internet Explorer, PowerPoint, Windows, and Windows Vista are registered trademarks of Microsoft Corporation. Any other trademarks mentioned in this manual are acknowledged to be the property of the trademark owners.
FCC and IC RFI Statements Federal Communications Commission and Industry Canada Radio Frequency Interference Statements This equipment generates, uses, and can radiate radio-frequency energy, and if not installed and used properly, that is, in strict accordance with the manufacturer’s instructions, may cause interference to radio communication.
NOM Statement Instrucciones de Seguridad (Normas Oficiales Mexicanas Electrical Safety Statement) 1. Todas las instrucciones de seguridad y operación deberán ser leídas antes de que el aparato eléctrico sea operado. 2. Las instrucciones de seguridad y operación deberán ser guardadas para referencia futura. 3. Todas las advertencias en el aparato eléctrico y en sus instrucciones de operación deben ser respetadas. 4. Todas las instrucciones de operación y uso deben ser seguidas. 5.
Table of Contents Table of Contents Quick Start Guide . ........................................................................................................................................................ 7 1. Specifications . ...................................................................................................................................................... 11 2. Overview . ..........................................................................................................
Table of Contents 5.4.7 5.4.8 5.4.9 Page 6 Firmware Upgrade........................................................................................................................................36 Reboot System.............................................................................................................................................38 Logout . .................................................................................................................................................
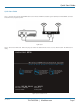
Quick Start Guide Quick Start Guide Step 1: Connect the projector VGA/HDMI cable to the Wireless HDMI Presentation System (WHPS) box VGA/HDMI connector and turn on the projector’s power. Figure QS-1. Step 2: Turn on the WHPS box. When the projector shows the default menu on the screen as shown below. The WHPS box is ready. LOGIN CODE: 4316 Server IP: 192.168.100.10 Resolution: 1280x720 Version: 1.0.0.0 SSID: WHPS Channel: 9 Security: OFF Figure QS-2. Default menu.
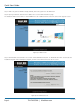
Quick Start Guide Step 3: Make sure your PC WLAN is already enabled, and connect your PC to the WHPS box. Step 4: Open your browser and enter the IP address to access the WHPS Web home page. The default IP address of the WHPS is 192.168.100.10. It is the IP address shown on the left corner of the projector screen. Figure QS-3. Main menu. Step 5: Download the client software. Select either “Win8/7/Windows Vista/XP” or “MacBook 10.5–10.8” and execute the installation program.
Quick Start Guide WHPS.exe WHPS-Interactive Figure QS-5. WHPS shortcut. Step 6: Make sure your personal firewall allows WHPS software to pass through. Step 7: Select the device that you want to project. Figure QS-6. Available server list. AVX-HDMI-WI 724-746-5500 | blackbox.
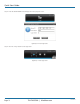
Quick Start Guide Step 8: Enter the LOGIN CODE and it will appear on the projector screen. Figure QS-7. Enter Login code. Step 9: Click the “Play” button to start projection. Figure QS-8. Start projection. Page 10 724-746-5500 | blackbox.
Chapter 1: Specifications 1. Specifications Technical Specifications Antenna 2 Dipole Approvals CE: Yes; RoHS: Pending Certificate FCC, CE, NCC Data Rate Wireless: Up to 300 Mbps; LAN: 10 to 100 Mbps Environmental Conditions Operating temperature: 32 to 104° F (0 to 40° C); Storage temperature: 14 to 140° F (-10 to +60°C); Operating humidity: ≤ 90%; Storage humidity: ≤ 80% Management Web-based configuration, SNMP Operating Systems Windows XP/Vista/7/8; Mac OX 10.
Chapter 2: Overview 2. Overview 2.1 Introduction The Wireless HDMI Presentation System (WHPS) is a must-have device for your meeting room. It turns your existing “wired” projector into a “high-end wireless” projector. Plug-and-Show wireless projection features enable WHPS to make your presentation and meeting efficient and successful. High-performance wireless projection and audio projection enables you to easily share multimedia on a big monitor without the hassle of using cables.
Chapter 2: Overview 2.3 What’s Included Your package should include the following items. If anything is missing or damaged, contact Black Box Technical Support at 724-746-5500 or info@blackbox.com. • Wireless HDMI Presentation System unit (AVX-HDMI-WI device) • USB token • (1) power adapter (5-VDC, 2.6-A) • (2) antennas • This user manual • Wallmount kit Additional items you will need include: • Projector • VGA/HDMI cable 2.
Chapter 2: Overview Table 2-1. WHPS components. Page 14 Number Component Description 1 Power LED Lights when power to the unit is on. 2 (2) USB connectors Connects clicker for presentations. 3 (2) Antennas Connects to antennas. 4 RJ-45 port Links to LAN. 5 VGA connector Connects to projector input. 6 HDMI connector Connects to projector input. 7 Audio connector Attaches to audio. 8 5-VDC power connector Links to power. 724-746-5500 | blackbox.
Chapter 3: Windows Client Utility 3. Windows Client Utility 3.1 Starting the Program After you download the WHPS Windows program via the Web page successfully, follow the steps below. Step 1: Click on the WHPS icon to execute the program. The program starts to search for the WHPS box automatically. Figure 3-1. WHPS icon. Figure 3-2. Searching for a WHPS box. Step 2: If a WHPS box is found, the “Login Code” dialog box will pop up on the PC screen. Figure 3-3. Login code dialog box pops up on the PC.
Chapter 3: Windows Client Utility 3.2 Login Enter the login code to start the presentation. You will see the login code on the projector screen. Figure 3-4. Login screen. 3.3 Main User Interface The main user interface is shown in the next diagram. Control Area for Screen Projection Feature Status Indicator Figure 3-5. Main user interface. 3.4 Screen Projection Click the “Play” button for full or split screen, and you can project the main screen onto the display immediately.
Chapter 3: Windows Client Utility Table 3-1. Buttons and descriptions. Button Description Full screen projection Project to Split #1 Project to Split #2 Project to Split #3 Project to Split #4 Stop projecting Pause projecting AVX-HDMI-WI 724-746-5500 | blackbox.
Chapter 3: Windows Client Utility 3.5 Audio Projection Step 1: If you are using WIndows® XP, before starting audio projection, install the “VAC.exe” (Virtual Audio Control) on your computer. You can find the software in the USB Token. (Windows Vista® and Win7 don’t need to install VAC.) Step 2: Select the ”Normal” option for “Projection Quality.” You should then hear the audio from the device when projecting. 3.
Chapter 3: Windows Client Utility 3.7.1 Show Receiver Information Click “Show Receiver Information” in the drop-down menu. The Receiver Information, such as Wi-Fi name, IP address, and code will appear on the display. This window will close automatically after 30 seconds. Figure 3-9. Show Receiver Information screen. 3.7.2 Web Admin Click “Web Admin” in the drop-down menu, and the browser will open and connect to the receiver Web admin page automatically.
Chapter 3: Windows Client Utility 3.7.3 Search Receiver Device Click “Search Receiver Device” from the drop-down menu. The program will disconnect from the current receiver and search for the receiver again. Figure 3-11. Search Receiver Device screen. 3.7.4 Select Projection Desktop (Win XP/Vista/7) Click on “Select Projection Source” to project the main screen of the desktop or the virtual extended screen. NOTE: If you are using Windows XP system, you need to install the “VDD.exe” driver first.
Chapter 3: Windows Client Utility 3.7.9 Send Audio to Display Click “Send Audio to Display” to start the audio projection feature. It will mute your local speaker during the projection and restore it when it closes the application. NOTE: If you are using Windows XP, you must install the Audio driver (VAC.exe). You can find the driver in the USB token. 3.7.
Chapter 3: Windows Client Utility 3.7.12 Make Plug-and-Show Token Click “Make Plug-and-Show Token” to make a USB WHPS Token. Simply insert a USB thumb drive and follow the wizard to make the token. Figure 3-13. Drop-down menu, Make Plug-and-Show Token selected. Page 22 724-746-5500 | blackbox.
Chapter 3: Windows Client Utility 3.7.13 Copy Application to Desktop Click the “Copy Application to Desktop” option from the drop-down menu; it will copy the application to your desktop immediately even if you don’t have system privileges. 3.7.14 About Click “About” to show system information, including product model name, client version, IP address, and other information. 3.7.15 Exit Click “Exit” to exit this application. It will stop current playing status and close the application immediately.
Chapter 4: Mac Client Utility 4. Mac Client Utility 4.1 Launch Application Step 1: Enable your Wi-Fi and connect to the WHPS device. Step 2: Execute WHPS client software for Mac. Step 3: Launch WHPS software and enter the login code. Step 4: Start projection. 4.2 Main User Interface Figure 4-4 shows the main user interface. Menu area Status indicator Control area for screen projection feature Figure 4-1. Main user interface. Page 24 724-746-5500 | blackbox.
Chapter 4: Mac Client Utility 4.3 Screen Projection Click the “Play” button for full or split screen to immediately project the main screen onto the display. Click the “Pause” button to freeze your projection screen. Click the “Stop” button to stop projecting your screen. Figure 4-2. Play button. Table 4-1. Buttons and descriptions.
Chapter 4: Mac Client Utility 4.4 Mac Audio Projection Before starting audio projection, install the “Soundflower.mpkg” (Mac system extension for audio) on your computer. You can find the software in the USB token. Second, click the menu to open the function list and enable Audio Projection. You can hear the audio from the device when projecting. Page 26 724-746-5500 | blackbox.
Chapter 5: Web Management 5. Web Management 5.1 Home Page 1. Make sure your PC is connected to the WHPS box successfully. 2. Open your browser, it will enter the WHPS home page automatically. 3. If not, enter your IP address in the browser, and you will see the IP on the projector screen. 4. The default IP is 192.168.100.10. Figure 5-1. Home page. 5.2 Download Software 1. Select “Download software” from the WHPS screen. 2.
Chapter 5: Web Management Figure 5-2. Download Windows or Mac utility. 5.3 Conference Control 1. This function allows you to host a meeting smoothly without projector cable swapping. Each participant can show their presentation. 2. Select the “Conference Control” function. 3. Enter the password (the default value is “moderator”) and then press “Login.” Page 28 724-746-5500 | blackbox.
Chapter 5: Web Management Figure 5-3. Enter password screen. 4. After login, you can see a User List on the screen that indicates all of the users connected to the WHPS box. 5. There are three columns: “Computer Name,” “Play Control,” and “IP Address.” 6. Play Control: There are six buttons, including Play (Full), Play Split #1, Play Split #2, Play Split #3, Play Split #4, and Stop. 7. User List. Figure 5-4. Play control page. AVX-HDMI-WI 724-746-5500 | blackbox.
Chapter 5: Web Management 5.4 Login Web Admin 1. Click “Admin” and then enter the password to login to the Web page. 2. The password default value is “admin.” Figure 5-5. Enter password screen. 5.4.1 System Status Click “System Status,” and the screen shows the current system status. Figure 5-6. Current system status screen. Page 30 724-746-5500 | blackbox.
Chapter 5: Web Management Table 5-1. Current system status screen components.
Chapter 5: Web Management 5.4.3 Network Setup There are many kinds of operating configurations. Figure 5-8. Network setup screen. Page 32 724-746-5500 | blackbox.
Chapter 5: Web Management 1. Click the “Network Setup” button, and the screen will show the network setting items. NOTE: Auto-Configuration Network Setup on WHPS. The default setting of the WHPS box is DHCP client. When the WHPS box is connected to a LAN that already has a DHCP server present, the WHPS box takes an IP address assigned to it by the server. When the WHPS box is connected to a LAN that does not have a DHCP server, the WHPS box becomes the DHCP server in the network.
Chapter 5: Web Management AP Client • Connect to Existing AP: Input the SSID of home Wi-Fi AP you want to connect. • Encryption: You can select “Disable” or WEP/WPA/WPA2 64-bit or 128-bit in an ASCII or HEX string. • Key: If Encryption is enabled, you have to set key value according to the encryption mode you selected. • Press the “Apply” button, and follow the reboot instructions to make it work. Gatekeeper Gatekeeper is designed to ensure the enterprise network security within the WHPS box.
Chapter 5: Web Management Screen Information • Enable: Default value, Show server IP, Resolution, Firmware version, SSID, channel and security on the screen. • Disable: User can only see quick guide on splash screen; server IP, SSID, login code, etc. won’t be displayed. • Some Information: Show server IP and SSID on the screen only. 5.4.5 Change Passwords Click the “Change Password” button to change the password value. The length of the password is up to 8 characters. Figure 5-10. Change password screen.
Chapter 5: Web Management 5.4.6 Reset to Default Click the “Reset to Default” button to restore factory default settings. Figure 5-11. Reset to default screen. • Apply: Confirmation and action. 5.4.7 Firmware Upgrade Click the “System Configuration” button to save your configuration of this device; you can import this back when you finish the firmware upgrade. Figure 5-12. Firmware upgrade screen. Page 36 724-746-5500 | blackbox.
Chapter 5: Web Management Click the “Firmware Upgrade” button to upgrade firmware. 1. Get the latest firmware image file from your vendor. 2. Click “Browse” to specify the file name you want to upgrade. 3. Click “Upgrade” to start. 4. A warning message and counter shows on the screen. 5. After a few minutes, a complete message will show on the screen. 6. Restart the WHPS box for the new firmware to take effect. Figure 5-13. Confirm firmware upgrade screen.
Chapter 5: Web Management 5.4.8 Reboot System Click the “Reboot System” button to restart the system. Figure 5-14. Reboot system screen. • Reboot: reboot system automatically. 5.4.9 Logout Logout button Figure 5-15. Logout button (see top right of this screen). Page 38 724-746-5500 | blackbox.
NOTES AVX-HDMI-WI 724-746-5500 | blackbox.
Black Box Tech Support: FREE! Live. 24/7. Tech support the way it should be. Great tech support is just 30 seconds away at 724-746-5500 or blackbox.com. About Black Box Black Box provides an extensive range of networking and infrastructure products. You’ll find everything from cabinets and racks and power and surge protection products to media converters and Ethernet switches all supported by free, live 24/7 Tech support available in 30 seconds or less. © Copyright 2013. Black Box Corporation.