Digital Color Imaging Systems Operating Instructions (For Scanner and Email) Model No. Before operating this machine, please read this manual completely and keep this manual for future reference. (Illustration shows optional accessories that may not be installed on your machine.
Operating Instructions The following Operating Instruction manuals are included with this machine. Please refer to the appropriate manual and keep all manuals for future reference. If you lose the manual, contact the authorized Panasonic dealer. Operating Instructions (For Setting Up) This manual contains essential information for setting up the machine. Accessories Operating Instructions (For Basic Operations) This manual contains essential information for proper operation of the machine.
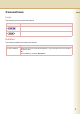
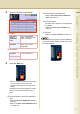
Conventions Icons The following icons are used in this manual. Icon Description Indicated important information that must be read in detail. Indicates reference Information. Notation The following notations are used in this manual. Notation For Keys and Buttons Description Hard buttons on the Control Panel are depicted as **** key, soft buttons on the Touch Panel are depicted as "xxx". Ex: Press the Start key and select "More Menus".
Table of Contents Chapter 1 Getting To Know Your Machine Basic Operation Procedure ..................................................................................................... 6 Sending an Email .................................................................................................................... 8 Chapter 2 Scan/Email Operations Scan to the SD Memory Card................................................................................“SD Card” 10 Scan to the PCMCIA/PC Card...........
Chapter 4 Adding to the Address Book Editing the Address Book ...................................................................................................... Edit an Email Address ....................................................................................................... Delete an Email Address ................................................................................................... Editing Image Box Name ..........................................................................
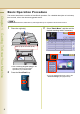
Chapter 1 Basic Operation Procedure Chapter 1 Getting To Know Your Machine 6 Getting To Know Your Machine This section describes the workflow of Scan/Email operations. For a detailed description of each setup item involved, refer to the relevant suggested section. z Optional Hard Disk Drive, Main Memory and Image Memory are required in this Scanner Function. 1 Place the original(s). 3 Select "Basic Menu", and then set the desired scanning mode if necessary. Face Up. Up to 70 sheets (20 lb).
4 Select the location or destination. To the Internal Hard Disk Drive To the Computer A reception notice appears on the destination PC's display. z Refer to the Scan to the Computer (see page 16). SD memory Card or PCMCIA/PC Card Select “SD Card/Hard Drive”, and then select “SD Card” or “PC Card”. Internal Hard Disk Drive Select “SD Card/Hard Drive”, and then select “Image Box”.
Sending an Email Chapter 1 • There are two ways of sending an Email. • Sending an Email using the Scan/Email Function : Available when Scan/Email Option is installed on your device • Sending an Email using the Internet Fax Function :Available when Internet Fax Option is installed on your device Scan/Email Function Color Original Getting To Know Your Machine Sending an Email using the Scan/Email Function or Monochrome Original Select “Email”. • JPEG • PDF • Compressed PDF Press the Scan/Email key.
Memo Chapter 1 Getting To Know Your Machine 9
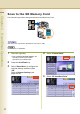
Chapter 2 Scan to the SD Memory Card Chapter 2 Scan/Email Operations 10 Scan/Email Operations The scanned image will be directly transferred to the SD Memory Card. z Be sure to use only Genuine SD Memory Card. (Up to 1 GB) z The SD logo is a trademark. 1 Place the original(s). 4 Select "Address Book". 5 Select “SD Card/Hard Drive”. z Refer to Placing Originals (Copy) in the Operating Instructions (For Basic Operations) of provided booklet. 2 3 Press the Scan/Email key.
6 Insert the SD Memory Card. ① Push the Slot Cover to open it. z Do not remove the SD Memory Card while the Access Indicator is flashing. 10 Close the Slot Cover. Select “SD Card”. z When canceling the operation, press the Stop key on the Control Panel, and then select “Yes” on the Touch Panel Display. Scan/Email Operations 7 Push the SD Memory Card, and then remove it. Chapter 2 ② Insert the SD Memory Card as illustrated. (Label side up). 9 z Only one storage device can be selected at a time.
Scan to the PCMCIA/PC Card Chapter 2 Scan/Email Operations 12 The scanned image will be directly transferred to the memory card into the PCMCIA/PC Card Adapter. z Be sure to use only PCMCIA/PC Card Adapter (Type II) for Memory Card. 1 Place the original(s). 4 Select "Address Book". 5 Select “SD Card/Hard Drive”. z Refer to Placing Originals (Copy) in the Operating Instructions (For Basic Operations) of provided booklet. 2 3 Press the Scan/Email key.
6 Insert a PCMCIA/PC Card Adapter with a memory card. Push the Eject button on the right side of PCMCIA/PC Card slot, and then remove the PCMCIA/PC Card Adapter. Eject button z Do not remove the PCMCIA/PC Card while the Access Indicator is flashing. 10 Close the Slot Cover. 7 Select “PC Card”. z When canceling the operation, press the Stop key on the Control Panel, and then select “Yes” on the Touch Panel Display.
Scan to the Internal Hard Disk Drive Chapter 2 The scanned image can be saved to the Internal Hard Disk Drive, and then saved data can be retrieved from computer via a network. Hard Disk Drive Scan/Email Operations 1 Place the original(s). 5 Select “SD Card/Hard Drive”. 6 Select an Image Box in the Hard Disk Drive. z Refer to Placing Originals (Copy) in the Operating Instructions (For Basic Operations) of provided booklet. 2 3 4 Press the Scan/Email key.
Retrieve Scanned Image from Hard Disk Drive 2 Start a Web Browser, such as the Internet Explorer, on your computer. ② Select an Image Box where image data is saved. Enter the IP Address that has been set on this machine. Ex: http://10.74.232.130 z Machine Status will be displayed on the Web browser. 3 Select an image box from its scanner image box list, and then download the image data from the image box onto the computer.
Scan to the Computer Chapter 2 Scan/Email Operations 16 The scanned image will be transferred to desired computer. z Before transferring the scanned image to your PC, it is necessary first to install the Panasonic Document Management System software, and then setup the scanner configuration on your PC. Refer to the Operating Instructions (For Setting Up) of provided booklet. 1 Place the original(s). 4 Select "Address Book". 5 Select an alphabet tab.
6 Select a computer. Chapter 2 Scrolling Pages To scroll to the previous page Current page Total number of pages To scroll to the next page 7 Press the Start key. When the scanned image is transferred to the PC, the scanner reception notice appears on the destination PC's display. z When scanning from the Platen Glass, place the next original, and then follow the instructions described on the touch panel display. 8 Scan/Email Operations z Only one computer can be selected at a time.
Scan to Email Chapter 2 The scanned image can be emailed to network connected computers. z JPEG (jpg) file is not available for multiple pages. z JPEG (jpg) file is only available in Color/Gray Scale mode. z TIFF file is only available in Monochrome mode. When sending a multi-page color document: Scan/Email Operations z When attaching a color document in JPEG/PDF (except Compressed PDF) file, the machine sends an individual Email for each scanned page.
5 Select an email address. 8 Select “Close”. Chapter 2 Scrolling through pages Current page To confirm the selected or inputted Email Address. ① Select "Addresses: ###". (###: Number of selected email addresses) Total number of pages To scroll to the next page 6 7 Select “Cc”, “Bcc” and/or “From” address field and follow the same procedures as in steps 4 and 5 if necessary. Input the subject if necessary. ① Select “Subject”. ② Select “OK”.
10 Select “Basic Menu” to configure the Chapter 2 Scan/Email Operations 20 required settings, and then select “OK”. Refer to Scanner Settings (see pages 28 to 39). 11 Press the Start key. Transferring the scanned image(s) to Email. z When scanning from the Platen Glass, place the next original and follow the instructions described on the touch panel display.
Memo Chapter 2 Scan/Email Operations 21
Email Addressing from LDAP Server Chapter 2 You can search an Email Address through the server (LDAP Server) for computer names beginning with a specified character(s). z This function is available where the LDAP Server is configured. 1 Place the original(s). Scan/Email Operations 6 Select “Global”. 7 Select “Search”. z Refer to Placing Originals (Copy) in the Operating Instructions (For Basic Operations) of provided booklet. 2 3 4 Press the Scan/Email key. Select “Email”. Select “Search”.
8 Select a compluter, and then select “OK”. ② Input a subject. Chapter 2 9 Select “OK”. z Up to 40 characters. z For instructions on how to enter characters, refer to Using the Keyboard in the Operating Instructions (For Function Parameters) on the provided CD-ROM. 12 Select “Close”. 10 To select “Cc”, “Bcc” and/or “From”, select the corresponding button, and then perform steps 4 to 9. z For the following steps, refer to steps 9 to 11 in Scan to Email (see page 18).
Add an Email Address to the Address Book Chapter 2 Email addresses that have been entered from the Scan/Email basic screen can be added to the address book. 1 2 Scan/Email Operations 3 Press the Scan/Email key. 5 Select “Add to Local”. 6 Select “Edit”. Select "Email". Select “Keyboard”. 7 4 Input an email address. Input a station name and a key name, and then select “OK” to edit the station name and key name selected in step 5. Ex: pcc@panasonic.com z Up to 60 characters.
8 Select “OK” to register the email address as a station. Chapter 2 Select “OK”. z For the following steps, refer to steps 6 to 11 in Scan to Email (see page 18).
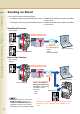
Receiving an Email Chapter 2 This function is only available when the optional Internet Fax Module (DA-NF320) is installed. If the machine connects to a network as a POP Client, it can receive Email either automatically or manually. The Email reception method from a POP Server varies depending on the POP settings programmed in Function Parameters.
Receiving Email Manually z With POP acquisition interval set between 1 and 60 minutes, queries are transmitted to the POP Server periodically to check for new mail and the number of the incoming Email messages on the server appears on the display. Press the Fax key. Check for incoming mail(s). 3 Select “Basic Menu”. 4 Select “Get Email”.
Chapter 3 Setting the Scanning Quality Scanner Settings Chapter 3 Documents, whether in Full Color or Monochrome, are scanned in three-colors. z Color mode settings are reset to their factory defaults when: -The machine is turned Off. -The Reset key is pressed. -A scan job is completed. 1 Select “Basic Menu”. Quality Adjustment Scanner Settings Color Setting Full Color Mode Color Original Three-colors (Red, Green and Blue) Grayscale Mode 2 Set the desired scanning modes.
Setting Original Type and Scanning Density Text/Photo Photo Adjusting Scanning Density Darker Lighter z The standard setting of “Original Type” and “Density” can be changed, refer to Scanner Settings in the Operating Instructions (For Function Parameters) on the provided CD-ROM. Selecting Original Type Adjusting Scanning Density 1 1 Select the original type, and then select “OK”. Text Mainly a Text original. Text/ Photo Text and Photo combined original. Photo Mainly a Photo original.
Scanning Resolution Chapter 3 Scanner Settings 30 You can set the appropriate resolution according to your originals. z The standard setting of “Resolution” can be changed, refer to Scanner Settings in the Operating Instructions (For Function Parameters) on the provided CD-ROM. z Resolution settings are reset to their factory defaults when: -The machine is turned Off. -The Reset key is pressed. 1 Select a desired resolution, and then select “OK”.
Memo Chapter 3 Scanner Settings 31
Advanced Color Quality Settings Chapter 3 The following picture qualities can be adjusted: Scanner Settings z The standard setting of “Compression (Full Color)”, “Compression (Grayscale)”, “Compression (Black)”, “Background Removal ” and “Contrast” can be changed, refer to Scanner Settings in the Operating Instructions (For Function Parameters) on the provided CD-ROM.
Select “OK”.
Chapter 3 Compression (Grayscale) Compression (Black) Selects picture quality, and then compression mode in Grayscale mode. Documents can be scanned with a Monochrome setting. 1 2 1 2 Scanner Settings 3 Select “Adjustment”. (See page 32) Select “Compression (Grayscale)”. Select an image quality, and then select “OK”. High Speed 4 34 Low picture quality. Transferring data at the higher speed. Standard Standard picture quality. High Quality High picture quality.
Contrast Color documents can be scanned in monochrome with their background removed. This feature is convenient for scanning newspapers, background-colored documents or the like. The scanning contrast can be adjusted to match the original. Higher When the Photo original is selected in the Original Type (see page 29), this Background Removal setting is not available. 1 2 1 2 Select “Background Removal”. Adjust the contrast level “Lower” or “Higher”, and then select “OK”.
Setting the File Type and/or File Name Chapter 3 Documents can be scanned with a file type specified. While files are named after their date by default, documents may also be scanned with a filename specified. Scanner Settings 1 z The standard setting of “File Type and Name” can be changed, refer to Scanner Settings in the Operating Instructions (For Function Parameters) on the provided CD-ROM. z The “File Type and Name” setting is reset to its standard setting when: -The machine is turned Off.
4 Select a File Name type. To enter File Name ② Enter a filename by using the onscreen keyboard, and then select “OK”. Scanner Settings z When the Date/Time is selected for the File Name, the file name will automatically default to Date/Time format. Chapter 3 ① Select “Custom”. z Up to 20 characters. z When scanning to the SD Memory Card or PCMCIA/PC Card, display limitation is up to 8 characters on the screen in lower case letters.
Scanning 2-Sided Originals Chapter 3 2-Sided Originals can be scanned and the binding position is selectable. The standard setting of 2-Sided/Original can be changed, refer to Scanner Settings in the Operating Instructions (For Function Parameters) on the provided CD-ROM. 1 Place the Original(s) on the ADF. 5 Select a bind position, and then select “OK”. Scanner Settings z Refer to Placing Originals (Copy) in the Operating Instructions (For Basic Operations) of provided booklet.
Special originals (like thin paper, etc.) can be fed from the ADF and scanned continuously using the Job Build and SADF Mode. 1 Place one original. (Minimum 50 g/m2) 5 Select "Address Book", and then select a destination. 2 3 z For more details, refer to Basic Operation Procedure (see page 6). Press the Scan/Email key. Select “Basic Menu”. 6 Press the Start key. z Place the next original within 5 sec. of last scanned original.
Chapter 4 Editing the Address Book Chapter 4 The IP and Email Addresses in the address book can be edited or deleted. Edit an Email Address The Email address can be edited. Adding to the Address Book 1 Press the Function key. 2 Select “Scanner Settings”. 4 5 3 Select “10-19”, and then scroll to the next page using 40 Adding to the Address Book . 6 Select “19 Edit Address Book: Email”. Select an address tab. Select an email address to edit, and then select “OK”.
7 Edit the email address, and then select “OK”. 12 Select “Close”. Chapter 4 z Enter an Email Address (up to 60 characters). z For instructions on how to enter characters, refer to Using the Keyboard in the Operating Instructions (For Function Parameters) on the provided CD-ROM. 8 9 Enter a station name, and then select “OK”. Enter a key name, and then select “OK”. 10 Select “Yes” or “No”. 11 Select “Cancel”. Adding to the Address Book 13 Press the Reset key. The Email Address is updated.
Delete an Email Address The Email Addresses in the address book can be deleted. Chapter 4 Adding to the Address Book 42 1 On the Scanner Settings screen (see page 40), select “21 Delete Address: Email”. z For instructions on how to display the Scanner Settings screen, refer to steps 1 to 3 in the Edit an Email Address (see page 40). 2 3 Select an address tab. Select the desired Email Address, and then select “OK”. 4 Select “Yes”. The Email Addresses is deleted. 5 6 7 Select “Cancel”.
Memo Chapter 4 Adding to the Address Book 43
Editing Image Box Name Chapter 4 The image box name can be changed. z For instructions on how to save Scanned image to an image box, refer to Scan to the Internal Hard Disk Drive (see page 14). z When the image data is registered into the image box, image box name can not be changed. Adding to the Address Book 1 Press the Function key. 2 Select “Scanner Settings”. 4 Select “25 Edit Image Box Name”. 5 Select the desired image box name.
7 Input a button name, and then select “OK”. Chapter 4 8 Select “OK” or “Cancel”. 9 Select “Close”. Adding to the Address Book z Up to 12 characters. 10 Press the Reset key.
Chapter 5 Glossary Chapter 5 Appendix 46 Term Appendix Meaning 10Base-T/ 100BaseTX An Ethernet standard for Local Area Network (LAN). The 10/100 refers to its 10/100 Mbps bandwidth, the base to single baseband, and the T to the Twisted pair. The cable uses two pairs of unshielded twisted wires. Address Book The Address Book is a convenient directory that stores contact Phone Numbers and Email Addresses for easy retrieval at a future time.
Term Meaning Disk Drive A peripheral storage device that holds, spins, reads and writes magnetic or optical disks. It may be a receptacle for disk cartridges, disk packs or floppy disks, or it may contain non-removable disk platters like most hard disks. Domain Name A unique name that identifies an Internet site. Domain Names always have 2 or more parts, separated by dots. The part on the left is the most specific, and the part on the right is the most general.
Term Chapter 5 Appendix 48 Meaning Group Dialing The ability to program many telephone numbers into a single station so that many locations can be dialed in sequence utilizing a single keystroke. Halftone A scanning technique to distinguish levels of gray from black and white. Handshaking The exchange of a group of control signals that communicate between the transmitter and receiver. These signals determine the condition at which communication can occur.
Term Meaning Key Name An alternate to the station name that can be programmed for each Address Book dialing key. Keypad A group of numeric keys located on your Control Panel. LAN (Local Area Network) A Local Area Network is a computer network system and printer limited to an immediate area, such as an Office, Factory, and University used to integrate and exchange data. LCD Liquid Crystal Display. The display area of your machine.
Chapter 5 Appendix 50 Term Meaning Panasonic SuperSmoothing An electronic image enhancement (Panasonic Super Smoothing) that will create a particular pattern for the improvement of copy quality. PC The Personal Computer - Quite Simply a computer designed to be used by one person at a time. PC Card A credit card sized removable module for portable computers. PC Cards are used to attach modems, network adapters, sound cards, radio transceivers, solid state disks and hard disks to a portable computer.
Term Meaning Selective Reception A function that can be set so that your unit will receive from only those machines programmed into your dialer. Server A computer, or a software package, that provides a specific kind of service to client software running on other computers. A single server machine could have several different server software packages running on it, thus providing many different servers to clients on the network.
Term Chapter 5 Appendix 52 Meaning TIFF Image Viewer An application software to view the contents of TIFF-F File. Some TIFF Image Viewers may not display the data properly. Time Zone By setting the Time Zone of your area on the device's Control Panel, the received Email will display in the correct Date & Time order, regardless of the time difference of the sender's area. To confirm your Time Zone, check the "Date/Time Properties" of your Computer.
Memo Chapter 5 Appendix 53
The following trademarks and registered trademarks are used throughout this manual: Microsoft, Windows, Windows NT, Windows Server, Outlook & Windows logo are either registered trademarks or trademarks of Microsoft Corporation in the USA and other countries. Adobe, Acrobat Reader & Adobe logo are either registered trademarks or trademarks of Adobe Systems Incorporated. All other trademarks identified herein are the property of their respective owners.