rev. 3.
MIX BUS, MEET YOUR NEW BEST FRIEND Looking for the piece of gear that gives you that elusive “magic” on your mix bus? We were too! We went through everything from high end summing mixers to racks of insanely expensive gear and most of it barely did anything (you had to sit on the edge of your seat and strain to see if you could tell the difference)! Even when we did find combinations that got us close to what we were after, it meant tens of thousands of dollars in gear and using each piece for very little (
IMPORTANT SAFETY INFORMATION READ ALL INSTRUCTIONS BEFORE USE WARNING! For your safety, the information in this manual must be followed to minimize the risk of electric shock. Failure to do so may result in property damage, injury or loss of life. IMPORTANT SAFETY INSTRUCTIONS WARNING: This device contains high voltage electricity capable of delivering lethal shocks if used improperly.
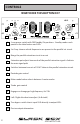
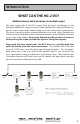
CONTROLS WHAT DOES THIS BUTTON DO? LOW ON FLAT HIGH HG-2 6 2 8 12 Sat. Freq. 1 OFF 7 IN/OUT 3 SATURATION ALT TUBE 5 9 4 L AIR BYPASS 11 1 3 way power switch with Off/Standby/On positions: Standby mode sends power to the tube heaters and LEDs 2 Sat. Freq. chooses which frequencies are present in the parallel sat.
LEFT RIGHT 16 15 13 17 14 13 IEC power socket 14 2AG power fuse: Replace only with the same rating fuse (4 amp slow blow) 15 Master on/off switch: In the “off” position, no power will reach the face plate and the front panel power switch will be inoperable. Be aware that in the “on” position, power is present inside the box even when the power switch on the front panel is in the “off” position.
CONTROLS THE METER The first thing you may notice about the HG-2 meter is that there is no scale. The first reason there is no scale is that the meter has the ability to switch between 3 different gain settings to suit different gain staging preferences and work flows. The second reason we decided not to add a scale is that we want to encourage you to use your ears! The meter is there simply to give you visual feedback about the energy of your mix.
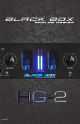
INTRODUCTION WHAT CAN THE HG-2 DO? Add Harmonics and Saturation (in multiple ways) The main signal path of the HG-2 travels from the input transformers to the Pentode amplification stage, on to the Triode amplification stage and finally to a passive output attenuation before hitting a pair of custom output transformers. The tubes naturally produce pleasing harmonics but each stage (Pentode and Triode) are voiced to produce more and more harmonics and eventually saturation as you drive them harder.
INTRODUCTION Increase RMS of your signal The same controls that allow you to enhance your signal with harmonics, also allow you to increase the RMS of your signal by pushing the tubes into saturation and natural compression. Each tube stage is specifically setup to have a range that goes from clean reproduction of the signal to full saturation where the peaks are compressed and the average level is increased.
GETTING STARTED WHAT SETTING SHOULD I START WITH? When setting up the HG-2, start with a neutral setting that closely matches the original signal. To match, use the bypass to switch back and forth as you make adjustments. NEUTRAL SETTING* Pentode: 12 o’clock Triode: 10-11 o’clock Output: Adjust until levels match when bypassed Parallel sat circuit: Off Air: Off * It’s important to remember that the HG-2 is designed to saturate, so how hard you drive into it affects the settings.
GETTING STARTED Shaping tone In addition to the harmonic and saturation control, the HG-2 also allows the user to shape tone via the “tilt” selector and the “air” switch. The “Sat. Freq.” selector The 3 position “Sat. Freq.” selector is a simple yet powerful feature that allows the user to choose what are present in the parallel saturation circuit. In the “Flat” position, full bandwidth is fed into the circuit, allowing for saturation of all frequencies.
NOTES: IN/OUT OFF ON Sat. Freq.