
User manual
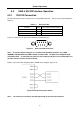
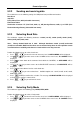

Table Of Contents
- 1.1 Feature Overview
- 1.2 Input Power and Fuse Requirements
- 1.3 Package Contents
- 2.1 Front Panel Overview
- 2.2 Screen Display
- 2.3 Front Panel Menu Options
- 2.4 Front Panel Menu Overview
- Rear Panel Summary
- 2.6 Power up
- 3.1 Overview
- 3.2 Measuring Voltage
- 3.3 Measuring Current
- 3.4 Measuring Resistance
- 3.5 Measuring Frequency and Period
- 3.6 Measuring Continuity
- 3.7 Testing Diode
- 3.8 Math Functions
- 4.1 Measurement configuration
- 4.2 Trigger Operations
- 4.3 Buffer Operations
- 4.4 Limit Operations
- 4.5 System Operations
- 5.1 Selecting an Interface
- 5.2 USB & RS-232 Interface Operation
- 5.3 GPIB Interface operation (model 5492BGPIB only)
- 5.4 Data Format
- 6.1 Command Structure
- 6.2 Command Syntax
- 6.3 Command Reference
- 7.1 Frequently Asked Questions
- 7.2 Error Messages
- 8.1 Technical Specifications
Measurement Options
52
6. Use or key to select ON or OFF for the front panel display.
7. Press (ENTER) to confirm the selection. The message “CHANGE SAVED” will be displayed
to show that the change is now in effect.
8. Press → key to exit from the menu.
4.5.5 Key Sound
The multimeter by default is shipped with beep sound enabled when keys are pressed. This can be set
to ON or OFF by the user.
Follow the steps below to set the key sound settings:
1. Press → to enter the menu on the menu level, “A: MEAS MENU” will be displayed.
2. Use or key to move across to the SYS MENU on the menu level, “D: SYS MENU” will
be displayed.
3. Press to move down to the command level within the SYS MENU, “1: RDGS STORE” will be
displayed.
4. Use or key to move across to the KEY SOUND command, “8: KEY SOUND” will be
displayed.
5. Press to move down a level to enable or disable the key sound.
6. Use or key to turn ON or turn OFF the key sound.
7. Press (ENTER) to confirm the selection. The message “CHANGE SAVED” will be displayed
to show that the change is now in effect.
8. Press → key to exit from the menu.
4.5.6 Self-test
The multimeter has a built-in self-test routine that is processed during an initial power up of the
instrument. Additionally, two other self-test routines can be run from the front panel. To do this, follow
the below steps:
1. Press → to enter the menu on the menu level, “A: MEAS MENU” will be displayed.
2. Use or key to move across to the SYS MENU on the menu level, “D: SYS MENU” will
be displayed.
3. Press to move down to the command level within the SYS MENU, “1: RDGS STORE” will be
displayed.
4. Use or key to move across to the KEY SOUND command, “9: TEST” will be
displayed.
5. Press to move down a level to select the self-test to run.
6. Use or key to select “KEY” (tests the keys) or “BUILT-IN” self-test.
7. Press (ENTER) to confirm the selection.
If “KEY” is selected, it will initially display a message “NO KEY PRESS”. At this point, pressing
any keys will display the key’s function. For example, pressing will display “LEFT PRESS”
message. To exit the key self-test. Press button. After it displays “SHIFT PRESS”