
User guide


10
August 2012
8802 User Guide
(BB0334-I)
See the Product Data sheet for a list of available transducer covers.
Press the scanner
Puncture
or
Biopsy
control button to superimpose a puncture
line on the scan image.
If more than one puncture line is available, refer to the applicable scanner user guide
for instructions on how to change which one appears.
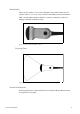
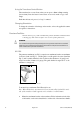
Move the transducer until the puncture line transects the target. Insert the needle and
monitor it as it moves along the puncture line to the target. The needle tip echo will
be seen as a bright dot on the screen.
To remove the puncture line from the scan image, refer to the applicable scanner user
guide for instructions.
Figure 5. Puncture line for UA1250 with 8802
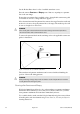
The transducer and puncture attachment can be removed without disturbing the
position of the needle during puncture.
Cleaning after Puncture and Biopsy
If biological materials are allowed to dry on the transducer or puncture attachments,
disinfection and sterilization processes may not be effective. Therefore, you must
clean puncture attachments and transducers immediately after use.
Use a suitable brush to make sure that biological material and gel are removed from
all needle guides and other channels and grooves. See
Care, Cleaning & Safety
for
cleaning instructions.
WARNING
If the needle guide is detached from the transducer during interventional procedures,
cover the transducer with a new transducer cover.
WARNING
When performing a biopsy, always make sure that the needle is fully drawn back inside the
needle guide before moving the probe.