User Guide Type 8802 Convex Array Transducer English BB0334-I August 2012 For Professional Users Only
WORLD HEADQUARTERS Mileparken 34 DK-2730 Herlev Denmark Tel.:+45 44528100 / Fax:+45 44528199 www.bkmed.com Email: info@bkmed.dk If you have comments about the user documentation, please write to us at the email address above. We would like to hear from you. BK Medical Customer Satisfaction Input from our customers helps us improve our products and services. As part of our customer satisfaction program, we contact a sample of our customers a few months after they receive their orders.
Contents Introduction . . . . . . . . . . . . . . . . . . . . . . . . . . . . . . . . . . . . . . . . . . . . . . . . . . . . . . 5 Scanning Plane . . . . . . . . . . . . . . . . . . . . . . . . . . . . . . . . . . . . . . . . . . . . . . . . 5 General Information . . . . . . . . . . . . . . . . . . . . . . . . . . . . . . . . . . . . . . . . . . . . . . . 5 Service and Repair . . . . . . . . . . . . . . . . . . . . . . . . . . . . . . . . . . . . . . . . . . . . . 6 Caring for the Transducer. . . . . . . .
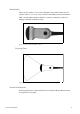
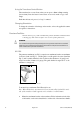
Introduction This is the user guide for Convex Array Transducer Type 8802 and must be used together with Care, Cleaning & Safety which contains important safety information 8802 is an abdominal transducer suitable for obstetric examinations, pelvic floor imaging and bladder and kidney studies. Figure 1. Convex Array Transducer 8802 Scanning Plane Figure 2.
Acoustic output data and data about EMC (electromagnetic compatibility) for this transducer are on the Technical Data CD that accompanies this user guide. A full explanation of acoustic output is given in your scanner user guide. WARNING If at any time the scanner malfunctions, or the image is severely distorted or degraded, or you suspect in any way that the scanner is not functioning correctly: • Remove all transducers from contact with the patient. • Turn off the scanner.
Caution: Keep all plugs and sockets absolutely dry at all times. Starting Scanning All equipment must be cleaned and disinfected with a suitable solution before use. Connecting the Transducer WARNING Keep all plugs and sockets absolutely dry at all times. The transducer is connected to the scanner using the array Transducer Socket on the scanner. To connect, the transducer plug’s locking lever should first be in a horizontal position. Align the plug to the scanner socket and insert securely.
Using the Transducer Control Button The transducer has a control button that you can press to Start or Stop scanning (freeze frame). Press the button for more than one second to make a copy of the image. Each time the button is pressed, a “beep” is emitted. Changing Orientation To change the orientation of the image on the monitor, refer to the applicable scanner user guide for instructions. Puncture Facilities Puncture and biopsy is possible with 8802.
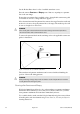
2 3 4 Fix the attachment bracket in position by tightening the attachment lock screw (item A in Fig 3). Tighten the screw up to its “locking point”, after which it will not be possible to tighten the screw anymore. The biopsy attachment should now be fixed solidly to the transducer’s handle. Using the needle guide locking screw (item B in Fig 3), adjust the needle guide according to the size of needle to be used.
See the Product Data sheet for a list of available transducer covers. Press the scanner Puncture or Biopsy control button to superimpose a puncture line on the scan image. If more than one puncture line is available, refer to the applicable scanner user guide for instructions on how to change which one appears. Move the transducer until the puncture line transects the target. Insert the needle and monitor it as it moves along the puncture line to the target.
Disposal When the transducer is scrapped at the end of its life, national rules for the relevant material in each individual land must be followed. Within the EU, when you discard the transducer, you must send it to appropriate facilities for recovery and recycling. See the applicable scanner user guide for further details.
August 2012 8802 User Guide (BB0334-I)