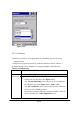
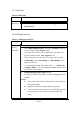
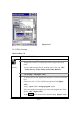
Figure 3-4-5 3.2.5 Certificates Certificates are used by some applications for establishing trust and for secure communications. Certificates are signed and issued by certificate authorities and are valid for a prescribed period of time. Windows CE manages multiple certificate stores. Table 3-4 Certificates(A) ICON ITEM & FUNCTION l Certificates ü ü ü ü “Store ” Tab ( Figure 3-5-1) : In the Stores tab, select the certificate store you wish to view or modify from the drop-down list (Figure 3-5-2).
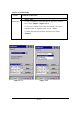
Table 3-4 Certificates(B) ICON ITEM & FUNCTION l Certificates ü ü ü Figure 3-5-1 “Store ” Tab : To add a certificate or associated private key to the selected store, select “Import” (Figure 3-5-4). To view more details of the selected certificate, such as the expanded name or expiration date, choose “View”. To delete the selected certificate from the store, choose “Remove”.
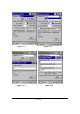
Figure 3-5-3 Figure 3-5-4 Figure 3-5-5 P3-31
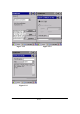
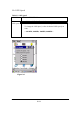
3.2.6 CPU Speed Table 3-5 CPU Speed ICON ITEM & FUNCTION l CPU Speed ü ü “CPU Speed” Tab :( Figure 3-6) Provide the information of current CPU Speed. To change the CPU Speed , select the desired CPU speed you want.
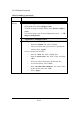
3.2.7 Date/Time Table 3-6 Date/Time ICON ITEM & FUNCTION l Date/Time ü “Date/Time ” Tab :( Figure 3-6) Please see the detail information of 2.5.1 Setting Time and Date on P2-22 3.2.8 Dialing Properties Table 3-7 Dialing properties(A) ICON Dialing Properties ITEM & FUNCTION l “Dialing Properties” Tab :( Figure 3-7-1) ü In the When dialing from list, select the “Location” where you want to change settings.(Figure 3-7-2) To create a new location, select “New”.
Figure 3-7-1 Figure 3-7-2 Figure 3-7-3 Figure 3-7-4 P3-34
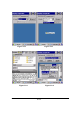
3.2.9 Display Properties Table 3-8 Display properties(A) ICON ITEM & FUNCTION l Display ü ü ü l ü ü “Background” Tab :( Figure 3-8-1) From the “Image” list, select an image you want as the background of the desktop.(Figure 3-8-2) To locate an image in another folder, select “Browse”.(Figure 3-8-3) To have the image cover the entire background, select “ □Tile image on background” “Appearance” Tab(Figure 3-8-4) Change the color scheme :( Figure 3-8-5) Ø From the ” Scheme ” list, select a scheme.
Figure 3-8-1 Figure 3-8-2 Figure 3-8-3 Figure 3-8-4 P3-36
Figure 3-8-5 3.2.10 Fkey Settings Table 3-9 FKey (A) ICON FKey Setting ITEM & FUNCTION l “Hot keys” Tab :( Figure 3-9-1) ü Assign your hot keys to wakeup system after it goes into sleep mode. To select which key(s) that can wakeup system, then, tap “OK”. < F1 key, F2 key, F3 key, F4 key and Scanner Buttons> ü l ü ü ü ü ü “AP Settings” Tab(Figure 3-9-2) To assign your favorite application program to F1,F2,F3 and F4 hot keys. Choose one of F1, F2, F3 and F4 from pull-down list.
Table 3-9 FKey (B) ICON FKey Setting ITEM & FUNCTION l “AP Settings” Tab(Figure 3-9-2) ü The defa ult setting for F1~F4: F Key F1 Name of Application Program Internet Explorer F2 WordPad F3 F4 Inbox My Computer Figure 3-9-1 Figure 3-9-2 P3-38
Figure 3-9-3 Figure 3-9-4 3.2.11 Information Table 3-10 Information ICON ITEM & FUNCTION l ü Information “Information” Tab : Provide hardware version, Software version, ROM size, RAM size, Serial No. and Configuration No. 3.2.12 Input Panel Table 3-11 Display properties(A) ICON Input Panel ITEM & FUNCTION l “Input panel” Tab :( Figure 3-10-1) ü Select the input method you want to change. To change the Soft Keyboard Options , tap “Option” (Figure 3-10-2) ü .
Table 3-11 Display properties(B) ICON ITEM & FUNCTION l Input Panel ü Ø Ø ü ü “Input panel” Tab : Change the soft keyboard options as desired, selecting from: Large or small keys Using gestures for space, black-space shift, and enter. To exit the soft keyboard Options , press “OK” on the control bar, or press the key on the keypad. To exit the Input Panel, press “OK” on the control bar, or press the key on the keypad. . Figure 3-10-1 Figure 3-10-2 3.2.
Table 3-12 Internet Options(B) ICON Internet Settings ITEM & FUNCTION ü “Connection” Tab :( Figure 3-11-2) Modify the network access setting as desired. l “Security” Tab (Figure 3-11-3) l Modify the security settings as desired. You can enable any of the following by tapping the checkbox: Ø Allow cookies Ø Allow TLS 1.0 security Ø Allow SSL 2.0 security Ø Allow SSL 3.0 security Ø Warm when switching across secure and insecure areas.
Figure 3-11-1 Figure 3-11-2 Figure 3-11-3 Figure 3-11-4 P3-42
3.2.14 Keyboard Table 3-13 Keyboard(A) ICON ITEM & FUNCTION “Repeat” Tab :( Figure 3-12) To change the amount of time between depressions before repetition starts, adjust the Repeat delay slider To change the repeat rate, adjust the Repeat rate slider. Test your new setting. Tap “ OK” to exit the “Keyboard” Tab.
3.2.15 Mouse Table 3-14 Mouse(A) ICON ITEM & FUNCTION l Mouse ü ü ü ü “Double-Click” Tab :( Figure 3-13-1,Figure 3-13-2) Double-click the checkerboard grid at comfortable speed Double-click the Test icon to test your setting. The function is OK if the figures are changed from Figure 3-13-1 to Figure 3-13-2. To tap “OK” to exit the Mouse tab.
3.2.16 Network and Dial-up Connections Table 3-15(A) Network and Dial- up Connections ICON ITEM & FUNCTION l “Connection” Tab : Network and Dial- up Connections To create a “Dial-up Connection”: Ø Double-tap the “Make New connection”. Ø In the “Make New Connection” dialog box, enter a name for the connection. Ø Select “Dial-Up Connection”. Ø Select the “Next” button. Ø Select the modem you want use. Ø Select “Configure ” Ø Under “Connection Reference”, use the default settings provided.
Table 3-15(A) Network and Dial- up Connections ICON ITEM & FUNCTION Once you have established an account, create a new connection on Network your device. When creating this connection, you should be able to use and Dial- up all of the default TCP/IP settings provided in the Make New Connections Connection Wizard. If you can’t connect using the default settings, contact your ISP or access your ISP’s Web site for specific TCP/IP information as well as primary and secondary DNS address.
P3-47