User’s Guide for IT7000 GPRS Model WinCE. NET Rugged PDA Dec. 06.
Table of Contents Chapter 1. Introduction 1.1: About this Manual 1.2: User and Product Safety 1.3: Insert IT7000 into Holster 1.4: Radio Frequency Interference Information 1.5: System specifications 1.6: Environment standard P1-1 P1-1 P1-2 P1-5 P1-6 P1-7 Chapter 2. Getting Started 21: Handling the PDA 2.1.1 Starting the PDA 2.2: Initiating a Network Connection 2.3 GPRS Function 2.3.1 Setup GPRS program 2.3.2 Interface layout 2.3.3 SELECTING COMMUNICATIONS SETTING 2.3.4 MAKING A VOICE CALL 2.3.
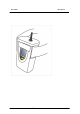
Chapter 1 Introduction Congratulations on purchasing the IT7000 PDA with GPRS module, a Microsoft Windows®CE .Net rugged PDA. Its special combination of features make it perfect for using in a wide range of applications. These features as: ˙ ˙ ˙ ˙ ˙ ˙ ˙ ˙ Small rugged lightweight form factor Microsoft Windows CE. Net operating system Flexible module design Wireless mobility via 802.11b Robust expansion capability Long battery life Transflective type color LCD display Backlit keypad 1.
User Guide Introduction ◆ Be sure that only authorized supplier are allowed to disassemble and reassemble the device. If the device or parts has been damaged due to any wrong handling, shall void the product and parts warranty. ◆ Always make back-up copies of all important data. Easy done by using a cable to transfer data to the computer. Manufacturer is not liable for any data damages or data loss caused by deletion or corruption by using of this device, or due to the drained battery.
User Guide Introduction P1-3
User Guide Introduction 1.4 Radio Frequency Interference Information 1.4.1 FCC Radiation Exposure Statement: This equipment has been tested and found to comply with the limits for a Class B digital device, pursuant to Part 15 of the FCC Rules. These limits are designed to provide reasonable protection against harmful interference in a residential installation.
User Guide Introduction IMPORTANT NOTE: FCC Radiation Exposure Statement: This equipment complies with FCC RF radiation exposure limits set forth for an uncontrolled environment. To maintain compliance with FCC RF exposure compliance requirements, please avoid direct contact to the transmitting antenna during transmitting. This transmitter must not be co-located or operating in conjunction with any other antenna or transmitter. This equipment has been SAR-evaluated for normal using condition.
User Guide Introduction 1.5 System Specifications The detailed specifications as follows. Unless otherwise noted, all the specifications are subject to change without prior notification. System Specification IT7000 Processor Memory Display Radio Support Communication Ports Scan Engine Expansion Slot LED - Intel® XScale PXA255 400Mhz 32 bits RISC - 64MB (M-System) Flash ROM - 64 or 128MB SDRAM - Support 240 x 320 TFT 256K Color LCD - Transflective type TFT LCD with back light -Wireless LAN: 802.
User Guide Introduction Power System Button/Key - Built in 7.
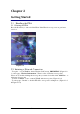
Chapter 2 Getting Started 2.1 Handling the PDA 2.1.1 Starting the PDA Press the Power key to turn on/off the PDA. If the PDA does not power on, perform a cold boot. Figure 2-1 2.2: Initiating a Network Connection To tap the icon at Task bar, then a Wireless LAN screen “PRISMNDS1”(Figure 2-21), select page “Wireless Information”. There is a list of Wireless access points. Select one by double-clicking the access point you want. Or double-click “Add New “ to add a new access point.
User Guide Getting Start Figure 2-2-1 Figure 2-2-2 Figure 2-2-3 Figure 2-2-4 P2-2
User Guide Getting Start 2.3: GPRS Function: 2.3.1 Setup GPRS program 1. Put the SIM card into SIM slot of PDA ( See Figure 2-3-5) 2. Enter into Start ? SettingsàControl PanelàSIEMENS GPRS (Figure 2-31)àTag ”OK” 3. A setup screen is showing as Figure 2-3-2 Figure 3-2-1 Figure 3-2-2 4. Please tag “OK” ICON to continue the program setup(Figure 3-2-3) Figure 2-3-3 5. The GPRS program will be finalized setup after the blue bar is fulfilled in the below figure.
User Guide Getting Start Figure 2-3-4 Figure 2-3-5 P2-4
User Guide Interface layout 2.3.2 INTERFACE LAYOUT Depending on options available and the capabilities of your PDA, the main interface enables you to: Look up all your messages using the Inbox, Outbox and Sent icons. Create and send Fax and SMS messages. Make a phone call using the Dialer, which also enables you to access SMS and fax functions. Manage several Phonebooks. Look up WAP sites. Connect to the Internet.
User Guide Interface layout Depending on the type of message, in order to send, see properties, move, resend, display, annotate or delete a message on the list: 1. Select the message and hold the selection with the stylus for a few seconds until a context menu is displayed. 2. Select the desired option. 3. Depending on the option selected, follow the usual procedure or click Cancel or the OK icon, located in the top right-hand corner of the screen, to return to the main interface.
User Guide Interface layout Depending on the type of message, in order to send, see properties, move, resend, display, annotate or delete a message on the list: 1. Select the message and hold the selection with the stylus for a few seconds until a context menu is displayed. 2. Select the desired option. 4. Depending on the option selected, follow the usual procedure or to return to the main interface click the Cancel button or the OK icon, located in the top right- hand corner of the screen.
User Guide Interface layout Phonebooks Clicking on the Phonebooks icon displays a drop-down list containing the phonebooks you have created or imported. Select the one you wish to set as the default phonebook from the list to be looked up or edited. If the drop-down list is empty and you would like to import contacts from your mobile phone, select the Tools>Read a phonebook menu. See Managing Phonebook, page 2-12.
User Guide Interface layout Drop-down menus The New and Tools drop-down menus have several functions, depending on the context and options available: New menu Click on the New menu at the bottom of the screen, then select: o SMS: follow the steps to prepare and send SMS messages as described on page 26. o Phonebook. To create a phonebook, see Managing Phonebook, page 2-10. o Phonebook Contact. To add a contact to your phonebook, see Managing Phonebook, page 2-10. o Call.
User Guide Selecting communications settings 2.3.3 SELECTING COMMUNICATIONS SETTINGS Before using the communications features, ensure that the communications port and the equipment you are using have been declared correctly. Communications tab 1. Select Tools>Options>Communications 2. Select the Manufacturer and the Model of your equipment (modem or telephone). 3. Select Connection type being used. 4. Click the confirm.
User Guide Making a voice call 2.3.4 MAKING A VOICE CALL 1. Select Call from the New menu in the main screen. The contacts list shows up. 2. Select the contact you wish to call. If this contact has more than one telephone number listed, select one of them and click Continue. 3. Click OK to make the call and follow the instructions displayed on screen. This function enables you to make a call rapidly from the main screen.
User Guide Managing phonebooks 2.3.5 MANAGING PHONEBOOKS Pocket PhoneTools enables you to create phonebooks, import contacts listed in your mobile phone (memory + SIM card) and synchronize various phonebooks. Creating a phonebook 1. Select New>Phonebook. 2. Enter the phonebook name. 3. Click OK. Adding a contact 2. Click the Phonebooks icon then select from the drop-down list the phonebook to which you wish to add a contact. Select New>Phonebook contact or click . 3.
User Guide Managing phonebooks Renaming a phonebook 1. Click the Phonebooks icon then select the phonebook to be renamed from the drop-down list displayed. 2. Select the Tools>Change menu. 3. Type your changes in the Name field and click OK. Changing a contact 1. Click the Phonebooks icon then select the phonebook containing the contact to be changed from the drop-down list displayed. 2. Select the contact you wish to change. 3.
User Guide Dialer 2.3.6 DIALER The Dialer module simulates the operation of a mobile phone in your PDA. It enables you to: y Make calls in various ways: by directly selecting an entry in the Contacts folder of your PDA. by selecting from a Fast calls list you will have pre-programmed. by entering a number directly using the keyboard. by redialing one of the last 10 numbers dialed. using the missed calls log if the caller has not withheld his/her number.
User Guide Dialer Dialer: Making a voice call 1. Access the dialer and use one of the following methods: - Direct entry, dial the number using the keys on the numeric keypad. To delete or correct the last digit displayed, click on the a C. To make the call, click the - icon showing an arrow pointing to the left and icon showing a green receiver. From Phonebook, click on the Contacts icon to retrieve the number you are calling.
User Guide Dialer It is just as easy to connect to your voicemail by pressing and holding the "1" key. If you have not specified this number yet, the dialer will prompt you to configure it. To end the call, click on the icon showing a red receiver. Call duration will then be displayed and an entry in the Dialer log created. If one or more callers have attempted to contact you in your absence, the dialer will inform you accordingly with an on-screen message.
User Guide Dialer Receiving SMS messages SMS messages are downloaded automatically as soon as your communications equipment informs the application that messages have been received. If the message received has high priority, its content is displayed automatically, otherwise you have to use the Envelope button to read it (see SMS, page 25).
User Guide Dialer Configuring a ringer 1. 2. From the main interface, select the Tools>Options menu. Click the Dialer link. You can specify the various tunes to be played according to the categories to which the callers belong in the window displayed. 3. Select the type of call to which a ringer is to be assigned in the first drop-down menu in the Events field: Incoming call, Incoming fax call or Receive SMS. 4.
User Guide SMS 2.3.7 SMS What is 'Short Message Service' (SMS)? The Short Message Service enables you to send messages in text format over a mobile phone network. This service requires a specific subscription. Short messages are sent first to the SMS Service Center run by the mobile phone network, which then forwards the message to the recipient. Received messages are stored in the memory. You cannot receive any more new messages once this memory is full.
User Guide SMS 3. 4. 5. You can also use the Detect automatically button for the application to interrogate your equipment and configure these settings. Enter the number for the answering machine suggested by your service provider. It will be used by the dialer. Click OK to confirm. SMS message settings 1. From the main interface, select Tools>Options and click on the SMS link.
User Guide SMS Sending an SMS message 1. 2. Starting from the main interface, select New>SMS or click . Enter the recipients' numbers using one of the following methods: ƒ Direct entry method: if you have a single recipient only, enter his or her information directly then click the Next button. If you have more than one recipient, enter their numbers then press the Add button to add them to the list.
User Guide SMS Downloading received SMS messages - Select Tools>Retrieve SMS. If you have received SMS messages on your mobile phone, they will be automatically copied or transferred to the Inbox. Unread messages appear in bold. To select a tool, simply click on it. Viewing an SMS 1. Select the SMS you wish to view. 2. 3. Select the Tools>View menu or hold the click until a context menu is displayed and select the View option on it.
User Guide SMS SMS send options on drafting - - Send now: the transmission request is implemented as soon as you click Send. Otherwise, the transmission request is stored in the Outbox. In order to send your message, you need to select it, then select Tools>Send. High priority: check this box to display the content of your message directly on the recipient's mobile phone screen. Request return receipt: check this box to receive an acknowledgement.
User Guide Dial-up networking 2.3.8 DIAL-UP NETWORKING The application assists the user when setting up dial-up networking, especially for Internet access. Since this setup relates to the service provider, you must configure it before anything else. Configuring the service provider 1. Starting from the main interface, select Tools>Options and click on the Network operator link. 2. Select your country and mobile telephony service provider. Accessing the connections list 1.
User Guide Dial-up networking Creating an access setup 1. 2. Access the connections Select the New option from the list. The first box appears, enabling you to enter the name to be assigned to your configuration. 3. Press the Next button. The application will list software that can be run while this connection is live. This choice is optional. 4. Press the Next button.
User Guide Dial-up networking Connecting You can set up the connection from the main interface, from the Tools>Dial-up networking menu or by clicking on . You will be shown a list if more than one access is configured. If no access has been configured, the application will prompt you to access the Setup program to create one.