Sections marked with this video icon have more information online. USER GUIDE POWERGLIDE ® For How-To videos, go to www.youtube.
IMPORTANT SAFETY INSTRUCTIONS READ ALL INSTRUCTIONS BEFORE USING YOUR UPRIGHT VACUUM. Always connect to a polarized outlet (one slot is wider than the other). Unplug from outlet when not in use and before conducting maintenance. When using an electrical appliance, basic precautions should be observed, including the following: WARNING TO REDUCE THE RISK OF FIRE, ELECTRIC SHOCK, OR INJURY: » Always connect to a polarized outlet (one slot is wider than the other).
Thanks for buying a BISSELL vacuum We’re glad you purchased a BISSELL vacuum. Everything we know about floor care went into the design and construction of this complete, high-tech home cleaning system. Safety Instructions . . . . . . . . . . 2 Your BISSELL vacuum is well made, and we back it with a limited five-year guarantee. We also stand behind it with a knowledgeable, dedicated Consumer Care department, so, should you ever have a problem, you’ll receive fast, considerate assistance. Operations . . .
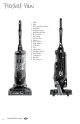
Product View 1 2 3 4 5 6 7 1 Handle 2 Wand 3 Dirt Container Release Button 4 Carry Handle 5 On/Off Power Switch On/Off Brush Roll Switch 6 Pre- Motor Filter 7 Dirt Container 8 Post-Motor Filter 9 PowerFoot 10 Hose Connection 11 Handle Adjuster 12 Cord Release 13 Cord 14 Variable Suction 15 Extra Reach Stair Hose 16 Lower Main Hose 17 Cord Wrap Clip 18 Brush Reset 19 Hose Connection 10 11 12 13 14 15 17 16 8 18 19 9 4 www.BISSELL.
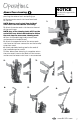
Assembly No tools required for assembly. Handle assembly 1. Press the handle adjustment lever and slide the handle into the vacuum base NOTE: The handle has two height settings. To lower or raise the handle, push the handle height adjustment lever and slide the handle up or down until it locks into the desired place. (2.) 1. 2. 3. Attach the lower cord wrap to the lower back of unit by snapping in place. 4. Attach the extra reach stair hose to the back of the unit.
Operations NOTICE Powering on 1. To turn on the vacuum, locate the power switch and move it to the “on” position (I) 2. Recline your vacuum by pressing your foot down on the foot of the vacuum and pulling back on the handle. Before using your vacuum, make sure that the dirt container is in locked position and that all filters (pre-motor and post-motor) are in place. Do not operate your vacuum without these filters. 1. 2. 3.
Operations NOTICE Above floor cleaning Ensure latch is fully engaged with the extra reach hose. 1. Disconnect the main lower hose by pressing the release latch and pulling up. 2. Remove extra reach stair hose from back of vacuum. 1. NOTE: Remove crevice tool from inside of extra reach stair hose before continuing. 3. Attach the extra reach stair hose to the end of the main hose. NOTE: Any of the cleaning tools will fit on the end of this hose.
Operations Above floor cleaning tools Attach any of the special tools to clean surfaces above the floor and hard to reach areas. 1. Select specialized tool: a . Crevice Tool: #2031063 Use in tight, narrow spaces b . TurboBrush Tool #2032447 (select models): Use rotating brush action for small, flat areas such as stairs and upholstery. Press down gently and pull toward you in a raking motion; excessive force will cause the brush to stop rotating. c .
Maintenance & Care WARNING 1. Empty dirt container when the dirt reaches the “full” line. To reduce the risk of electric shock, turn power switch off and disconnect polarized plug from electrical outlet before performing maintenance or troubleshooting checks. 2. Check the pre-motor filters at least once a month and clean and replace as needed. 3. Check and replace the post-motor filter as needed.
Maintenance & Care WARNING Cleaning the pre-motor filter 1. Unplug the cleaner from electrical outlet. Do not operate cleaner with damp or wet filters or without vacuum bags and all filters in place. 2. Remove the Easy Empty dirt container from the vacuum base by pushing the tank “empty” button. 3. Twist the top part of the dirt container counter clockwise and lift to remove. 4. There are two pre motor filters: one foam filter under a thinner fiber filter.
Maintenance & Care Cleaning the inner cyclone 1. Remove the inner cyclone by pulling up and separating it from the container. 1. 2. The inner cyclone may be wiped clean with a damp cloth. Make sure all parts are dry before replacing. 3. 3. The screen can be removed, by separating it from the cyclones. Pull down to remove and rinse with warm water. Let the screen completely dry before replacing. 4. Reassemble container and place back on vacuum. Replacing the post-motor filter 1.
Maintenance & Care Rotating brush and drive belt maintenance Check your vacuum cleaner’s rotating floor brush and drive belt regularly for debris, wear or damage. Debris can wrap around the brush and hamper its ability to effectively clean your carpet. 1. Unplug cleaner from electrical outlet. 2. Recline handle and turn vacuum cleaner over so the underside of the vacuum is accessible. 3. 3. Remove the seven screws as shown with a Phillips head screwdriver. Lift the brush cover off. 4.
Maintenance & Care Maintaining the TurboBrush Tool and Pet TurboEraser Tool The TurboBrush Tool should be checked regularly for clogs or debris wrapping around the brush. Select models include a Pet TurboEraser Tool that follows the same maintenance instructions. 2. 1. Unplug the vacuum from electrical outlet. 2. If a clog is present or debris is visible, twist the grey collar counterclockwise to remove the faceplate and clear any obstructions. 3.
Troubleshooting Is your vacuum plugged in? Are all hoses connected? Problem Possible causes Remedies Vacuum cleaner won’t turn on Blown fuse/tripped breaker Check/replace fuse or reset breaker No power at rotating floor brush Vacuum cleaner won’t pick up dirt Visible dirt escaping from cleaner 14 WARNING To reduce the risk of electric shock, turn power switch off and disconnect polarized plug from electrical outlet before performing maintenance or troubleshooting checks.
Warranty This warranty gives you specific legal rights, and you may also have other rights which may vary from state to state. If you need additional instruction regarding this warranty or have questions regarding what it may cover, please contact BISSELL Consumer Care by E-mail, telephone, or regular mail as described below.
Register your product today! Registering is quick, easy and offers you benefits over the lifetime of your product. You’ll receive: BISSELL Rewards Points Automatically earn points for discounts and free shipping on future purchases. Faster Service Supplying your information now saves you time should you need to contact us with questions regarding your product. Product Support Reminders and Alerts We’ll contact you with any important product maintenance reminders and alerts.