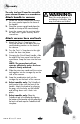
CLEAN view CYCLONI C USER'S GUIDE 80E7 and 28F4 SERIES 220-240V 2 Thank You 3 Safety Instructions 4 Product View 5 Assembly 6-7 8-12 13-14 Operations Maintenance and Care Troubleshooting 14 Replacement Parts 15 Warranty 16 Consumer Services
Thanks for buying a BISSELL Cleanview™ Cyclonic We’re glad you purchased a BISSELL Cleanview cyclonic vacuum. Everything we know about floor care went into the design and construction of this complete, high-tech home cleaning system. Your BISSELL Cleanview cyclonic vacuum is well made, and we back it with a limited one year warranty. We also stand behind it with a knowledgeable, dedicated Consumer Services department, so, should you ever have a problem, you’ll receive fast, considerate assistance.
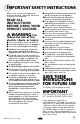
IMPORTANT SAFETY INSTRUCTIONS When using an electrical appliance, basic precautions should be observed, including the following: Read all instructions before using your Upright VACUUM. WARNING: To reduce the risk of fire, electric shock, or injury: ■ Do not use outdoors or on wet surfaces. ■ Do not leave machine when it is plugged in. ■ Do not use with damaged cord or plug.
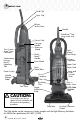
Product view Cord Clip Hose Clip Deluxe Stretch Hose Handle TurboBrush™ Tool (select models only) Crevice Tool Carrying Handle Extension Wand Twist 'n Snap™ Hose Connector Quick Release™ Cord Wrap Quick Reach™ Handle Combination Dusting Brush/ Upholstery Tool Primary Separator Hose Wand Upper Tank Hose Wand Base Power Switch Power Cord Inner and Outer Circular Filters Dirt Container Handle Release Pedal Filter Cup Foot Hose Pre-Motor Filter Lock ’n Seal™ Lever HEPA Media Post-Motor Filter*
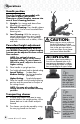
Assembly The only tool you’ll need to assemble your vacuum cleaner is a screwdriver. Attach handle to vacuum 1. Locate the vacuum handle and remove the screw packet taped to the base of the handle. 2. Stand the vacuum upright and place the handle on the top of the vacuum body. 3. Insert the screws into the existing holes on each side. Tighten securely with a screwdriver. WARNING: Plastic film can be dangerous. To avoid danger of suffocation, keep away from babies and children.
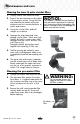
Operations Handle position Press the handle release pedal with your foot to place your BISSELL Cleanview cyclonic bagless vacuum into one of three cleaning positions. 1. Upright- For storage and above floor cleaning with special tools. 2. Normal Cleaning- Press handle release pedal once. Use for most household floor cleaning tasks. 3. Low Cleaning- With the vacuum in normal cleaning position, press handle release pedal again. Use for reaching under low furniture such as tables, chairs and beds.
Operations Special tools Your BISSELL Cleanview cyclonic bagless vacuum is not only a powerful carpet and rug vacuum cleaner, it’s also a versatile above floor vacuum cleaner when you select one of the special tools. 1. Raise handle to upright position. 2. Grasp the Quick Reach handle and lift hose wand to separate from suction intake opening. 3. Attach tools by firmly pushing onto vacuum hose or extension wand.
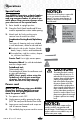
Maintenance and care To maintain maximum cleaning performance from your BISSELL Cleanview cyclonic bagless vacuum, perform these simple maintenance steps. 1. Empty the dirt container when the dirt reaches the “Full” line on the side. 2. Check the inner and outer circular filters, and the pre-motor filter at least once a month and clean or replace as needed. 3. Replace the HEPA media post-motor filter* every three to six months.
Maintenance and care Cleaning the inner & outer circular filters 1. Unplug cleaner from electrical outlet. 2. Remove the dirt container as described in the previous section. Grasp the filter cup located at the bottom of the dirt container and twist counterclockwise to unlock and remove. NOTICE: This product is intended for household use only and not for commercial or industrial use. Vacuuming of dust from products like plaster, concrete or ashes will damage the motor and void the warranty. 3.
Maintenance and care Replacing the HEPA media post-motor filter * The post-motor filter is a H13 HEPA media filter*, which assists in the filtration process to return clean air to the room. 1. Unplug the vacuum from electrical outlet. 2. Remove the filter door, located on the front of the vacuum. HEPA Media Post-Motor Filter* 3. Remove the post motor filter. 4. Replace the post-motor filter with a new filter. NOTE: The post-motor filter is a white pleated HEPA media filter*.
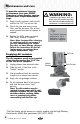
Maintenance and care Check rotating floor brush and drive belt You should check your vacuum cleaner’s rotating floor brush and drive belt regularly for wear or damage. You should also clean the brush and brush ends of string, hair and carpet fibers. These can wrap around the brush and hamper its ability to effectively clean your carpet. Also remove any debris that has accumulated under the brush cover. 1. Unplug cleaner from electrical outlet. Brush Cover 2.
Maintenance and care Clearing clog Low suction, poor pickup or no suction may be due to a clog in the vacuum cleaner. If you notice a change in the sound of the vacuum motor or a reduction in the spinning action in the dirt container, check for clogs. 1. Unplug cleaner from electrical outlet. Primary Separator 2. Empty dirt container. 3. Check upper tank and primary separator for build up or clogs. Check to make sure primary separator is installed correctly.
Troubleshooting Vacuum cleaner won’t turn on Possible causes 1. Power cord not firmly plugged in WARNING: To reduce the risk of electric shock, turn power OFF and disconnect plug from electrical outlet before performing maintenance or troubleshooting. Remedies 1. Check electrical plug Vacuum cleaner won't pick up dirt Possible causes Remedies 1. Incorrect height adjustment 2. Hose not attached to suction opening 2. Grasp Quick Release handle and firmly push hose wand onto the suction opening.
Troubleshooting Visible dirt escaping from cleaner continued Possible causes Remedies 3. Dirt container installed incorrectly 3. Position correctly and lock into place 4. Filter cup installed incorrectly 4. Remove dirt container and make sure filter cup is fully attached Other maintenance or service not included in the manual should be performed by an authorized service representative. Thank you for selecting a BISSELL product. Please do not return this product to the store.
Warranty This warranty gives you specific legal rights, and you may also have other rights which may vary from country to country. If you need additional instruction regarding this warranty or have questions regarding what it may cover, please contact BISSELL Consumer Services by telephone, or regular post as described below, or contact your local in country distributor. Limited One Year Warranty Subject to the *EXCEPTIONS AND EXCLUSIONS identified below, BISSELL Homecare, Inc.
BISSELL consumer services If your BISSELL product should require service: Call BISSELL Consumer Services at the numbers below and we will give you the location of a BISSELL Authorized Service Center in your area. For all other countries, contact your local in country distributor for questions, service, or repair. If you have questions about your warranty or need replacement parts please contact the numbers below.