
Operation Manual
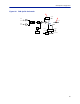
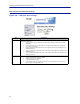


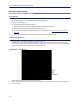
Table Of Contents
- Safety Precautions
- About This Manual
- Table of Contents
- Chapter 1 Introduction
- Chapter 2 System Description
- Chapter 3 Installation guidelines
- Chapter 4 DAS Software Configuration
- Chapter 5 Commissioning
- Chapter 6 RF Commissioning
- Chapter 7 Troubleshooting
- Alarms
- Base Station Gateway (BGW) Alarms
- Fiber Optic Remote (FOR) Alarms
- Remote Unit (RU) Alarms
- Fiber optic Interface (FOI) Alarms
- Base Station Interface (BIU) Alarms
- Medium Power Amplifier (PA) Alarms
- Variable Gain Amplifier (VGA) Alarms
- Analog Pre-distortion (APD) Amplifier Alarms
- Multi-carrier Power Amplifier Interface (MPI) alarms
- Alarms
- Chapter 8 Model Identification

DAS Software Configuration
96
Moving Remotes to Different FOI Port
All DAS components are assigned IP addresses by the BGW. The FOR in the Remote is the assigned an IP address as
a subunit of the FOI to which it is connected. When the Remote is moved to a different FOI one of several actions
must take place:
1. The lease on the Remote IP address must be given time to expire
. This could take up to 30 minutes. Once the
current IP lease expires, the new FOI will then assign the correct IP address to the Remote.
2. Manually power cycle the Remote. During the reboot process, the Remote will release the old IP address and
have the correct IP address assigned by the new FOI.
3. Communications to the remote can only occur when the remote has the correct IP address. Before moving the
fiber, access the FOR via the GUI. In the advanced settings, reboot the FOR. As soon as the reboot has been
initiated, quickly move the head end fiber to the new FOI port. When the Remote finishes the rebooting
process, the new FOI will assign the correct IP address.
Replacing Master Unit Cards
All DAS components are assigned IP addresses by the BGW. When a card is replaced, the card must be assigned a
new IP address by the BGW. On rare occasions, the BGW may have not be able to assign an IP address to the new
card. This is easily corrected by removing the card from the Master Unit chassis (with ESD strap attached) and then
re-install the card. The BGW will then assign the correct IP address.
Moving Master Unit Cards
Occasionally, cards need to be moved to different slots in the Master Unit.
CAUTION
Always use an ESD strap when installation and removing cards. Failure to comply may
result in permanent disabling damage to the module.
1. Move the card to the new slot.
2. Ensure there is an Ethernet connection for the new card location on the backplane of the Master Unit.
3. Wait for the card to complete the boot process. If the card remains in the boot process (Green LED remains on
for approximately 2 seconds and then off for one second) then the IP address may not have been assigned.
Check Ethernet connection.
4. Log into the GUI to confirm software connectivity. On occasions the card will not show up after being moved.
a. Go to the Configuration menu and remove the card (move from right to left) and then Submit. See
Figure 109 on page 96
.
b. Select the card from the left menu and then add it back to the system on the right and then submit.
c. Go to the Home menu. Log out of the BGW and then log back in.
d. Go to Network Views and log into the card to verify GUI connection.
Figure 109 Manage System Modules