
User's Manual
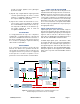
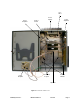
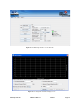
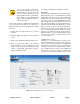

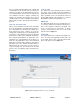

Table Of Contents

TX RX Systems Inc. Manual 7-9485-1.7 09/12/11 Page 12
channel module as well as updating any displayed
data from the module, but only after the button is
pressed.
FILTER AREA
This is a user interactive area where the field engi-
neer can program the operating characteristics of
the selected channel filter. Each parameter in the
settings area can be changed by clicking in the box
and typing in the new values or by pointing at an
arrow to display a drop down box. Most of the
adjustable parameters have adjustment limitations
as applicable. The parameters are self-explana-
tory. The changes you make are only applicable to
the selected channel filter. After you have made
changes to the various parameters press the “sub-
mit” command interface button (lower left corner of
the screen) in order to copy the changes into the
module itself.
When the “Design Filter” button is pressed a cus-
tom design template will be displayed as shown in
Figure 9. Remember the changes you make are
only applicable to the selected channel filter. After
you have made changes to the various parameters
press the “submit” command interface button
(lower left corner of the screen) in order to copy the
changes into the module itself.
STATUS AREA
The status area of the filters tab lets the user know
whether the channel is enabled, if the test signal is
on, if the carrier squelch is on, and what the output
power level is for that channel. A green bubble indi-
cates the parameter is on and a black bubble indi-
cates the parameter is off.
Link Tab
The link tab is divided into four functional areas
which include a row of command buttons running
down the left side of the screen, a link and settings
area in the middle of the screen, and a status area
on the right side of the screen as shown in Figure
10. The link tab is designed to interact with one
branch of a module at a time. The branch that is
selected for interaction is determined by the LINK
box on the upper left of the screen. To change the
branch that you are going to interact with click on
the arrow to display the full drop down box. Scroll
down the list until the desired branch is highlighted
and click on it. The data displayed in the link area
of the display screen will now be for the selected
branch.
COMMAND BUTTONS
Clicking on a command button (located on the
extreme left hand side of the filters tab) performs
Figure 11: The Web-Page Interface screen, admin tab.