
User's Manual
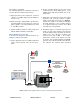
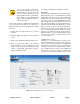

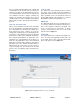

Table Of Contents

TX RX Systems Inc. Manual 7-9485-1.7 09/12/11 Page 11
O n c e yo u r p a ss w o r d h a s b e e n
entered and validated a 15 minute
inactivity timer is started. If the user
does not make any changes to the
web page interface the system will re-
arm security once the inactivity timer
expires. The user will then need to re-
enter the password.
Password protection is disabled by default when
your system leaves the factory. To enable pass-
word protection for your system perform the follow-
ing steps;
1) Launch the web page interface in your web
browser.
2) Click the “Admin” tab at the top of the interface
screen.
3) Click on the “Enable Password protection” box.
4) Enter your password. Write your password
down somewhere for safe keeping in case you
forget it. If you do forget your password you will
need to contact Bird Technologies Group to
obtain a default password.
5) Click the submit button to apply the changes.
Filters Tab
The filters tab is divided into three functional areas
which include a row of command buttons running
down the left side of the screen, a filter area in the
middle of the screen, and a status area on the right
side of the screen as shown in Figure 8. The filter
tab is designed to interact with one channel at a
time. The channel that is selected for interaction is
determined by the LINK and FILTER boxes on the
upper left of the screen. To change the filter chan-
nel that you are going to interact with click on the
arrow to display the full drop down box. Scroll
down the list until the desired channel is high-
lighted and click on it. The data displayed in the fil-
ter area of the display screen will now be for the
selected channel.
COMMAND BUTTONS
Clicking on a command button (located on the
extreme left hand side of the filters tab) performs
the associated task immediately. The submit and
reload buttons in the bottom left corner allow any
changes you make to the display/interface boxes
to be downloaded to the booster. The submit and
reload buttons act like a trigger sending any
changes you made in the interface boxes to the
NOTE
Figure 10: The Web-Page interface screen, link tab.