CardioMessenger® Smart Transmitter for BIOTRONIK Home Monitoring® Technical Manual Doc. Id.
Table of Contents Introduction. . . . . . . . . . . . . . . . . . . . . . . . . . . . . . . . . . . . . . . . . . . . . . . . . . . 4 First Steps . . . . . . . . . . . . . . . . . . . . . . . . . . . . . . . . . . . . . . . . . . . . . . . . . . . . 5 Check the completeness of the delivery. . . . . . . . . . . . . . . . . 5 Where Do I Put the CardioMessenger? . . . . . . . . . . . . . . . . . 6 How Do I Connect the CardioMessenger? . . . . . . . . . . . . . . . 7 How Do I Use the CardioMessenger? . . .
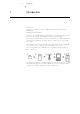
1 Introduction Introduction Introduction1399229_ATechnical ManualCardioMessenger® Smart Dear Patient: You have received a device with the additional Home Monitoring function by BIOTRONIK. How Home Monitoring works Your device (1) is equipped with a special transmitter. It sends information on your heart to the transmitter, your CardioMessenger (2), usually at night. The transmission power from your device is low and does not impair your health in any way.
2 First Steps First Steps First Steps2399229_ATechnical ManualCardioMessenger® Smart Check the completeness of the delivery Your CardioMessenger is supplied ready for use, and you can operate it immediately by inserting the power plug into the wall outlet. However, prior to usage, check the CardioMessenger for any visible damage and use only an undamaged CardioMessenger. Return a damaged CardioMessenger to your physician. Use only the provided original power supply brick (see the technical data).
First Steps Where Do I Put the CardioMessenger? Your CardioMessenger has a battery so you can take it along as needed during the day. However, it should be placed close to your bed at night for the nightly data transfer from the device to the CardioMessenger. The bedside table is therefore the best location for your CardioMessenger, as it usually meets the following conditions: • The CardioMessenger is placed on a solid base and cannot fall.
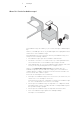
First Steps How Do I Connect the CardioMessenger? Your CardioMessenger is already pre-installed and supplied ready for use. You can operate it immediately by inserting the power plug into the wall outlet. Also consult the included quick reference guide. However, proceed as follows if the plug has disconnected during removal from the package or during shipping: 1 Connect the small plug (micro USB plug) on the right to the CardioMessenger.
First Steps How Do I Turn Off the CardioMessenger? Since the CardioMessenger contains a mobile ("cellular") module, you may need to switch off the CardioMessenger for safety reasons (e.g., in an airplane). The use of cellular phones is prohibited in some locations to provide quiet zones (e.g., in a theater or cinema). The CardioMessenger does not need to be turned off in such places because it produces no noise. Press the on/off key for approximately 5 seconds until the display turns off.
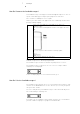
3 Icons on the CardioMessenger Icons on the CardioMessenger Icons on the CardioMessenger3399229_ATechnical ManualCardioMessenger® Smart The CardioMessenger has the following icons: 1 Operation icon 2 Call back icon See Call back function, p. 11 3 Information icon See Error Resolution, p. 12 4 The battery icon is always displayed with 1-3 bars according to the charging status. When the CardioMessenger is charging, a battery icon with a small power plug is displayed.
4 Functions Functions Functions4399229_ATechnical ManualCardioMessenger® Smart Self-test The CardioMessenger automatically conducts a self-test after being connected. 1 All icons on the CardioMessenger are displayed. The CardioMessenger then checks the connection to the cellular phone network. 2 The operation icon flashes and the battery icon is displayed. The connection test can take up to 15 minutes.
Functions Call back function With the call back icon, your physician can request you to call him/her. Your physician can turn on the icon via the cellular phone network. It will then flash for a maximum of 3 days. The call back icon flashes if your physician wants you to call. Your physician will let you know in advance whether he or she intends to use this function in general. Contact your physician during office hours as soon as you notice that the call back icon is flashing.
5 Error Resolution Error Resolution Error Resolution5399229_ATechnical ManualCardioMessenger® Smart If your physician contacts you because device messages are not being received but your CardioMessenger was ready for use during the period in question, you should remove possible sources of radio interference from the immediate vicinity of the CardioMessenger.
Error Resolution Error type B Self-test failed The information icon is displayed. Repeat the self-test because the CardioMessenger did not finish it. The CardioMessenger is not ready for use. 1 Press the on/off key on the right of the CardioMessenger for approximately five seconds. 2 Press the on/off key again for approximately five seconds. The CardioMessenger starts and automatically repeats the self-test. After the selftest has been completed, the CardioMessenger is ready for use.
6 Handling Handling Handling6399229_ATechnical ManualCardioMessenger® Smart The CardioMessenger is intended primarily for continuous operation at home because it receives information from your device once daily, usually at night, and forwards it to the BIOTRONIK Service Center. Make a habit of charging the CardioMessenger at night so that it can be used in mobile operation during the day.
Handling Charging Note: You should charge the CardioMessenger once before using it for the first time. It is also recommended that you operate the CardioMessenger with the power supply brick on the bedside table to fully charge the battery. At the very latest, the CardioMessenger must be charged when the battery icon flashes. Proceed as follows: 1 Connect the CardioMessenger to the mains supply.
Handling Maintenance The CardioMessenger is intended for continuous, automatic operation. Once correctly installed, ongoing maintenance is typically not required. Disposal European Directive 2002/96/EC regarding waste electrical and electronic equipment (WEEE) applies to the CardioMessenger and associated power supply brick, because they contain materials that must be correctly disposed of for reasons of environmental protection.
7 Precautionary Measures Precautionary Measures Precautionary Measures7399229_ATechnical ManualCardioMessenger® Smart The CardioMessenger is a medical product and therefore complies with the strict requirements for the development, manufacturing, and testing of medical devices. Please take the following precautions: Statutory regulations for electrical devices in hospitals require that the CardioMessenger not be used in areas where cellular phones are prohibited.
8 Guidelines Guidelines Guidelines8399229_ATechnical ManualCardioMessenger® Smart Telemetry data for the USA This transmitter is authorized by rule under the Medical Device Radiocommunication Service (in part 95 of the FCC Rules) and must not cause harmful interference to stations operating in the 400.150-406.000 MHz band in the Meteorological Aids (i.e.
9 Guidelines Technical Data General Permissible ambient conditions • Operating mode: Continuous operation • Longevity: 6 years • IP 21: Protection against dripping water • Operating temperature: -5°C to +40°C • Storage and transport temperature: -20°C to +60°C • Store in a dry place: • Atmospheric pressure: 700 hPa to 1060 hPa • Type: CardioMessenger Smart • Dimensions (WxLxH): approx. 67 x 135 x 17 mm • Weight: approx.
Legend for the Label Guidelines The label icons symbolize the following: BIOTRONIK order number Serial number Manufacturing date Follow the instructions for use Store in a dry place Storage temperature Air pressure limit Humidity limit Transmitter with non-ionizing radiation at designated frequency Transceiver frequency This device contains material that requires special waste disposal according to the environmental protection guidelines.