
Product Manual


4
Controlled Flow Baby Feeder Assembly Instructions
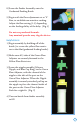
1) Screw the Yellow 5-Hole Flow Restrictor
onto the Bottle.
2) Press the Purple Silicone Seal onto the
Yellow 5-Hole Flow Restrictor.
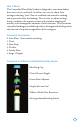
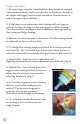
3) Place the Green Flow Adjuster over the
Purple Seal and snap it onto the Yellow
Flow Restrictor so that the number “0”
is viewable through the window on the
Green thumb tab. Make sure all 3 tabs
on the Green Flow Adjuster are securely
fastened. (Fig. 1)
4) Place the Bionix Silicone Nipple inside
of the Blue Ring Cap, creating the nipple
assembly.
5) Screw the nipple assembly onto the
Green Flow Adjuster. (Fig. 2)
6) Seat the channel of the nipple into the
Green Flow Adjuster by gently pulling
up on the nipple to align the channel into
the Green Flow Adjuster. Once aligned,
squeeze the nipple and push down,
inserting the channel of the nipple into
the raised component of the Green Flow
Adjuster. (Fig. 3)
7) Unscrew the completed Feeder Assembly
and fill the Bionix Graduated Feeding
Bottle with the premixed nutrition of
choice. (Fig. 4) IMPORTANT: You must shake the formula well
prior to filling the Controlled Flow Baby Feeder to ensure clogs
do not form.
Fig.1
Fig.2
Fig.3
Fig.4