Biotechnology Explorer™ Fish DNA Barcoding Kit Quick Guide explorer.bio-rad.com Catalog #166-5100EDU Duplication of any part of this document is permitted for classroom use only. Please visit explorer.bio-rad.com to access our selection of language translations for Biotechnology Explorer kit curricula.
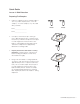
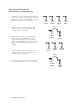
Quick Guide Lesson 1: DNA Extraction Preparing Fish Samples 1. Label one capped 2 ml microcentrifuge tube for each of your fish samples (that is, “1” for fish sample 1, “2” for fish sample 2, etc.). Also label with your initials. Fish 1__________________ 1 2 Initials Initials Fish 2__________________ 2. Cut a piece of fish muscle up to 100 mg in mass, approximately the size of a pencil eraserhead, from your first fish sample.
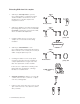
Extracting DNA from fish samples 200 µl 1. Add 200 µl of Resuspension to your two microcentrifuge tubes containing minced fish and flick the tubes several times to ensure full submersion of the fish sample in the resuspension solution. 1 2 Resuspension Flick 250 µl 2. Add 250 µl of Lysis to each tube and mix gently by inverting tubes 10 times to mix contents. Do not vortex! Vortexing may shear genomic DNA, which can inhibit PCR amplification. 1 2 Invert gently, 10x Lysis 3.
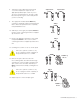
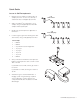
8. Transfer the entire supernatant (500–550 µl) of each fish sample from step 5 into the appropriately labeled spin column. Try not to get any of the particulates into the spin column because they will clog the column and prevent you from continuing. Supernatant Supernatant 1 1 9. Thoroughly mix the tube labeled Matrix by vortexing or repeatedly shaking and inverting the tube to make sure particulates are completely resuspended before use. 2 2 200 µl 1 10.
15. Remove the spin column from the 2 ml microcentrifuge tube, discard the flowthrough at the bottom of the 2 ml tube, and replace the spin column in the same tube. Centrifuge columns for a full 2 min to remove residual traces of ethanol and dry out the matrix. 1 16. Label two clean 2 ml capless microcentrifuge tubes with your fish sample name and your initials. 1 2 Initials Initials 17. When your 2 min spin is completed, remove the spin columns and discard the 2 ml microcentrifuge wash tubes.
Quick Guide Lesson 2: PCR Amplification of DNA 1. Label four PCR tubes with your initials and the sample name (1 for fish sample 1, 2 for fish sample 2, (+) for the PCR positive control DNA, (–) for the PCR negative control). Keep the tubes on ice for the remaining steps. Tube Name Master Mix DNA 1 35 µl CMM, 5 µl fish sample 1 2 35 µl CMM, 5 µl fish sample 2 (+) 35 µl CMM, 5 µl (+) sample (–) 35 µl CMM, 5 µl (–) sample (+) (–) 35 µl 2.
Preparing PCR Samples for Electrophoresis and Sequencing 1. Label four 2 ml microcentrifuge tubes with both your initials and E. E stands for electrophoresis. Now label one of these tubes Fish 1, one tube Fish 2, one tube (+), and one tube (–). 1, E Initials 2, E Initials 4. Remove 30 µl from each PCR reaction and deposit into the 2 ml microcentrifuge tube corresponding to that sample. 1, PCR Product 1, SEQ Initials 2, SEQ Initials 1, E Initials (+), SEQ Initials 30 µl 5.
Quick Guide Lesson 3: Gel Electrophoresis 1. Retrieve the 5 µl samples of PCR products (4 samples) from 4°C. To each one, add 5 µl of sterile water. Use a new pipet tip each time. 5 µl sterile water 2. Add 2 µl of UView™ 6x loading dye to each sample, using a new pipet tip each time. Mix samples well and pulse-spin. 1, E 3. Set up your gel electrophoresis apparatus as instructed. 2, E (+), E (–), E 2, E (+), E (–), E 2 µl 6x loading dye 4.
Quick Guide Lesson 4: Sequencing 1. Parafilm your capped Fish 1 SEQ, Fish 2 SEQ, and (+) SEQ tubes thoroughly to prevent leakage while shipping. 2. Record the sample names on your tubes and make sure these match the names your instructor is submitting to the sequencing facility. This is the only way you can identify the correct sequencing data file for each sample. 3. Give your samples to your instructor for shipment to the sequencing facility.
Bio-Rad Laboratories, Inc. Web site www.bio-rad.