
Software Updates User guide


Plates
56
Well Groups Manager Window
Well groups divide a single plate into subsets of wells that can be analyzed independently in
the Data Analysis window. Once well groups are set up, select one in the Data Analysis
window to analyze the data as an independent group. For example, set up well groups to
analyze multiple experiments run in one plate or to analyze each well group with a different
standard curve.
NOTE: The default well group is All Wells.
Create Well Groups
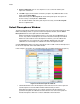
To create well groups in the Well Groups Manager window, follow these instructions:
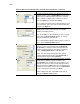
1. Click the Well Groups button in the Plate Editor toolbar or click the Manage Well
Groups button in the Data Analysis window toolbar.
2. Click Add to create a new group. The pull-down menu shows the group name as Group
1 for the first group.
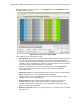
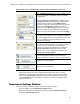
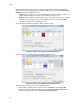
3. Select the wells that will compose the well group in the plate view by clicking and
dragging across the group of wells. Selected wells turn blue in color (Figure 36).
4. (Optional) Change the name of the group by selecting the group name in the pull-down
menu and typing a new name.
5. (Optional) Create more well groups by repeating steps 1 and 2.
6. (Optional) Delete well groups by selecting the group name in the pull-down list and
clicking the Delete button.
7. Click OK to finish and close the window, or click Cancel to close the window without
making changes.
Figure 36. Color of wells in the Well Group Manager window.