
Software Updates User guide


Plates
50
5. Control sample tab. Click on one sample to use as a control for relative gene
expression calculations.
6. Click OK to apply the information entered to your plate. Any additional edits can be
made using the Plate Editor.
NOTE: Returning to the Auto layout tab will reset the plate layout. The layout can
also be reset by selecting To o l s > Clear Plate.
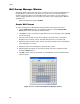
TIP: To read text within wells of the plate layout more easily, click the Zoom plate
box for a magnified view.
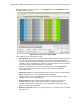
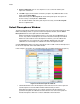
Select Fluorophores Window
The Select Fluorophores window lists fluorophores that can be selected to load into the Plate
Editor well loading controls. To open the Select Fluorophores window, click the Select
Fluorophores button on the right side of the Plate Editor.
NOTE: The fluorophores listed depend on the scan mode; when SYBR/FAM only is
chosen, only channel 1 fluorophores are shown in the Select Fluorophores window.
NOTE: You cannot add or remove fluorophores in this list; you must calibrate the
new fluorophores on an instrument in the Calibration Wizard (page 151). After
calibration, the new fluorophore is added to the Select Fluorophore window.
Click the Selected checkbox next to the fluorophore name to add or remove fluorophores to
the list on the right side of the Plate Editor window.
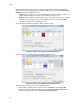
In this example, several dyes are selected from the list of available fluorophores (Figure 33).
Figure 33. Select Fluorophores window.
• Click the Color box next to the fluorophore name and select a new color to represent
each fluorophore in the Plate Editor window and Data Analysis charts
NOTE: Before beginning the run, the software verifies that the fluorophores you
specified in the plate are calibrated on that instrument. You cannot run a plate if it
includes fluorophores that have not been calibrated on that instrument.