ENrich™ Q ENrich™ S High-Resolution Ion Exchange Columns Instruction Manual Catalog numbers 780-0001 780-0003 780-0021 780-0023 Please read these instructions before you use ENrich Q and S high-resolution ion exchange media. If you have any questions or comments regarding these instructions, please contact your Bio-Rad Laboratories representative.
Table of Contents Section 1: Characteristics of the ENrich Ion Exchange (IEX) Columns ................................... 1 1.1 Introduction .......................................................1 1.2 The ENrich Separation Media ............................. 1 1.3 Connection to the NGC™ and Other Chromatography Systems ................................. 2 Section 2 : Use of the ENrich IEX Columns ........................ 3 2.1 Preparation for Initial Use ................................... 3 2.
Section 1: Characteristics of the ENrich Ion Exchange Columns 1.1 Introduction ENrich prepacked ion exchange columns meet the needs of the biochromatographer for rapid and reproducible high-resolution separations of proteins and other biomolecules, including peptides and polynucleotides. Two column sizes (bed volumes of 1 and 8 ml) provide predictable scale-up of high-resolution separations without sacrificing capacity. 1.
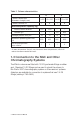
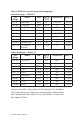
Table 1. Column characteristics. Q Column dimensions (diameter x height, mm) Column volume, ml S 5 x 50 10 x 100 5 x 50 10 x 100 1 8 1 8 130 1000 – – Maximum protein capacity, mg Bovine serum albumin – – 120 940 Average particle size, μm Human IgG 10 10 10 10 Maximum operating pressure, psi 500 500 500 500 1 4 1 4 Recommended flow rate, ml/min* * At room temperature. Viscosity may increase at lower temperatures, which will reduce the recommended flow rates. 1.
Section 2: Use of the ENrich Columns 2.1 Preparation for Initial Use The columns are supplied in a storage solvent of 20% ethanol in water. Prior to initial use and after extended storage periods, each column should be conditioned as described in steps 1–4. Always use HPLC-grade reagents and be sure to filter and degas solvents. During these four steps do not exceed more than 50% of the recommended flow rates (see Table 1). 1. Wash with 5 column volumes of water. 2.
Table 2. Buffers for ion exchange chromatography. Anion Exchange — ENrich Q pH Range Buffer MW pKa @ 25°C Counter-Ion pKa/°C –0.015 5.0–6.0 Piperazine 86.1 5.7 Cl-/HCOO– – 5.0–6.0 L-histidine 155.2 6.15 CI 5.8–7.2 Bis-Tris 209.2 6.5 CI– 6.4–7.3 Bis-Tris propane 282.3 6.8,9 CI– 7.3–8.3 Triethanolamine 149.2 7.8 CI-/CH3COO –0.02 7.6–8.6 Tris 121.1 8.1 CI– –0.031 8.4–8.8 Diethanolamine 105.1 8.9 CI– –0.025 9.0–9.9 Ethanolamine 61.1 9.5 CI– –0.029 9.8–10.
2.3 Sample Preparation Proper adjustment of the sample pH and ionic strength is critical for consistent and reproducible chromatography. For best results, the sample should be exchanged into the start buffer or diluted to the start buffer’s concentration. Buffer exchange can be performed using Bio-Spin® 6 and Micro Bio-Spin™ 6 columns, Econo-Pac® 10DG desalting columns, Bio-Gel® P-6DG gel, or the Bio-Scale™ Mini desalting cartridges with Bio-Gel P-6. The choice of product depends on sample volume.
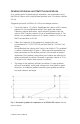
Gradient Volumes and Salt Concentrations As a starting point for developing a separation, we recommend using the ENrich column with a simple linear gradient over 15 column volumes (15 ml). Suggested protocol for ENrich 5 x 50 ion exchange columns: • Use a flow rate of 1.0 ml/min. Equilibrate the column with 5 column volumes (5 ml) of equilibration buffer. Then apply the sample. Following sample application, wash unbound proteins from the column with 3 column volumes (3 ml) of equilibration buffer A.
Section 3: Care of the ENrich Ion Exchange Column 3.1 Column Cleaning Careful preparation (especially filtration) of the sample and the buffers will maintain the column performance and lifetime. Normally, washing with 1.0 M NaCl or KCl will remove most bound components. However, if there is a significant decrease in column performance (increasing backpressures or a significant drop in resolution), then a more extensive cleaning protocol such as that described in steps 1–6 should be used.
3.2 Bed Height Adjustment Under certain conditions of buffer composition, high flow rates or long-term use, the resin bed may compress, creating a void between the frit and the top of the bed. Normally, the void can be eliminated by turning the adjusting nut clockwise until the frit just touches the top of the bed (Figure 2). If the bed compresses at high flow rates, stop the pump and loosen the top fitting, then use the adjusting nut to remove the void, retighten the top fitting and resume pumping buffer.
3.3 Frit Replacement The top frit may need to be replaced after extensive column use or if increasing backpressures are noticed. Always try cleaning the column in the reverse direction (as described in Section 3.1) before replacing the frit. A frit kit is available which contains a frit removal tool, 2 O-rings and 2 frits. Figure 3 shows a column diagram to assist in the replacement of the top frit. Fig. 3. Column diagram. 1. Start buffer through the column at a slow flow rate (0.5 ml/min or less). 2.
4. Raise the adaptor a few millimeters by slowly by turning the adjusting nut counterclockwise (Figure 5). Fig. 5. Raise the adaptor by turning the adjusting nut counterclockwise. 5. Unscrew the upper retainer. Let it rest on the bottom retainer (Figure 6). Fig. 6. Remove the retainer. 6. Slowly pull out the upper adaptor from the glass column. Allow the buffer flow to continue in order to maintain the integrity of the top of the bed.
7. Stop the pump. Plug the bottom of the column. Set the column upright in a beaker. Remove the tubing and fitting from the top of the adaptor. 8. Remove the frit from the adaptor by hooking one end of the frit removal tool/tweezer into the frit in a sideways motion with slight downward pressure. 9. Push the new frit into the end of the adaptor. 10. Replace the O-rings if they appear worn or torn. If the O-rings are replaced, wet them with buffer before the next step. 11.
13. Lower the adaptor to the top of the bed by turning the adjusting nut clockwise (Figure 8). Fig. 8. Lower the adaptor by turning the adjusting nut clockwise. 14. Tighten the lock nut by turning it counterclockwise (Figure 9). Fig. 9. Hand-tighten the lock nut by turning it counterclockwise. 3.
Section 4: Product Information Catalog Number Product Description 780-0001 ENrich Q 5 x 50 Column 780-0003 ENrich Q 10 x 100 Column 780-0021 ENrich S 5 x 50 Column 780-0023 ENrich S 10 x 100 Column 780-0091 ENrich 5 Frit Kit, includes 2 frits, 1 frit remover, 2 O-rings 780-0093 ENrich 10 Frit Kit, includes 2 frits, 1 frit remover, 2 O-rings 780-0008 1/16” 10-32 Male Fittings, 2/pk ENrich Instruction Manual 13
Bio-Rad Laboratories, Inc. Web site www.bio-rad.